Throwing away old furniture is sometimes just a shame. Sitting comfortably, and it looks good. An old sofa or armchair may have a solid wooden frame or reliable metal springs hidden under the upholstery. Nowadays it is difficult to find good upholstered furniture at an adequate price.
Fortunately, the old furniture is being restored. In most cases, the usual constriction is sufficient for this. Padding of upholstered furniture consists in cleaning or replacing the upholstery. Sometimes the filler is replaced with the upholstery.
We will describe the upholstery using the example of a sofa, but this information can be used to upholster any upholstered furniture: armchairs, beds, couches, etc.
Tool selection
We'll need a tool to remove the upholstery and then reattach it:
- furniture stapler
- anti-stapler
- screwdriwer set
- set of wrenches for nuts and bolts
- pliers
- roulette
- furniture glue
- camera
If you want to make a new case, then you will also need:
- sewing machine
- tailor's scissors
- threads
- needles
- fabric crayons
Disassembly
Before you get started, take a few photos of your old sofa from different angles. Also take pictures of all fasteners. Ideally, you need to take a photo at each stage of disassembly. These pictures will come in handy as step-by-step instructions for assembling furniture.
Choose a place where you will disassemble the sofa. Inside old furniture there is a lot of dust, dirt, crumbled filler, etc. It is best to disassemble the sofa outside. If this is not possible, then take things to another room or cover the entire room with foil.

Examine the sofa. You need to understand in what sequence he was going. Disassembly is carried out upside-down. Some sofas have elements that can be detached without a tool. For example, removable pillows. These parts are removed first. Then the backrests, seats and armrests are removed. The sofa should be disassembled like a designer. The main thing for us is the ability to get to all the fixing points of the upholstery.
Place the removable fasteners in a separate container. This way you will not lose them, and dust will not adhere to the grease.
It is recommended to shake out the cover and vacuum it before washing. It is better to wash the cover in the laundry. Upholstery fabrics should be washed gently at a temperature not exceeding 60 ° C. At higher temperatures, the fabric can shrink and shrink dramatically. It will be impossible to pull it onto the frame.
It is useless to wash a torn, shabby and sweat-soaked cover. The cover will still look bad, and the fabric may simply creep out during the wash. This upholstery will have to be replaced. Yes, it is more difficult, but the result is also more durable.
In the old movie, they trained on cats. Practice on soft-seated chairs before replacing the cover on a sofa or armchair.
Don't tear the upholstery even if you want to replace it. We still need it as a stencil for a new cover. The upholstery is attached to wood or plywood using U-shaped fastening brackets. It is advisable to use a staple remover when removing old staples, but you can get by with a flat screwdriver and pliers.
There is a filler underneath the fabric. If your sofa is more than 5 years old, then the filler most likely has already lost its elasticity, crumpled or even crumbled. We do not need such a filler - we replace it.
Remember to measure the length, width, and height of each piece of padding.
Removing the filler reveals a bare frame. Only at this stage can the real condition of the sofa be fully appreciated. If the damage is serious, then the constriction will not be enough. Major repairs will be required. If there are no visible problems, then carefully inspect the fasteners, floors, springs, etc. Perhaps there are minor defects that can be fixed in a couple of minutes.

Choosing a new upholstery
Measure the length and width of the old upholstery to determine the correct material size. When you buy a new fabric, just in case, take it with 10-15% stock in size.

It is very important to choose the right upholstery material. Do not use rough or artificial fabrics. If the material has a strong synthetic smell, then it should not be used for upholstery. The fabric should not fade or leave traces of paint. It is also not recommended to use chinilla or leatherette when tightening. These are cheaper materials, but they quickly deteriorate, so soon they will have to be tightened again.
Tapestry
Tapestry is quite durable and not too expensive material. There are practically no puffs on it. It is best to use tapestry with an abstract pattern, or even a solid color. If you use a complex drawing, then it will have to be customized. This complicates work and increases material consumption.
Leather
Working with leather is not as difficult as it is thought. For furniture upholstery, leather with a thickness of 1.5-2 mm is used. Such leather retains elasticity, it is easy to fasten it and even sew it if necessary. Work on dry skin. Wet skin stretches strongly when it dries.
Choosing a new filler
Foam rubber or synthetic winterizer is usually used as a filler in upholstered furniture. The filler not only makes furniture soft, but also protects the internal parts from damage.
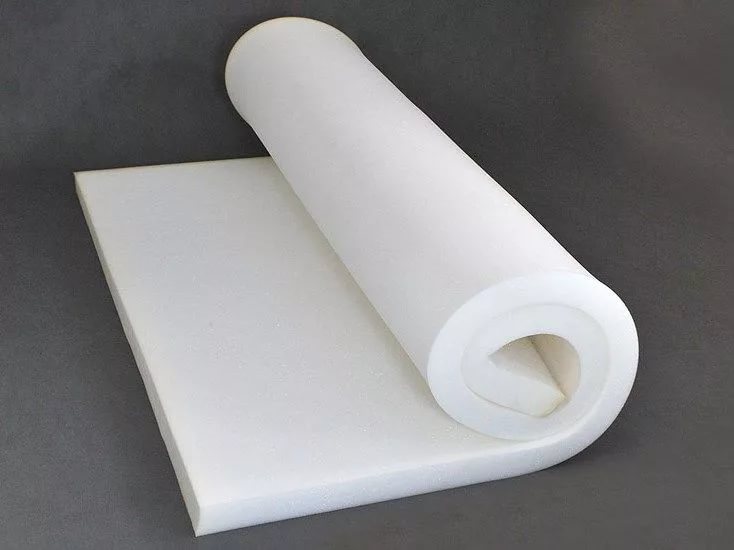
Foam rubber
When choosing foam rubber, its porosity and density are assessed. Examine the material. If the foam rubber consists of small bubbles, then this is a high-quality material. Large bubbles are a sign of low-quality foam rubber. Such material easily loses its elasticity and ability to take its original shape. The foam will quickly begin to crumble.
To check the quality, squeeze the foam rubber in your hands. The material should instantly take its original shape. If the foam rubber straightens slowly, then it is a low-quality material.
Do not use foam that has just been unpacked. When packed, the material shrinks a lot. Only in a few days will it take on its real shape and size.
For upholstered furniture, foam rubber with a density of 25-45 kg / m3 is used. Do not take very hard material. Although it will last a long time, it will be uncomfortable to sit on it. For the seat, two layers of foam rubber of different hardness are often used: the bottom is more dense, and the top is softer.
Sintepon
The synthetic winterizer for furniture should not have a strong poisonous odor. The material should be white. If at least in some places there are other shades, then this is a sign of a low-quality padding polyester. This means that recyclable or toxic materials were used in the manufacture. The synthetic winterizer should be equally flat and dense in all areas. Also, a good synthetic winterizer is hard to break with your hands, it does not crumble or exfoliate.
Pieces of filler of the desired size are cut from the selected material. If necessary, they are glued together and fixed on the frame. This needs to be done before making new upholstery, as we need to do the fittings.
Making new upholstery
We take the old upholstery. Carefully unfasten the threads and separate the sewn upholstery parts from each other. A scan is made from large pieces.
Don't forget to take photos.
We lay out the old fabric or leather on top of the new one and outline it with crayons. Consider the direction of the pile and pattern when working with the fabric. Make small allowances of 10-20 mm for seams, but do not get carried away. Remember, the upholstery should stretch like a frame, without wrinkling or sagging.

We cut out the details along the contour. The edges of the fabric are usually folded inward and sewn together. So don't be alarmed if the edge of the fabric is not cut perfectly straight. Partly for this we made a reserve.
We sew covers, focusing on the photos. For sofas and armchairs, covers for each part are separate parts: backrest, seat, armrests, etc. This greatly simplifies the work. We sweep the covers by hand with threads and try them on to the frame. If all is well, then you can sew with a sewing machine.
Trying on the finished cover again. Check that the cover fits well on the frame. The seams should be straight, the corners of the covers should coincide with the corners of the frame. The cover should not be put on freely, it is better that it stretches.
At this stage, the cover can still be sutured or trimmed. If necessary, make holes in the boot for bolts or other fasteners. Also, the fabric should not interfere with the movement of mechanisms inside the sofa, if any.
Assembly
For attaching covers to furniture, wide staples with a length of 6 to 16 mm are usually used. The distance between the staples is no more than 40 mm. A furniture stapler is used to work with staples.

The upholstery is stretched over the frame with the filler already laid. The upholstery is attached where the fasteners will be invisible. This is usually the bottom of a sofa or armchair. Join the fabric to the frame from the center to the edges. This reduces the likelihood of wrinkling and excess fabric can be sutured or trimmed. With one hand, shoot the staples, and with the other hand, guide over the fabric, straightening and pulling it. When the fabric is secured, the sofa can be assembled. Use the photos as a step-by-step guide.
That's it, the sofa is reassembled, but with an updated or cleaned cover. The work is done in a couple of days and does not require large financial investments. The overtightened sofa looks like new.
Any, even the most durable furniture gradually wears out and takes on an unsightly look. The sofa, as an actively used piece of furniture, is no exception. Do-it-yourself sofa restoration will restore its attractiveness and functional indispensability.
The easiest way to repair upholstered furniture is by inviting craftsmen. This approach is justified if your sofa is unique and has an antique value, or if its design is very complex. In most cases, sofa restoration is a very real and economical undertaking. The question of how to restore a sofa can be solved quite simply, if you do not spare time and purchase high-quality material.
Useful information
The sofa consists of several elements with a standard design. The main elements include the back, sidewalls, and seat. In addition, sofas can contain overhead elements (ottomans, pillows, etc.), additional mechanisms (folding mechanism, hinges, etc.) and decorating accessories. In turn, the main elements include the frame, upholstery, padding and back panel. The seat also includes a shock absorbing element.

The frames of the main elements are made of wooden blocks of different sizes. Usually the bars are connected with adhesives, and the joints can be hardened with screws. Foam rubber of various thickness and density is used as a filler, as well as batting, synthetic winterizer or other soft synthetic fillers.
The cushioning element of the seat is most often made in the form of springs, but it can also be represented by a thickened foam rubber sheet. The armrests of the sidewalls are formed by an additional layer of soft material. All main elements are covered with fabric or leather upholstery on top. To prevent sagging or stretching of the fabric upholstery on the surface of the main elements, tightening elements are used (decorated, for example, in the form of buttons, rivets, etc.).
Back to the table of contents
Basic principles of restoration: step-by-step instructions
Any restoration of an old sofa (regardless of its reason) includes the replacement of the upholstery and filler, since the materials of these elements are subject to the most rapid wear. Replacement or repair of other elements is made as necessary, if damaged.
An exception is the repair of a sufficiently new sofa in case of damage to the frame or shock-absorbing element from mechanical stress or due to manufacturing defects. In this case, the upholstery and filling remain in good condition and their replacement is impractical. During the repair, the upholstery is carefully removed and the damaged element is replaced, after which the upholstery returns to its place.

If, after identifying the damage, the decision has come to restore the old sofa, then it should be determined which element will only be repaired and which one will be completely replaced. Accordingly, a list of required materials and their quantity is drawn up.
When restoring a sofa with your own hands, you should simultaneously decide on the need to make changes to the design. Introducing the following improvements will not cause any particular difficulties: increasing the thickness of the sidewalls; changing the shape of the armrest; change in the rigidity of the seat and backrest, etc.
Back to the table of contents
The choice of upholstery material
The upholstery of a sofa is the most visible and most wearing part of any sofa. The upholstery material must meet a number of requirements, such as:
- abrasion resistance;
- mechanical tensile strength;
- reduced ability to concentrate dust and dirt;
- aesthetic appeal;
- harmlessness to humans;
- dye fastness.
Leather upholstery has many benefits, but is expensive and difficult to do with your own hands. Such upholstery is used, as a rule, if the leather was on an old sofa. A good tapestry is very beautiful and aristocratic, more technological, but not much different in price from leather. At the same time, it should be borne in mind that both leather and tapestry have a long service life.

The choice of fabric colors is very important from both aesthetic and practical points of view. When choosing a fabric, one should take into account the need to combine it on different elements of the sofa structure and its location on the area of the element itself. The smallest waste is achieved by using solid colors and fabrics with a small abstract pattern. Waste material occurs when cutting fabrics with large ornaments in the form of geometric shapes, lines and cells of different colors.
Dense fleecy fabric is able to hide many blemishes when stretched. When choosing a fabric, it is necessary to check that the pile is firmly attached to the base. Cotton fabrics are not practical, wrinkle and do not resist abrasion. Velor fabrics look good, but have low wear resistance and actively collect dust.
Back to the table of contents
Filler selection
Foam rubber and synthetic winterizer are widely used as a filler. When choosing a material, you should pay special attention to its quality. The synthetic winterizer should be white without significant shades. It should not emit unpleasant odors. The strength of the padding polyester is such that it is difficult to break it by hand; if it breaks easily, then this is a substandard material.
In the seat and backrest, foam rubber is usually used with a thickness of at least 50 mm or several layers of 20 mm thick. The structure of high-quality foam rubber contains very small pores. When buying a material, you should check its elastic properties: after pressing with your hand on the foam rubber, it should quickly return to its previous position.
Back to the table of contents
Dismantling the sofa and its elements

The restoration of a sofa begins with its complete disassembly. It is done in the following order. All overhead and decorative elements are removed. The sidewalls are unscrewed. The dismantling of the mechanisms for the layout of the sofa and fixing the elements is being carried out. The back and seat are separated.
Complete disassembly of the sidewalls includes unscrewing the legs and fittings, removing the upholstery and removing the filler. The armrest is dismantled. The strength of the frame is checked.
Disassembly of the backrest begins with the removal of the rear panel. Then the tightening elements are dismantled and the upholstery is removed. The filler is removed. The strength of the frame is checked.
Dismantling the seat of the sofa includes the dismantling of the tightening elements and the removal of the upholstery. The depreciation elements are removed. The filler is removed. The strength of the frame is checked.
It should be borne in mind that in a number of sofa designs, the back and seat upholstery is carried out with one continuous piece of fabric for both elements.
Often the sofa seat is installed on a pallet. Its separation and disassembly completes the disassembly of the entire sofa.
Back to the table of contents
Cut out the new upholstery
The easiest way to cut new fabrics is to use old upholstery. If it was possible to remove it carefully, then it will serve as a template for a new upholstery. With this cutting, it is advisable to add 1-2 cm in all directions, providing an allowance and facilitating the subsequent pulling. If a decision is made to expand the sidewalls, then the corresponding change is taken into account when cutting. If it is impossible to use the old upholstery, all elements are measured using a tape measure and a meter ruler. Then a pattern is made on paper and the fabric is cut.
It is very expensive, and not everyone can constantly update it. And what to do if an old one, for example, a sofa, functions well, but it has just lost its external beauty, and the upholstery has completely worn out. Do not throw it away because of such a trifle. The solution is pretty simple! You can re-tighten the sofa.
For these purposes, you can invite specialists who, for a certain fee, will pull your old sofa with new upholstery. Or, do it yourself. Many people think that doing this kind of work yourself is very difficult, but in reality it is not at all true. The main thing is to understand the stages of work and find all the necessary tools. Let's take a closer look at all stages of work, and after a while you can easily boast of a “new” sofa, so to speak.
Required tools
To stretch the sofa with your own hands at home, you will need:
1. Flat screwdriver for removing old staples.
2. Wrenches from 7 to 18 mm.
3. Scissors, nippers, glue, side cutters.
4. Furniture stapler.
5. Sewing machine.
6. Threads of high strength, such as Titan.
7. For decoration you may need decorative buttons (if desired).
The main stages of do-it-yourself upholstered home furniture constriction:
Stage 1
We disassemble and remove individual components in the form of pillows, sidewalls, poufs. We disassemble the sofa using some of the necessary tools. First, carefully detach the side sections, remove all trims, seat and backrest. Often, this is done quite easily, since manufacturers provide furniture with high maintainability. Put all the fasteners in a previously prepared container so as not to lose them during further work.
Stage 2
We remove the old upholstery that has become unusable. You can remove the unsuitable upholstery with a staple remover, or replace it with a regular flat screwdriver. Do not forget that the work requires a certain degree of accuracy from you. Do not tear the old upholstery, as we will use it as a template to cut out the necessary parts from the new fabric. Remove debris and dust from all interior cavities of the sofa. Pay attention to the foam rubber, if it is in good condition, you can not throw it away, but if it is very worn out, it is better to buy a new one. Carefully inspect metal nets, springs, and all kinds of stretch marks. Repair any defects or breakages found if necessary. The fabric stretch marks must be replaced with new ones. Tighten all screws carefully, reinforce the joints of the parts, glue the wooden joints.
Stage 3
We start cutting out new upholstery parts. The final result of the entire constriction of this product largely depends on the quality of the new patterns. The old upholstery will serve as the pattern for our pattern, the main thing is to leave a few centimeters on the edges of the new fabric. We take the details of the old upholstery, put them on the new fabric, outline with chalk, do not forget to add a few centimeters at the edges, and cut out all the details with sharp scissors.

Stage 4
We attach the new upholstery to the furniture parts. The fabric on the details of the sofa must be stretched evenly so as not to distort the pattern (if any) on the fabric. We fix all the details with a stapler. The distance between each staple should not be more than 4 cm in order to firmly fix all the details of our pattern. If you are afraid to make a mistake with the amount of new fabric, we recommend buying it with a small stock. Even if you have excess material later, you can easily cover stools in the kitchen or sew decorative pillows. We cut out and fasten the foam rubber, if necessary, in the same way as a new fabric. For convenience, you can cut it with a sharp kitchen knife.
Stage 5
Complete assembly of the renovated furniture design. We assemble the sofa in the same way as we took it apart. The main thing is that there are no "extra parts" left after assembly, as is often the case!
If the upholstery of your sofas and armchairs has become unusable from long use, then to replace it, you can contact the workshop or invite a specialist to your home. But, as a rule, such services are not cheap. But hauling furniture with your own hands is a painstaking, but not too difficult job.
Furniture hauling services are quite expensive. To save money, you can do it yourself.
If you have an expensive antique sofa, you shouldn't start updating the upholstery. By repairing it yourself, you can significantly reduce the cost of your furniture. In this case, it is wiser to call a professional restorer for help.
Pulling furniture with quilted surfaces or decorated piping, folds and draperies is also quite difficult. A person who does not have special skills is unlikely to cope with such a job. In all other cases, even a novice master can update a chair or couch.
Stages of work
The whole hauling of upholstered furniture with your own hands consists of the following stages:

What does the furniture look like before and after the constriction.
- Disassembly into component parts, removal of side and rear backs, legs, pillows.
- Dismantling of worn-out elements (upholstery and softening pads).
- Cut out and prepare new parts.
- Installation of new upholstery on separate pieces of furniture.
- Final assembly of the finished structure.
Regardless of the type of upholstered furniture you want to update, you will need the following tools:
- Phillips screwdrivers and flat-blade tools of various sizes;
- hex keys (if you are renovating fairly new furniture);
- nippers;
- side cutters;
- special furniture stapler;
- furniture glue;
- upholstery nails (regular and with decorative caps);
- sewing accessories.

When repairing upholstered furniture with your own hands, try to avoid complex, curly patterns. Buy all materials with a margin. This will be necessary in order not to suture individual flaps.
Before taking on the restoration of overall furniture, try your hand at a stool or chair. This practice will only do you good. This will not only improve your skills, in this way you can choose the most convenient tool for yourself and master in practice all stages of work.
Do-it-yourself furniture hauling requires photo or video filming of all stages of work.
This approach will help you assemble your sofa or chair in the correct order after replacing the upholstery. Take pictures of all the main assemblies, fasteners and connections of parts. The final assembly of the furniture must be carried out in the same sequence in which you dismantled it.
Back to the table of contents
Choice of materials

Cutting of fabric furniture parts is done according to the patterns.
When choosing materials for upholstered furniture constriction, consider not only its appearance, but also practicality. It is wiser to purchase fabrics specially designed for furniture upholstery: gabardine, velor, artificial leather or material that imitates it. Do not buy fabrics with an overly rough or embossed surface. It is uncomfortable to sit and lie on such sofas. Materials with a high content of synthetic fibers do not add comfort either.
When choosing a material, adhere to the following rules:
- Do not buy fabrics with a strong or unpleasant odor. Wet your fingers and rub the surface lightly. There should be no paint residue on your skin.
- If the material is fluffy, then slide your palm over it in the direction opposite to the location of the villi. If there are no hairs left on the hand, then the fabric is of high quality.
- Thick and loose material, such as velor, will help hide some of the faulty constriction defects. For the same purpose, a fabric with a small but active ornament will also serve. In addition, workpieces made of such material have to be joined together less, making sure that the pattern matches. Small mistakes just become invisible. But a large geometric pattern, especially a cage or borders, need to be carefully adjusted from one detail to another.
And don't try to follow fashion by trying to make your upholstered furniture look like an illustration from a magazine. Remember that sofas and armchairs in your home are primarily designed for your comfort.

The fabric can be secured with small studs.
No less attention should be paid to the choice of softener. High-quality foam rubber should have a porous and elastic structure. The bubbles in it are small, and when pressed with a finger, such material straightens quickly, the dent disappears without a trace.
If you want to give your upholstered furniture a stiffer base, then get not one thick softener sheet, but 2 thinner ones. And during installation, lay them with a layer of felt. Seats with such a base last much longer.
Usually, softener is sold in vacuum packaging, which reduces its thickness by several times. Before starting work on furniture hauling, free the foam rubber from polyethylene and let it rest for 1-2 days.
Sometimes a synthetic winterizer is also placed on top of a thick layer of foam rubber. When buying it, pay attention to structure, density and thickness. These indicators should be the same throughout the canvas.
Back to the table of contents
Self replacement
First, you need to remove the main structural parts: side backs, seat, arms and legs.

Fixing the tack on the furniture can be done with a furniture stapler.
All connections must be dismantled very carefully, taking care not to damage the frame. If the bolts or screws are rusted, do not try to rip them off, but use a special liquid to remove corrosion. To remove the old staples, pick up the plywood sheet with a flat screwdriver and lift it up, being careful not to break the plywood. After the fasteners are loose, you can remove them. Try to unscrew the screws, not pull them out of the wood.
If the fasteners are suitable for further use, then collect them in a specially designed box. But in any case, it is wiser to replace the old fasteners with new ones.
Use a flat screwdriver or the tip of a utility knife to hook the staples that attach the old upholstery to the furniture frame. Loosen the leg attachment and only then remove the bracket. Try not to damage the upholstery, as it will later serve as a template for a new blank.
Don't just cut the upholstery, leaving the staples with a strip of fabric on the furniture. They will prevent you from securing the new material securely and can ruin the updated look of your chair or sofa. In addition, rust on old fasteners can show through the new upholstery as indelible stains.
Back to the table of contents
Furniture frame repair

In addition to the soft parts of the furniture, the frame also needs to be repaired.
It is better to replace all softening pads (foam rubber and synthetic winterizer). Because you are unlikely to be able to correct the dents on them. And even if you put a new layer of material on top, then in these places it quickly deforms. But with a wooden frame and base, try to get along as carefully as possible.
Meshes, springs and braces that have lost their elasticity are also wiser to replace with new ones. Sometimes in furniture instead of springs, leather or rubber belts are used. Examine them carefully. If you do not notice cracks, torn edges, and the material itself has retained its elasticity, then such elements can be reused.
It is best to disassemble all joints and connections of the frame, clean it from the remnants of glue, then glue and fix it again. The joints are tightened with clamps until the adhesive is completely dry. If the wood in the socket for the screws has worn out over time and the fastening in it does not hold firmly, then drill a new place for fasteners 1.5-2 cm from the old one. Be sure to place a wooden plug or putty on an already unused socket.
Remove all chips and burrs and sand the uneven edges of the frame. Otherwise, such defects can damage the new upholstery.
Remember that you cannot tolerate haste and carelessness. If you hurry, you will end up with a completely different result than you expected.
Sofa- the main element in the living room, which emphasizes its interior, which means that its appearance should always be attractive. Shabby upholstery will not add chic to the room. Unfortunately, no one is safe from the appearance of characteristic shortcomings, especially given the significant and regular loads that this piece of furniture experiences. In this case, wear occurs naturally. But it also happens that pets irrevocably spoil the upholstery. In both cases, replacement is unavoidable. It often happens that the cost of hauling furniture is almost equivalent to buying a new one. To help you save your family budget, in this article we will provide useful tips, how to do it yourself on a sofa.
1. Where to start?
Before taking on such a responsible business, and even without proper experience, you should sensibly assess the situation and understand whether your sofa should really be hanged. There are cases when the furniture already resembles a ruin, but it is still a pity to throw it away. But at the same time, all household members are just waiting for the moment when something will break down completely, so that there is definitely a reason to take him to hell. In such cases, even an independent restoration at a cost will reach the price tag of a new piece of furniture. Therefore, you should not go to extremes. An exception is the case when the sofa is expensive as a heirloom or antiques. There are a few more situations where should refrain from a handwritten replacement, for example:

If, nevertheless, an unambiguous decision is made to act, it will be necessary to go through all the laborious restoration processes, namely:
- Dismantling an old piece of furniture into separate elements;
- Complete removal of worn-out upholstery, and sometimes;
- Thorough inspection of the frame, spring block and other parts;
- Choosing a new upholstery material;
- Upholstery cutting;
- Fastening fabric to individual pieces of furniture;
- Reassembly of the structure.
Let's consider in more detail taking into account key tips from manufacturers of cabinet furniture and specialists in restoration and hauling. 
2. Stage I - dismantling the old sofa
If your sofa is of a standard configuration, the process is straightforward and can take at least an hour. For everything to be fast and organized, first of all, you need to prepare everything required tools:
- You definitely can't do without a set;
- A set of wrenches for nuts or bolts;
- For lack of keys, pliers will do.
Dismantling must begin with those elements whose fasteners are in plain sight. Usually these are the sides of the sofa, after unscrewing which, nuts are found that secure the lifting mechanism. After removing the mechanism, you can detach the back and seat. If the sofa has legs, you can start disassembling from them. It is very important at this stage to keep all fasteners intact. If in some places the parts are interconnected with the help of grooves and protrusions, you should not make sharp jerks so as not to break them.
Necessarily memorize the sequence their actions. After all, you have to assemble furniture according to the reverse scheme. It is important to remember which of the fasteners connected this or that part of the sofa. Otherwise, at the end, it may turn out that this bolt does not fit in length, and the required one is already hidden somewhere under the sidewalls. We'll have to disassemble everything again.

3. Stage II - remove the old upholstery
When the sofa appears in front of you in the form of separate spare parts, you must carefully remove everything that is old and has lost its visual appeal and functionality. Be prepared for the fact that you will have to get rid of more than one hundred staples from a furniture stapler. This process can become very painstaking and annoying if you do not prepare the entire required tool:
- First of all, you will need to pry the bracket with something; a thin flat screwdriver is suitable for this;
- Now it must be removed; pliers or round-nose pliers will do for this;
- A clerical knife may come in handy.
The work will progress much faster if on each part you first pry in all the brackets and then remove them. There will be no time wasted on changing the working tool. In order not to find staples later in the most unexpected corners of the apartment and not to get injured, immediately prepare a garbage bag.
When removing fasteners, be careful not to cut the fabric itself. At the stage when it is necessary to cut new upholstery, it will be possible to use the old fragments as patterns. Under the cloth you will find filler. It can be foam rubber and other materials. In older models, filler often fills the space between the springs. You need to carefully pull it out too.
Starting this stage, after you have prepared the necessary tools, we recommend that you cover the area of the floor on which you will work with oilcloth. The old filler can simply crumble in your hands, turn into dust, which will quickly spread throughout the apartment. There will be a lot of garbage. 
4. Stage III - visual inspection and identification of problem areas inside the structure
There is no point in wasting time and effort replacing the upholstery if the inside of the sofa is damaged. Beautiful fabric will not hide the pits that form from the fact that the filler loses its density. It will not hide sagging structural elements, which are the result of a stretched spring block. For this, it is necessary to completely clear the frame of all unnecessary - in order to find and eliminate malfunctions. Under the filler you will find springs or mesh or straps. All these components, including the joints of the wooden frame itself, must be carefully examined. If springs stretched out, straps burst and broke, and metal or nylon stretch marks no longer fulfill their functions, all this must be replaced with new parts. Very often the springs burst in the middle of the seat.  If you find cracked wooden crossbars, they also need to be replaced without fail. To do this, choose well-dried wooden beams without knots and cracks. The presence of such defects will serve as stress concentrators, and the crossbar will burst again under heavy load. Raw wood, gradually drying out under the influence of the temperature in the apartment, will deform, which can cause the entire frame to skew.
Masters advise impregnate the joints of new and old beams with PVA glue before reassembling. In older models, the frame has three fiberboard jumpers, one in the middle and two on the sides. Very often they also burst after many years of operation. It is useless to repair such parts. Better to do a complete replacement. You can attach the lintels to the frame using a small, faster way - use a pneumatic stapler.
Concerning filler. In 95% of cases, it must be thrown away. Instead of worn-out, you need to purchase a medium or high degree of rigidity with high density indicators. Its height should be at least 45-50 mm, and better at all - 60 mm. This not only makes the seat more elastic and gives it an attractive shape, but also protects the internal parts from damage. To ensure a longer service life of the filler itself, it is recommended to wrap it with several layers of padding polyester. If you need to change the filling in the back, you can use foam rubber of a lower degree of rigidity. This will make your stay more comfortable.
Very often he blabs himself lifting mechanism, uncharacteristic backlashes appear or springs completely fly off. If the problem persists by replacing the screw or spring with a stiffer one, buy a new lock.
As you can see, self-stretching of a sofa is not only about replacing the upper upholstery. This is the replacement of all structural elements that have lost their original appearance. Only this complex work will lead to the desired result and give a second life to old furniture. Of course, if your sofa was just spoiled by pets, or you decide to fit furniture into a new interior by changing its colors, then you may be lucky enough to avoid all this. 
5. Stage IV - choosing a new upholstery
It's time to start the most creative stage of our work - to choose a new, beautiful upholstery. First you need to decide on the necessary the amount of material. It will be very easy to do this if you measure all parts of the old fabric and add a margin of 0.5 meters to the total. Firstly, in the process of cutting, you can make a mistake, and secondly, since you are doing this for the first time, for convenience, you need to leave more space for turns. For what note when choosing a new upholstery fabric:

With all of these points in mind, the choice can be quite tricky. Below we will provide a short list most popular upholstery materials and their performance characteristics so you can quickly find your bearings.
- Microfiber- a kind of synthetic fabric that is highly resistant to various dirt, high humidity and temperature changes, at an affordable cost. Hence, it is very easy to care for. Good quality microfiber is breathable and hypoallergenic. In support of this, it is necessary to ask the seller to present the appropriate quality certificate. This material would be perfect for. The only disadvantage is flammability. To avoid trouble, simply place the furniture away from the gas stove. The color palette is quite diverse, there are both monochromatic and colorful varieties. There will be plenty to choose from.
- Fuzzy fabrics such as velor or plush are very gentle and delicate. They quickly lose their color under the influence of ultraviolet radiation, have a low degree of abrasion resistance, which makes them unsuitable for the upholstery of a sofa that will be used on a daily basis. An exception is the material called flock with a diagonal weave of fibers, which in appearance resembles velvet. It is slightly less durable than microfiber, but it is more attractive in appearance and is suitable for upholstery of a sofa in the living room. The advantage of the flock is its resistance to food and other contaminants. Modern flock has a special silicone coating, and its surface is very soft and pleasant to the touch.
- An elegant but expensive material is jacquard. It is distinguished by high performance characteristics and a rich, varied palette of colors and textures. Its surface practically does not wear out and does not fade. The fabric itself is very dense and durable. However, if you have pets or children, then you should think about it, because it is very difficult to care for a jacquard. It does not tolerate contact with a damp cloth and is more suitable for strict ones, and its surface is cold to the touch.

- Tapestry- a type of fabric with a high degree of wear resistance and density. It is able to keep its shape well. Retains stability and color saturation for a long time, regardless of the effects of external factors. Tapestry has anti-static properties. The color palette is also very varied. All this makes this material very popular among furniture manufacturers.
- Chenille- a kind of natural fabric with the addition of synthetic and artificial fibers, it is considered an ideal option for upholstery of sofas. Its peculiarity is a very high strength, which is achieved by a special production method and the addition of a small amount of synthetic fibers. This fabric is very warm and pleasant to the touch. Sitting on such a surface will be very comfortable. And any contamination can be easily removed from the surface with an alcohol or vinegar solution.

6. Stage V - making a pattern
After the suitable fabric has been selected, you need to cut it into pieces. To simplify the process use old upholstery, which must first be shaken out well or vacuumed.

7. Stage VI - fix the new fabric
Finally, everything is ready, beautiful new covers have already been sewn, and it's time to fix them on the parts of the sofa. You must understand what exactly from this stage the final result depends. Whether the surface of your sofa is smooth and flawless, or wrinkles and distortions form on it, it is entirely up to you. Therefore, you need to work slowly and carefully. It's better to try on all the covers first, because you still have time to work on it. You may have to sew something by hand, cut somewhere, there is nothing to worry about. Better to discover it now. It is better if the cover fits tightly than loose. In the latter version, folds may form when fastened with staples. So, subsequence your actions:

This is such a difficult and painstaking process of pulling the sofa with your own hands. But if you follow all the steps thoughtfully and measuredly, then the result will exceed all your expectations. And your new "old" sofa will delight you for a few more years.