Style trends in interior design are increasingly influencing the modification staircase structures. Thus, cantilever stairs are gaining popularity. Its advantage is that it does not interfere with the spread of light indoors. This design looks quite non-standard, one might even say bizarre. The treads simply hang in the air on consoles lowered from the ceiling. But you shouldn’t be afraid to walk on it, because the design is well thought out. If you have construction experience and desire, you can make a comfortable and unusual cantilever staircase with your own hands.
Design features
Design advantages:
- unusual appearance;
- low material consumption - such stairs do not have risers, and sometimes even railings;
- space saving.
It is important when designing such a structure to take into account the loads perceived by the tread. They must withstand 150 kg. – and this figure does not take into account the weight of the handrails.
Even organizations engaged in the manufacture of cantilever staircases do not have products ready for installation. They have only individual elements from which the march will later be assembled. Each design must be developed individually for the customer, taking into account all conditions.
But making such a staircase is quite difficult. Its installation takes place during the construction stage or before finishing the premises. There are several ways to attach treads:
- Embedding steps into the wall.
- Embedding brackets into the enclosing structure, onto which treads will subsequently be attached.
- Fastening steps using anchors.
- Ceiling mount.
- Brackets that are welded or screwed to a steel bowstring.
If the house is made of brick or heavy blocks, good option To install a cantilever staircase, the steps will be sealed during the construction stage. To do this, the ends of the treads must be embedded in the wall at a distance of 1/4 of finished product. So, if you want to make a flight of stairs equal to 80 cm, then you need to lay 20 cm steps. Another requirement for this installation option is that the tread must be pressed down with at least ten rows of masonry.

In case of using lighter building materials, such as porous ceramic, hollow expanded clay concrete blocks or slotted brick, the depth of laying the treads increases by 1.5-2 times and will be 30-40 cm. This will be difficult to implement if the thickness of the designed wall is less than required.
Aerated concrete buildings also have their own design features for cantilever staircases. In the walls, it will be necessary to strengthen the places where all treads are sealed using embedded elements made of heavy concrete. There is no need to worry about your appearance, because there are decorative overlays, for example, wooden. Laminated panels, natural or artificial stone are also suitable. When using this design in style decision the loft can be left unchanged.

With this option for installing a cantilever staircase, it is necessary to wall up a profile pipe no more than a meter long into the wall. The depth of the bookmark should be at least 25-30 centimeters. The remaining outlets should correspond to 2/3 of the tread length. The requirements for the walls remain the same, and the possibility of choosing the material for the steps has expanded. For this fastening option, you can use engineered solid wood, as well as materials based on wood composite, such as chipboard, MOR. This happens because the treads no longer act as self-supporting structures. The entire load is transferred to the brackets embedded in the wall. Metal parts can be hidden in grooves or holes that are drilled in the treads.
Fastening with anchors
This method is used when the walls have already been erected and it is not possible to embed them into the finished enclosing structure. fasteners, as in the first two cases. But it also remains important material. Walls made of porous block or slotted brick are unable to hold anchors.
To reduce the possibility of anchors being pulled out if the walls are not made of sufficiently strong material, it is necessary to significantly increase the size support platforms.
In order to carry out such an installation of a cantilever staircase, you will need welded brackets with support platforms. The finished elements must be attached to the wall at the location of the steps using anchor bolts. Their number must be at least four, and their length must be from 15 cm, while the radius must be chosen more than 10 cm.

Ceiling mount
This method will be an alternative for those whose house has already been built or whose boundary walls are not strong enough to withstand the loads. The steps must be secured before starting finishing works. To briefly describe the essence of this method, it consists in using a powerful welded metal frame made of a channel; a profile pipe is also suitable. This design spans the entire height of the room, because how to attach metal carcass will be towards the ceiling.
The metal frame is placed along the entire length of the flight close to the wall. It also needs to be tied to the upper and lower floors. After this, it is necessary to weld the cantilever supports for the treads to the resulting racks; it is possible to use fastening bolts. The resulting frame can be hidden with plasterboard sheathing or masonry made of light blocks.
Steel bowstring
This method of installing a cantilever staircase is perhaps the most difficult.. It uses brackets that are welded or screwed to a steel bowstring. This is the only support. It must be secured to the floors using powerful support platforms and anchors. To prevent the bowstring from twisting under load, it is necessary to create complex design. It will have welded trusses with stiffening ribs, which are located transversely, diagonally and longitudinally. This design is a bit like the booms of a tower crane. You will also have to work hard with the console. It needs to be thought through to avoid the unsteadiness of the steps, provided that it is not embedded in the wall.
Strengthening the structure
If you doubt the safety of operation and reliability of your cantilever staircase, you can use some engineering tricks to strengthen the structure:
- Rigid connection of treads to each other. Loaches are suitable for this. They will transfer the loads to the floor. Bolts are hidden bolts that are used with a spacer sleeve. If we talk about the cantilever structure, then it is necessary to connect each pair of treads using one such bolt, placing it at the hanging edge. Since all the main loads fall on wall mount, then it becomes possible to use small bolts. This option for strengthening the structure will make it possible to reduce the brackets. So, for each step it will be sufficient to use one pair of rods, which will have the following parameters: length - 40-60 cm, diameter - 3-4 cm, embedding in the wall - 8-16 cm.

Bolts can be hidden by disguising them as parts of the enclosing structure, and also hidden in the inside of the riser.
- Mounting to the ceiling using ties. For this work you will need cables, the material for which is stainless steel 8-10 mm thick. You will also need to install screw hooks - a lanyard. They will help eliminate slackness of the cords. This type of hanging fastening will make the structure airy, unlike bolt-on.

Possible mistakes
When installing a cantilever staircase, there is a possibility of missing some features of its structure, which will lead to danger of use. The most common mistakes are:
- Incorrectly chosen method of attachment to the enclosing structure. For example, it would be a mistake to try to tie it to the masonry using anchors if the wall is made of slotted bricks or light blocks.
- Unreliable fastening of brackets to the wall. If the diameter of the steel anchor is chosen incorrectly or if a plastic dowel is used instead, loosening of the treads may occur.
- Using insufficiently thick metal as a bracket or frame. Selecting an element diameter of less than 3 mm. may cause curling load-bearing elements under load.
- Installation of treads on brackets in the wall without using a special damping gasket. Its use will prevent the transmission of footstep sounds through the building envelope to adjacent rooms.
- Application is sufficient heavy material for railings It is worth abandoning cast or forged fencing, because it will place additional stress on the steps.
It often happens that insufficient space in a private house simply does not allow the construction of an ordinary single-flight staircase to the second floor. We have to look for another solution - divide the rise into two flights or fit a screw structure into the available space.
Or you can combine these approaches - the staircase will have two flights, but between them there is not a platform, but a section of ascent of the spiral type, for the transition between straight sections. In this area, so-called winder steps are installed, which allow you to change the direction of the stairs. The design, of course, becomes more complicated, but the required compactness of the interfloor transition is achieved.
Can a winder staircase be built with your own hands? Yes, definitely. But in order to understand this issue, it is necessary to first consider what types of structures that have winder steps are, and learn how to calculate them.
Stairs with winder steps
First of all, it must be said that winders are steps that have the shape of a regular or irregular triangle and are almost always located on the same support. Such steps can completely form the structure of the staircase or replace the platform between two flights.
Staircases with winder steps include several types of structures:

No one doubts that the stairs in the house must rest on something, because the lower floor is not a circus arena and our home is not aerialists! However, there are designs of hanging capital staircases that do not rest on the floors of the underlying floor; their steps seem to float in the air, creating the effect of lightness and openwork. There are no special stairs for these stairs. supporting elements: oblique load-bearing beams(stringers, bowstrings) or vertical racks(see article “ General information about stairs").
Stairs without supports can be arranged according to two design schemes:
1. Unsupported stairs on vertical suspensions, in which steps using load-bearing suspensions attached to load-bearing structures ceilings of the overlying floor;
2. Unsupported stairs with steps with consoles, in which the steps are attached to the wall enclosing the flight of stairs, like a console.
Combinations of the two indicated design schemes of unsupported stairs are also possible, when on one side the steps are embedded in the wall, and on the other they are suspended from the upper ceilings.


More photos of unsupported stairs can be viewed in a special photo album.
And we’ll make a change in the way the stairs are attached to the interfloor ceiling - we’ll make ceiling mount, that is, we place the stringer under the ceiling of the first floor.
- If you and I install a staircase, placing strings under the ceiling of the first floor, unlike the first option, we will be able to remove one step of the upper flight of stairs stairs and instead of 15 steps, we get 14 steps. Instead of the 15th step, we will have the floor of the second floor of the house.
- We change the angle of inclination of the stairs (the first and second flights of stairs) making it flatter.
- Changing the angle of inclination and reducing the number of steps in a flight of stairs will help us increase the width of the tread (stair steps). Thus, making the tread of the steps wider for the most convenient movement along the stairs, this will especially have a positive effect on descending such stairs.
We will leave most of the calculations for stairs with an intermediate platform unchanged:
- Lifting height - 19.4 cm;
- Platform installation height - 97 cm;
- Width of the stairs (landing) - 80 cm;
- The thickness of the material for the steps of the stairs is 4 cm.
We also do not change the dimensions of the room and staircase opening in the interfloor ceiling:
- The room in which the stairs are installed - 450x340 cm
- Room height taking into account ceiling- 295 cm
- Dimensions of the staircase opening - 300x150 cm
Note: It is not difficult to secure the flight of stairs to the ceiling, or rather to the ceiling beam, but to more securely attach the stairs to the interfloor ceiling, we will still do additional fastening stairs also to the end of the opening interfloor covering.
To arrange and install the stairs, we need to make adjustments to the previous calculations. To recalculate, we will need a blank sheet of A4 paper or a double notebook sheet. On a piece of paper or on a PC, we draw up a diagram of the room in which we will install the stairs. An example of a diagram with dimensions is shown in the figure. As you can see, the walls of the room along which the flights of stairs will pass are displayed in one plane to make it easier to carry out calculations and draw marking lines:
We know that the staircase has 15 steps and the rise of the steps is 19.4 centimeters. Since our staircase will extend with strings under the ceiling of the first floor, and the flooring of the second floor will serve as the last step of the upper flight of stairs, we need to calculate and draw the height of the rise of the last step. In our case, the thickness of the interfloor ceiling is 25 cm, and the rise height of the steps, 19.4 cm, obtained in previous calculations, must be made so that the height of each step is 19.4 cm. To do this, we schematically display the last step of the upper flight of stairs.
We measure 23.4 cm from the floor level of the second floor and mark point A. 23.4 cm is the height of the last step, taking into account the thickness of the step material: 19.4 cm + 4 cm = 23.4 centimeters. In the figure, we see a diagram for calculating the height of the last step of the staircase, as well as point A, which indicates the installation location of the staircase and the upper frieze step:

Having determined the location of the upper frieze step of the staircase, we can continue our calculations.
On the diagram in which we display the parameters of the room, we continue to draw marking lines based on calculations. The height of the last step and point A are already known to us from what was described above, now we need to divide the distance from point A to the floor level of the first floor into 14 segments of equal height, in our case 19.4 cm, this distance will be the height of the stairs, measuring down We make marks at 19.4 cm and then draw horizontal lines markings.

Step width in this method The structure of the staircase will change, since we removed the last step in the upper flight. According to what was previously done, our staircase opening included 10 steps and a landing 80 cm wide, but in this method there are one fewer steps in the upper flight, so we will take the calculation of the width of the steps from the result:
10 steps - 1 step = 9 steps and platform width 80 cm.
In this case, the width of the stairs will be:
215 cm opening width from ceiling to landing / 9 steps = 23.88 cm (rounded to 23.9 cm).
We divide the distance from the end of the interfloor opening to the platform into equal segments of 23.9 cm in length and make marks, after which we draw vertical marking lines. We also mark the width of the steps on the lower flight of stairs, as shown in Figure 3, there should be five steps.
Next, from point A to the landing, we draw a diagonal at the intersections of the lines marking the height and width of the steps and obtain the axis of inclination of the upper flight of stairs. From the landing to the floor level of the first floor, we draw a diagonal between the intersection points of the lines marking the height and width of the steps, we obtain the axis of inclination of the lower flight of stairs. Using a protractor, we measure the angle of inclination of the stairs from the floor level; the angle of inclination is 39.5°.
To increase the width of the tread of the steps, we can use material for making steps with a width of not 23.9 centimeters, but 26.5 cm - increasing the extension of the step beyond the stringer by 2.6 cm (23.9 cm + 2.6 cm = 26.5 cm ). In this case, we get a step overlap above the step of 2.6 centimeters, and in the first version this overlap was equal to 4 cm.
As a result of the calculation in the first method, we obtained the following indicators:
- The number of steps in the upper flight of stairs is 9 pieces;
- The number of steps of the lower flight of stairs is 5 pcs. (the platform serves as a continuation of the fifth stage);
- The angle of inclination of the stairs is 39.5°;
- The width of the steps without overlap is 23.9 cm.
- We managed to make the angle of inclination of the stairs flatter, unlike the first option - instead of 42°, the inclination angle became 39.5°.
- The width of the steps without overlap has increased compared to the first option from 21.5 cm to 23.9 cm, this will allow us to reduce the overlap of the step above the step from 4 cm to 2.6 cm, while the width of the step increases by 1 cm (in the first option the width of the step was 25.5 cm - became 26.5 cm).
When calculating and arranging the steps of a staircase, every centimeter can play an important role in the final result - whether the staircase will be comfortable or vice versa. In our calculation, we see that the stairs have become more convenient to move. But is it possible to make the stairs even more convenient?
Perhaps this representative of the family of interfloor stairs is the most spectacular. Sometimes it seems that its steps are floating in the air. But this is only an illusion; in fact, this is a carefully thought-out engineering design.
Traditional wooden staircase on bowstrings or stringers, with its massive pillars, obligatory risers, turned balusters and wide handrails, creates a feeling of solidity, but at the same time blocks the light flux and limits the field of view. In other words, it requires a lot free space. Modern interior styles do not tolerate such extravagance: designs should be light and transparent, lines should be simple and sweeping.
| 1 |
 2 2
|
 3 3
|
 4 4
|
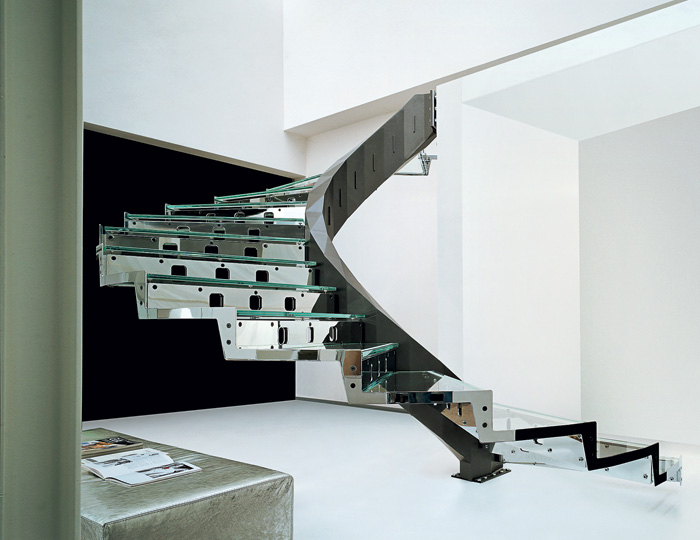
1. The main support of this unusual staircase is cantilever brackets, auxiliary support is ceiling cords. The design has retained its visual lightness, despite the fact that its steps are quite massive, and thanks to the handrail running along the wall and the rope fence, it is very convenient and safe to move along it.
2-4. The cantilever principle is widely used in the manufacture spiral staircases. The assembly of their attachment to the pole can be made in such a way that the step does not require any additional support. The pillar will have to be made more massive, but then neither a bowstring nor a stringer will be required.
 5 5
|
 6 6
|
 7 7
|
 8 8
|
5. Typically, the steps are strung on a central pillar, installed spaced between the floors, and clamped using spacer bushings.
6. Bolts and miniature wall brackets are used to add rigidity to the structure.
7, 8. A fence made of laminated tempered glass (7) has a significant mass, so it is almost never supported on steps, but attached to the floors. Such railings can become additional support for the march, and the main load is taken by steel brackets attached with anchors to the wall (8).
In response to requests from designers, new types of staircases appeared: cantilever, suspended (on ties), bolted, spinal (on a central stringer) and combined. Probably, the dream of fans of minimalism and high-tech style is fully embodied by console models, in which there are no unnecessary parts, only steps, and attached to a support (wall, pillar, column) with only one end, while the other is free." floats" in the air. They try to make the fencing of such stairs as inconspicuous as possible, and in radical versions they do without railings at all. But it should still be noted that such extremes are rare and are intended more for demonstration than for practical use. And the console steps themselves pure form You don’t see it often, usually this mount is combined with other support units.
As a rule, cantilever staircases are not sold ready-made; they are made according to the dimensions of a specific room and taking into account the requirements of the home owner. When fulfilling such orders, European companies take one of their catalog models as a basis and use factory components, making a minimum of changes to the design (thanks to this, their products are consistently different high quality). Domestic firms produce mainly piece goods.
Looking for a foothold
Building a cantilever staircase is a complex and time-consuming task. Its foundation must be laid at the stage of erecting the walls of the building (or at least before interior decoration), because each step must withstand a load of at least 150 kgf applied to its suspended, that is, not supported by anything end (and this is in addition to the weight of the railing!). Such high strength can be achieved in different ways.
Sealing the steps. During the construction of the wall, the ends of the steps are embedded into it to a length of at least 200 mm (with a maximum flight width of 800 mm). This is only feasible if the masonry is made of bricks or fairly heavy (for example, solid expanded clay concrete) blocks, and it is necessary that each step be pressed down by at least ten rows of masonry. When using porous ceramic and hollow expanded clay concrete blocks, as well as slotted bricks, the depth of embedding must be increased to 300-400 mm, which is not always possible with the thickness of the wall. When building with aerated concrete, it will be necessary to strengthen the embedding site of each step with embedded elements made of heavy concrete. Not just any steps are suitable either, but only those made of very hard and elastic materials, such as reinforced concrete. However, they are quite easy to decorate with the help of wood overlays, laminated panels, natural or artificial stone. Or can you leave the steps in original form- you can’t find anything better for a loft-style interior.
Sealing the brackets. Sections are embedded into the wall to a depth of 250-300 mm profile pipe up to 1 m long, leaving outlets equal to approximately 2/3 of the length of the step. At the same time, the requirements for the wall are not reduced at all, but the steps can be made of engineered solid wood, as well as materials based on wood composite (chipboard, MDF). The fact is that in this design they are no longer self-supporting, but are supported by steel brackets. Metal parts are usually hidden in grooves or holes milled (drilled) in the steps. Please note that to implement projects with pinched and embedded consoles, you should contact only leading construction companies, A prerequisite success is architectural supervision.
Fastening with anchors. The method is applicable after completion of the main construction, but will require welded brackets with support platforms. Each such element is secured to the wall with four or more anchor bolts with a length of at least 150 mm and a diameter of 10 mm. The requirements for the material of the enclosing structure in this case are very strict: neither a porous block nor a slotted brick will hold the anchors (or, in order to reduce the force of pulling out, the supporting platforms will have to be greatly increased).
 9 9
|
 10 10
|
 11 11
|
 12 12
|
9. Creating more and more original architectural forms becomes for manufacturing companies in a great way demonstrate the skills of your engineers.
10-12. High-tech style corresponds to products made of aluminum, glass and plain laminated panels (10, 12). Solid wood steps with chrome railings emphasize the eclecticism of the interior (11).
 13 13
|
 14 14
|
 15 15
|
 16 16
|
13, 14. When manufacturing fencing according to individual order You can give free rein to your imagination, for example, decorate pillars and balusters with inserts made of copper, brass, bronze or cut glass. It is only important not to overload the supporting units and not to disrupt the stylistic unity of the interior.
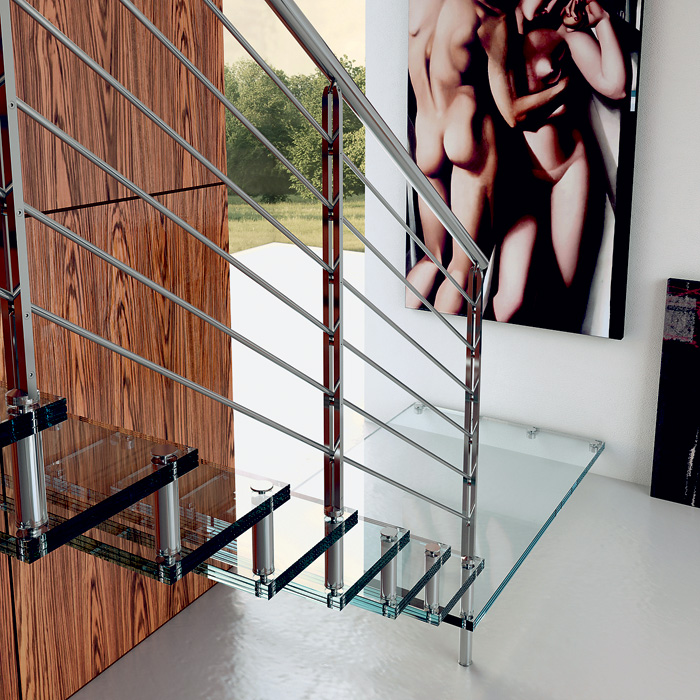
15. Glass steps always require bolt support, since they only allow the use of short wall brackets.
16. For design and construction reinforced concrete stairs Only the most experienced specialists are hired.
Don't depend on the walls
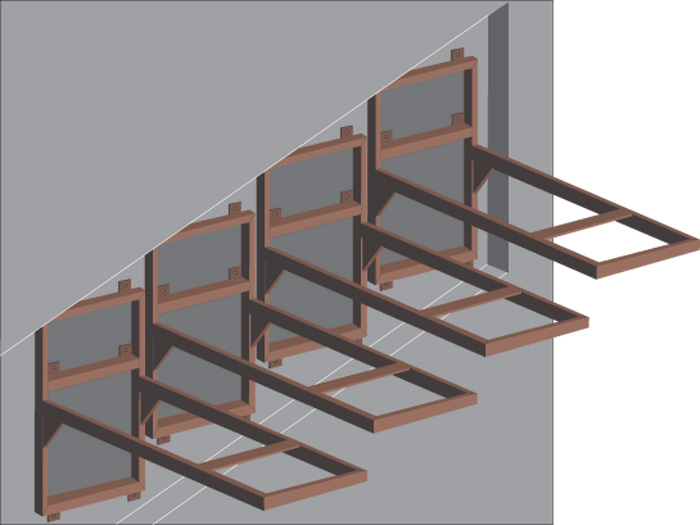
If the wall does not have the necessary strength, this is a serious obstacle to the construction of a cantilever staircase. But still surmountable. Let us describe a method for attaching steps, which can be implemented in almost any building before finishing work begins. Its essence is the use of a powerful welded metal frame made from a channel or profile pipe. The structure is made up to the ceiling, the entire length of the flight, placed close to the wall and tied to the upper and lower ceilings. Cantilever supports for the steps are welded (or bolted) to the racks. The frame is then hidden using plasterboard sheathing or masonry made of light blocks.
The most complex type of cantilever staircase with brackets welded (screwed) to a single steel string, which is attached to the floors using powerful support platforms and anchors. To prevent the bowstring from twisting under load, it itself must be a complex welded truss with longitudinal, transverse and diagonal stiffeners (like a tower crane boom). And yet, even a well-thought-out and well-made console (except for one embedded in the wall) does not allow you to completely get rid of the unsteadiness of the steps. First of all, a staircase should be safe and comfortable, but what kind of comfort can we talk about if you feel deflections and backlashes at every step? We have to look for ways to strengthen the structure.
Console help
The engineers' task is to create a not too noticeable, but sufficiently reliable support for the second end of the steps. For example, you can rigidly connect all the treads to each other using bolts and thus transfer the load to the floors. Bolts are hidden bolts used in conjunction with spacer bushings. In the case of a cantilever structure, each pair of steps is connected with just one such bolt (and not two, like a typical bolt), located at the hanging edge. Since the main load is borne by wall mount, the bolts can be made miniature and disguised as fencing parts or hidden inside risers. On the other hand, the use of bolts makes it possible to significantly simplify and reduce the brackets: for each step, a pair of rods with a diameter of 30-40 mm and a length of 400-600 mm, embedded in the wall at 80-160 mm, is quite sufficient.
Fastening steps to the ceiling with ties is no more difficult than a bolt connection. You just need to purchase cables from of stainless steel 8-10 mm thick and install screw hooks, allowing you to select the slack of the strands and lanyards. Stairs with hanging mount they look even more airy than bolts.
The editors would like to thank the companies "White Maple", "SM Kvadrat", Euroscala, UNION
for assistance in preparing the material.


