The first signs of problems in the laptop backlighting system are the disappearance of the image on the screen or an unstable brightness level.
Liquid crystal matrices are one of the most expensive parts of modern laptops. Since liquid crystals themselves do not glow, in order for an image to appear on the LCD matrix screen, a backlight system is required, which is created using fluorescent lamps cold cathode or light emitting diodes (LED).
In addition to cold cathode lamps, the backlight system includes an inverter, which converts the normal laptop supply voltage (15-20 V) into high voltage (about 1000 V). The inverter itself consists of a conversion transformer and a control board. In addition to voltage conversion, the inverter also additionally performs the functions of adjusting the brightness of the lamp, as well as protective device, saving the system from overloads and short circuits.
The most common types of laptop backlight system failures
Decreased or unstable brightness level, disappearance of the image on the screen
The reasons for this may be:
- Failure of the fluorescent backlight lamp itself;
- Inverter failure;
- Lack of power on the inverter board;
- Matrix cable malfunction.
Let's take a closer look at each of the identified problems.
Backlight failure
Like anyone else consumables, the backlight lamp of a laptop matrix has its designed service life, after which it completely fails or loses the necessary properties.
The first signs that the backlight will soon fail are a noticeable decrease in the brightness of the laptop screen, as well as the acquisition of a reddish tint to the image at the edges of the matrix.
In this case, it is better not to wait for the lamp to completely fail, since due to the increasing current of its supply, other elements of the backlight system (for example, the inverter control board) may be damaged.
It happens, however, that the lamp suddenly stops glowing. But such cases are atypical and indicate the presence of a manufacturing defect or improper handling of the laptop (blows or falls).
There is no point in repairing the lamp, and the problem is solved by replacing the component with a working element. To replace the backlight, you will have to disassemble the laptop, and if you have no experience, this is not at all easy to do. In addition, the size and parameters of the lamp being replaced are important. Therefore, it would be more rational to contact a service center for help.
Inverter failure
The failure of a voltage converter can be caused by the failure of one or more of its components: a transformer or a control board. This type of malfunction is usually caused by voltage surges in the network, mechanical damage or short circuits.
If the transformer breaks, the matrix will be completely dark, since there is not enough voltage to start it. There is no point in repairing the transformer, so it is simply replaced with a suitable working one.
Manifestations of problems in the control board can be different: flickering or completely dark screen, floating backlight brightness, spontaneous screen shutdown. Repairing the control board involves finding and replacing failed electronic components. In more complex cases, the board is replaced with a working one. Typically, such work is performed in a service workshop where the appropriate equipment is available.
No power to inverter
In this case, the matrix backlight is completely absent. The cause of the inverter power failure may be physical damage to the power cable or a malfunction of the controller located on the system board.
The problematic wire is checked for a break and replaced with a working one, and in the case of a controller, a search for the failed component is carried out or the entire module is replaced.
Matrix cable failure
The reason for the breakage of the cable is the form factor of the laptop itself, with constantly opening and closing top cover devices. If the cable is damaged, the screen remains completely dark. The problem can be solved by disassembling the laptop and replacing the problematic cable with a working one.
Details Updated December 26, 2016 10:09 Published February 16, 2016 08:16 Author: nout-911Laptop backlight repair: we'll put new lamps in place!
The absence of an image on the liquid crystal display (LCD) screen of a laptop requires repair of the backlight system. Its main components are a backlight lamp and a voltage inverter. If there is an image, but it is very dim (sometimes it can only be seen in intense external lighting), then most likely the backlight has burned out. You can verify this by connecting the lamp to a known-good inverter.
The backlight is located inside the LCD screen and is its structural element, which makes repairing the laptop backlight a rather complicated operation, accessible only to a highly qualified specialist. Disassembly and assembly of the LCD screen matrix must be carried out in a specially prepared clean room. Dust particles, hairs and fingerprints caught on inner surface matrices will then be clearly visible on the screen. It is very difficult to ensure the cleanliness required for installation operations at home.
Disassembling a laptop screen should be done very carefully and carefully. The lamp is mounted along one side of the display in a reflective container. To remove the container, you need to disconnect the liquid crystal panel from the lid of the laptop case and disassemble it by removing the metal frame. Particular care should be taken when removing protective film from the electronics board. The board is about 1mm thick and is easy to damage. The reflector is glued to the screen frame with double-sided adhesive tape. By disconnecting the reflector, you can remove the backlight lamp from it. Before this, you need to make sure that the inverter is turned off, since from its output the lamp is supplied high voltage 1000-1500 V. If the lamp really burns out, a wide black stripe will be visible around its cathode.
Now to complete laptop backlight repair, you need to replace the burnt out lamp with an original one or select an analogue. Practice shows that it is better to entrust this task to a specialist. The backlight lamp is a glass tube with a diameter of 2 mm or 2.6 mm. It is important to choose its length exactly like the original, since the tolerances in laptop panels are very tight. A lamp that is too long (only 2-3 mm longer) simply will not fit into the panel. Too short will result in uneven illumination of the screen with dark corners. There is a "fashionable" trend to replace the traditional cold cathode fluorescent lamp with a linear powerful LEDs, not requiring an inverter. Here you need to keep in mind that the emission spectra of a lamp and an LED are different, so the colors on a laptop screen may look unnatural. In addition, at home it is difficult to ensure uniform illumination of the matrix with LEDs.
Hi all!
Today we will be with you repair lcd tv Samsung , or rather, we will eliminate the malfunction that arose in LED backlight of this device.
So, I went in for repairs. led TV Samsung, model UE42F5500AK, with LED backlight .
According to the client, the TV screen first darkened at the top and then went completely dark. At the same time, all other functions worked properly, i.e. there was sound, channels were switched, etc. Also, when you shine a flashlight on the matrix, you can see the image.
Well, let's get started LCD TV repair .
With these symptoms, two options can be assumed - either the power supply has failed (no power is supplied to the LED backlight ), or the backlight itself has failed (the LEDs have burned out, the flow of power through the tracks in the backlight strips has been disrupted).
In the first case, you need to check the power circuit from the secondary winding of the transformer to the contactor, which goes to the backlight itself, as well as led driver, consisting of an SLC5012M PWM controller and two switches, which are assembled on N-channel field-effect transistors D3N40. Also, in this case, you need to check the power supply to the PWM controller itself.
In the second case, you will need to remove the matrix to get to LED backlight , and then, using a multimeter, make the necessary measurements to identify the cause of the malfunction: check the tracks in the backlight strips and, if they are working properly, check the LEDs of this backlight.
WITH possible reasons We have decided, now we will proceed to specific diagnostics of the device.
So, the television was “opened”.

After that, I measured the necessary parameters in the power supply, which were mentioned above.
It turned out that the power supply was in working condition, even power was supplied to the TV backlight (with the device turned on).
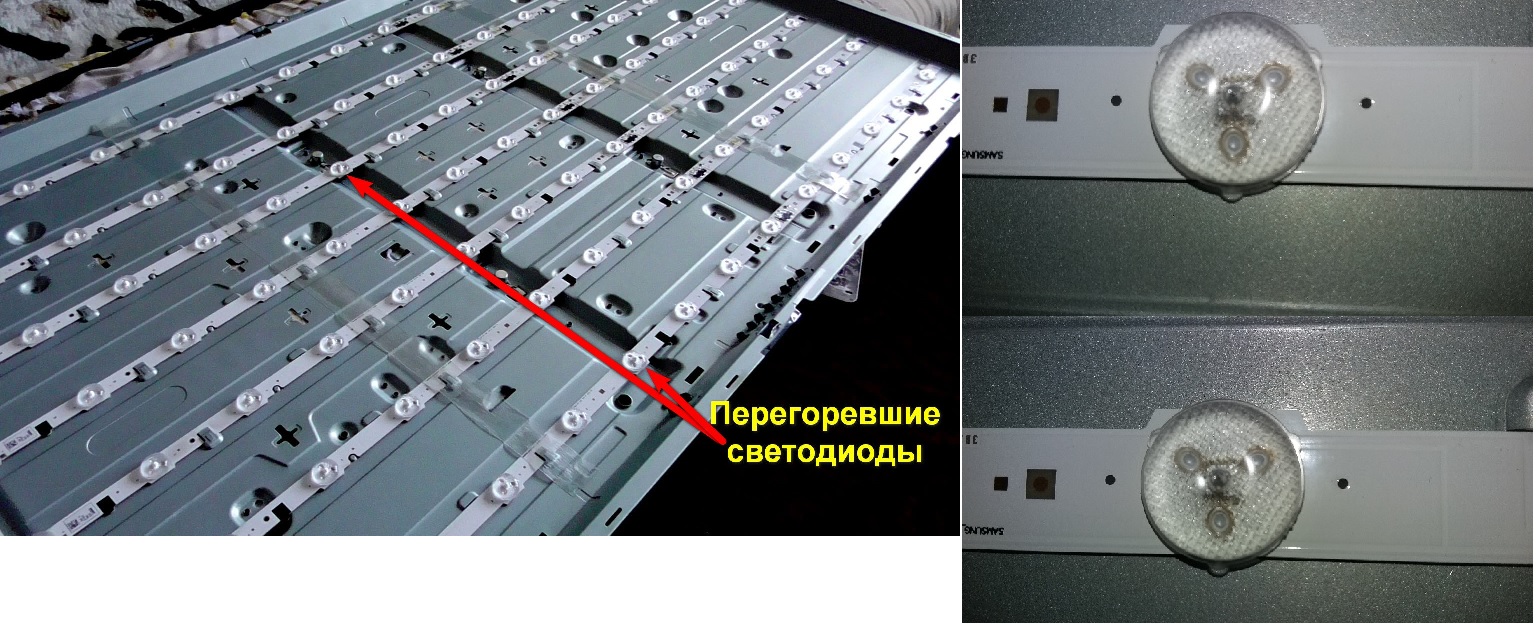
Based on this, it was concluded that the backlight of the TV matrix was faulty. To get to it, it was necessary to remove the matrix and diffusers from the case, which was done.
Next, the tracks were checked and found to be in good working order.
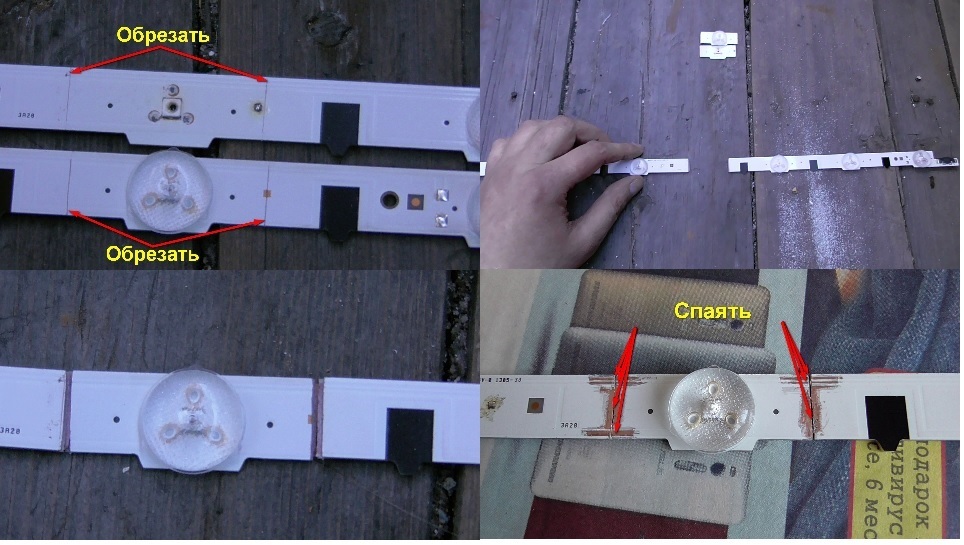
After that, I began checking the LEDs, of which there were 98 pieces (7 strips of 14 LEDs each).
I checked the “continuity” of the diodes with a regular digital multimeter on the scale.
The strips had contacts to which probes of the device could be connected to test LEDs. When connecting the multimeter probes to the contacts on the strip, observe the polarity, since these LEDs have a plus and a minus. At correct connection and a working LED, the LED will glow. If the connection is correct, but the LED does not light, then this LED is faulty. Also, if the LED shows short circuit, then in this case the diode is faulty.

In order not to check all the LEDs, you can alternately supply a constant voltage of 25...35V to the strips. In this case, a strip with working LEDs will work, i.e. All LEDs on this bar will light up. The bar on which the LEDs will not glow must be subjected to a more thorough check, measuring each LED separately.
In general, after performing the above verification procedures LED backlight , two faulty LEDs were found located on the first and fifth strips.
So, the reason for the TV’s inoperability has been identified, now all that remains is to carry out replacing the backlight , namely two failed LEDs.
This is not so easy to do, since such LEDs are not commercially available (at least here). In this regard, it was decided to install LEDs from the donor strip. Donor strips can be found in workshops or service centers, if you come across an understanding master. In my case, an understanding master was found.
There are two ways to replace an LED - unsolder the faulty and working LEDs and replace the faulty one with a working one. To desolder such an LED, you need to remove the reflector from it and use a soldering hair dryer to heat the bar from below, in the place of the LED being desoldered, until the LED freely “lags behind” its place. This must be done very carefully so that the LED does not melt, as they are very delicate. And to solder the diode, you need to use a soldering iron with a thin tip (do not forget about the polarity of the LEDs).