Water is life. If it is in the tap, or in the heating radiator, this is good. And if it is on the floor of your apartment, or on the ceiling of your neighbor below, this is a big financial and moral problem. Of course, it is necessary to regularly check the water supply and heating system for corrosion or cracks in plastic pipes. However, a water breakthrough usually occurs suddenly, without any sign of impending danger. It’s good if at this moment you are at home and not sleeping. But, according to the law of meanness, leaks occur at night, or when you are not at home.
Simple rules for dealing with this problem (especially for old housing stock, with worn-out networks):
- Regularly inspect water pipes and heating system elements for defects, spot rust, tight connections, etc.
- When leaving home, close the entrance valve on the riser.
- Outside the heating season, close the taps on the radiators (if any).
- Use a leakage protection system.
We will consider the last item on the list in more detail.
How to signal a water leak
The solution to the problem came into everyday life from the yachting world. Since the ship's lower tier rooms (especially holds) are located below the waterline, water regularly accumulates in them. The consequences are clear, the question is how to deal with it. It is irrational to assign a separate sailor on watch for control. Then who will give the command to turn on the sump pump?
There are effective tandems: a water presence sensor and an automatic pump. As soon as the sensor detects that the hold is full, the pump motor turns on and pumping occurs.

The water sensor is nothing more than a regular float on a hinge connected to the pump switch. When the water level rises by 1–2 cm, the alarm and the sump pump motor are triggered at the same time.
Comfortable? Yes. Safely? Of course. However, such a system is unlikely to be suitable for a residential building.
- Firstly, if the water reaches a level of 1–2 cm over the entire area of the room, it will run through the threshold of the front door onto the landing (not to mention the neighbors below).
- Secondly, a bilge pump is completely unnecessary, since the cause of the breakthrough must be immediately found and localized.
- Thirdly, the float system for rooms with a flat floor is ineffective (unlike watercraft with a keeled bottom). By the time the “required” level for operation is reached, the house will fall apart from dampness.
Therefore, a more sensitive alarm system against leaks is needed. This is a question of sensors, and the executive part comes in two types:
1. Alarm only. It can be light, sound, or even connected to a GSM network. In this case, you will receive a signal on your mobile phone and will be able to remotely call an emergency team. 
2. Turning off the water supply (unfortunately, this design does not work with the heating system, only water supply). After the main valve, which supplies water from the riser to the apartment (it does not matter whether it is before or after the meter), an electromagnetic valve is installed. When a signal is sent from the sensor, the water is shut off and further flooding is stopped. 
Naturally, the water shut-off system also signals a problem in any of the above ways. These devices are offered in a wide range by plumbing stores. It would seem that material damage from a flood is potentially higher than the price of peace of mind. However, the majority of citizens live by the principle “until thunder strikes, a man will not cross himself.” And more progressive (and prudent) homeowners make a water leakage sensor with their own hands.
Operating principle of leakage sensors
Speaking about the block diagram, everything is very simple. A certain element fixes the liquid at the point of its placement and sends a signal to the executive module. Which, depending on the settings, can give light or sound signals, and (or) give a command to close the valve.
How the sensors work
We will not consider the float mechanism, since it is not effective at home. Everything is simple there: the base is fixed to the floor, a float is suspended on a hinge, which, when floating, closes the switch contacts. A similar principle (mechanical only) is used in the toilet cistern.
The most commonly used sensor is a contact sensor, which uses the natural ability of water to conduct electrical current.

Of course, this is not a full-fledged switch through which 220 volts passes. A sensitive circuit is connected to two contact plates (see illustration), which detects even a small current. The sensor can be separate (as in the photo above), or built into a common housing. This solution is used on mobile autonomous sensors powered by a battery or accumulator.

If you do not have a smart home system, and water is supplied without any solenoid valves, a simple sensor with an audible alarm can be used as a starting option.
Homemade sensor of the simplest design
Despite its primitiveness, the sensor is quite effective. Home craftsmen are attracted by this model due to the cheap cost of radio components and the ability to assemble it literally “on the knee”.

The base element (VT1) is an NPN transistor of the BC515 series (517, 618 and the like). It supplies power to the buzzer (B1). This is the simplest ready-made buzzer with a built-in generator, which can be purchased for pennies, or removed from some old electrical appliance. The power required is about 9 volts (specifically for this circuit). There are options for 3 or 12 volt batteries. In our case, we use a Krona type battery.
How the scheme works
The secret is in the sensitivity of the collector-base transition. As soon as a minimum current begins to flow through it, the emitter opens and power is supplied to the sound element. A squeak is heard. An LED can be connected in parallel, adding visual signaling.
The signal to open the collector junction is given by the very water whose presence needs to be signaled. Electrodes are made from metal that is not subject to corrosion. These could be two pieces of copper wire, which can simply be tinned. Connection points in the diagram: (Electrodes).
You can assemble such a sensor on a breadboard.

Then the device is placed in a plastic box (or a soap dish), with holes made in the bottom. It is advisable that if water gets in, it does not touch the circuit board. If you want aesthetics, the printed circuit board can be etched.
The disadvantage of such a sensor is different sensitivity to different types of water. For example, distillate from a leaking air conditioner may go unnoticed.
Based on the concept: an inexpensive autonomous device, it cannot be integrated into a single security system for your home, even a homemade one.
A more complex circuit, with a sensitivity regulator
The cost of such a scheme is also minimal. Performed on the KT972A transistor.

The operating principle is similar to the previous version, with one difference. The generated signal about the presence of a leak (after opening the emitter junction of the transistor), instead of a signaling device (LED or sound element), is sent to the relay winding. Any low-current device, such as RES 60, will do. The main thing is that the supply voltage of the circuit matches the characteristics of the relay. And from its contacts, information can be sent to the actuator: smart home system, alarm system, GSM transmitter (to a mobile phone), emergency solenoid valve.
An additional advantage of this design is the ability to adjust sensitivity. Using a variable resistor, the collector-base transition current is regulated. You can adjust the response threshold from the appearance of dew or condensation to the full immersion of the sensor (contact plate) in water.
Leak sensor on LM7555 chip
This radio element is an analogue of the LM555 microcircuit, only with lower energy consumption parameters. Information about the presence of moisture comes from the contact pad, indicated in the illustration as a “sensor”:

To increase the response threshold, it is better to make it in the form of a separate plate connected to the main circuit with wires with minimal resistance.
The best option in the photo:

If you don’t want to spend money on buying such a “limit switch,” you can etch it yourself. Just be sure to cover the contact paths with tin to increase corrosion resistance.
As soon as water appears between the tracks, the plate becomes a closed conductor. An electric current begins to flow through the comparator built into the chip. The voltage quickly increases to the operating threshold, and the transistor (which acts as a key) opens. The right side of the diagram is command-executive. Depending on the execution, the following happens:
- Top diagram. The signal on the so-called “buzer” (beeper) is triggered, and the optionally connected LED lights up. There is another use case: several sensors are combined into a single parallel circuit with a common sound alarm, and the LEDs remain on each block. When the sound signal is triggered, you will accurately determine (by the emergency light) which unit has triggered.
- Bottom diagram. The signal from the sensor is sent to an emergency solenoid valve located on the water supply riser. In this case, the water is shut off automatically, localizing the problem. If you are not at home at the time of the accident, the flood will not happen, and material losses will be minimal.
Information: Of course, you can also make a shut-off valve with your own hands. However, it is better to purchase this complex device ready-made.

The circuit can be made using a printed circuit board layout that is equally suitable for both LM7555 and LM555. The device is powered by 5 volts.

Important! The power supply must be galvanically isolated from 220 volts so that dangerous voltage does not enter a puddle of water during a leak.
In fact, the ideal option is to use a charger from an old mobile phone.
The cost of such a homemade product does not exceed 50–100 rubles (for the purchase of parts). If you have old components in stock, you can reduce costs to zero.
The case is at your discretion. With such a compact size, finding a suitable box will not be difficult. The main thing is that the distance from the common board to the contact plate of the sensor is no more than 1 meter.
General principles for placing leakage sensors
Any owner of a premises (residential or office) knows where the water supply or heating communications are located. There are not many potential leak points:
- shut-off taps, mixers;
- couplings, tees (this is especially true for propylene pipes that are connected by soldering);
- inlet pipes and flanges of a toilet tank, washing machine or dishwasher, flexible hoses of kitchen faucets;
- connection points for metering devices (water meters);
- heating radiators (can leak both over the entire surface and at the junction with the main line).

Of course, ideally, the sensors should be located precisely under these devices. But then there may be too many of them, even for the DIY option.
In fact, 1-2 sensors per potentially dangerous room are enough. If it is a bathroom or toilet, as a rule, there is an entrance door threshold. In this case, water is collected as if in a pan; the layer can reach 1–2 cm until the liquid spills through the threshold. In this case, the installation location is not critical, the main thing is that the sensor does not interfere with moving around the room.
In the kitchen, sensors are installed on the floor under the sink, behind the washing machine or dishwasher. If a leak occurs, it will first form a puddle in which the alarm will sound.
In other rooms, the device is installed under heating radiators, since water supply pipes are not laid through the bedroom or living room.
It would not be superfluous to install the sensor in a niche through which risers of pipelines and sewers pass.
The most critical points of water breakthrough
With uniform operating pressure, the risk of leakage is minimal. The same applies to mixers and taps, if you open (close) the water smoothly. The weak point of the pipeline system manifests itself during water hammer:
- when closed, the water supply valve to the washing machine creates a pressure that is 2–3 times higher than the nominal value of the water supply system;
- the same, but to a lesser extent, applies to the locking fittings of the toilet cistern;
- Heating radiators (as well as their connection points to the system) often do not withstand the pressure testing carried out by heating supply companies.
How to properly place sensors
The contact plate should be located as close to the floor surface as possible without touching it. Optimal distance: 2–3 mm. If the contacts are placed directly on the floor, constant false alarms will occur due to condensation. Long distance reduces the effectiveness of protection. 20–30 millimeters of water is already a problem. The sooner the sensor works, the less losses.
reference Information
Regardless of whether the leakage protection system is purchased in a store or made by yourself, you need to know the uniform standards for its operation.
Device classification
- By the number of secondary protective devices at the facility (emergency shut-off valves with electromagnetic drive). Leakage sensors should not shut off all water supplies if shut-off systems are distributed among consumers. Only the line on which a leak is detected is localized.
- According to the method of submitting information about a water supply (heating system) accident. Local alarm assumes that people are present at the site. Remotely transmitted information is organized taking into account the prompt arrival of the owner or repair team. Otherwise, it is useless.
- Notification method: local sound or light alarm (on each sensor), or output of information to a single remote control.
- Protection against false positives. Typically, finely tuned sensors perform more efficiently.
- Mechanical or electrical protection. An example of mechanics is the “Aqua Stop” system on the supply hoses of washing machines. There is no alarm on such devices, the scope of application is limited. Self-production is impossible.
Conclusion
By spending a little time and a minimum of money, you can protect yourself from serious financial problems associated with a flood in your apartment.
Video on the topic
This simple homemade device is used for water or other liquid, in various rooms or containers. For example, these sensors are very often used to detect possible flooding of the basement or cellar with melt water or in the kitchen under the sink, etc.
The role of the humidity sensor is performed by a piece of foil fiberglass with grooves cut into it, and as soon as water gets into them, the machine will disconnect the load from the network. Or if we use the rear contacts, the automatic relay will turn on the pump or the device we need.

We manufacture the sensor itself in exactly the same way as in the previous diagram. If liquid gets on the contacts of the F1 sensor, the sound alarm will begin to emit a constant sound signal, and the HL1 LED will also light up.

Using the SA1 toggle switch, you can change the order of the HL1 indication to a continuous LED glow in standby mode.
This humidity sensor circuit can be used as a rain detector, overflow of a liquid container, water leakage, etc. The circuit can be powered from any five-volt DC power source.

The source of the sound signal is a sound emitter with a built-in sound generator. The humidity sensor is made from a strip of foil PCB with a thin track in the foil. If the sensor is dry, the sound signal does not signal. If the sensor gets wet, we will immediately hear an intermittent alarm signal.
The design is powered by a Krona battery and will last for two years, because during standby mode, the circuit consumes almost zero current. Another bonus of the circuit is the fact that almost any number of sensors can be connected parallel to the input and thus cover the entire controlled area at a time. The detector circuit is built on two 2N2222 type transistors connected in a Darlington manner."
List of radio componentsR1, R3 - 470K
SW1 - button
R2 - 15k
SW2 - switch
R4 - 22K
B1 - crown type battery
C1 - capacitor with a capacity of 0.022 µF
T1, T2 - input terminals
PB1 - (RS273-059) piezo buzzer
Q1, Q2 - 2N2222 type transistors
When the first transistor opens, it immediately unlocks the second, which turns on the piezo buzzer. In the absence of liquid, both transistors are securely off and very low current is consumed from the battery. When the buzzer is turned on, the current consumption increases to 5 mA. Sound emitters of type RS273-059 have a built-in generator. If a more powerful alarm is needed, connect several buzzers in parallel or use two batteries.

We manufacture printed circuit boards with dimensions of 3*5 cm.
The test toggle switch connects a 470 kOhm resistance to the input, simulating the action of a liquid, thereby checking the functionality of the circuit. Transistors can be replaced with domestic ones, such as KT315 or KT3102.

An automatic humidity sensor is designed to turn on forced ventilation of a room at high air humidity; it can be installed in the kitchen, bathroom, cellar, basement, garage. Its purpose is to turn on the fans for forced ventilation of the room when the humidity in it approaches 95... 100%.
The device is highly economical, reliable, and its simplicity of design makes it easy to modify its components to suit specific operating conditions. The diagram of the humidity sensor is shown in the figure below.

The scheme works as follows. When the air humidity in the room is normal, the resistance of the dew sensor - gas resistor B1 does not exceed 3 kOhm, transistor VT2 is open, the powerful high-voltage field-effect transistor VT1 is closed, the primary winding of transformer T1 is de-energized. The load connected to the XP1 connector will also be de-energized.
As soon as the air humidity approaches the point of dew, for example, it boils when left unattended, the bathroom is filled with hot water, the cellar is flooded with melted water, groundwater, the thermostat of the water heater has failed, the resistance of the gas resistor B1, the sharp alternating current is removed from the secondary winding T1 and supplied to the bridge diode rectifier VD2. Rectified voltage ripples are smoothed out by a high-capacity oxide capacitor C2. The parametric DC voltage stabilizer is built on a composite transistor VT3 with a high base current transfer coefficient of the KT829B type, a zener diode VD5 and a ballast resistor R6.
Capacitors SZ, C4 reduce output voltage ripple. Fans with an operating voltage of 12...15V, for example, “computer” fans, can be connected to the output of the voltage stabilizer. Fans with a total power of up to 100 W, designed for a supply voltage of 220 VAC, can be connected to the XP1 socket. A bridge rectifier VD1 is installed in the open supply circuit of the step-down transformer T1 and the high-voltage load. A pulsating DC voltage is supplied to the drain of the field-effect transistor. The cascade on transistors VT1, VT2 is powered by a stabilized voltage of +11 V, set by the zener diode VD7. The voltage is supplied to this zener diode through the chain R2, R3, VD4, HL2. This circuit design allows the field-effect transistor to be opened completely, which significantly reduces the power dissipated on it.
Transistors VT1, VT2 are included as a Schmitt trigger, which prevents the field-effect transistor from being in an intermediate state, which prevents it from overheating. The sensitivity of the humidity sensor is set by trimming resistor R8, and, if necessary, by selecting the resistance of resistor R7. Varistors RU1 and RU2 protect device elements from damage by network voltage surges. The green LED HL2 indicates the presence of supply voltage, and the red LED HL1 signals high humidity and the device is switched to forced ventilation mode.
You can connect up to 8 low-voltage fans with a current consumption of up to 0.25 A each to the device and, or several fans with a supply voltage of 220 V. If using this device it is necessary to control a more powerful load with a supply voltage of 220 V, then to the output voltage stabilizer, you can connect electromagnetic relays, for example, type G2R-14-130, the contacts of which are designed for switching alternating current up to 10 A at a voltage of 250 V. In parallel with resistor R8, you can install a thermistor with negative TKS, resistance 3.3...4, 7 kOhm at 25°C, placed, for example, above a gas or electric stove, which will allow you to turn on the ventilation also when the air temperature rises above 45...50 °C, when the stove burners are operating at full power.
In place of transformer T1, you can install any step-down transformer with an overall power of at least 40 W, the secondary winding of which is designed for a current value not less than the current of the low-voltage load. Without rewinding the secondary winding “Yunost”, “Sapphire”. Unified transformers TPP40 or TN46-127/220-50 are also suitable. When making a transformer yourself, you can use an W-shaped magnetic core with a cross-section of 8.6 cm2. The primary winding contains 1330 turns of wire with a diameter of 0.27 mm.
Secondary winding 110 turns of winding wire with a diameter of 0.9 mm. Instead of the KT829B transistor, any of the KT829, KT827, BDW93C, 2SD1889, 2SD1414 series will do. This transistor is installed on a heat sink, the size of which will depend on the load current and the magnitude of the collector-emitter voltage drop VT3. It is advisable to choose a heat sink with which the temperature of the VT3 transistor body would not exceed 60°C.
If the voltage on the plates of capacitor C2 with a load connected to the output of the stabilizer is more than 20 V, then to reduce the power dissipated by VT3, you can unwind several turns from the secondary winding of the transformer. The field effect transistor IRF830 can be replaced with KP707V2, IRF422, IRF430, BUZ90A, BUZ216. When installing this transistor, it must be protected from breakdown by static electricity. Instead of SS9014, you can use any of the KT315, KT342, KT3102, KT645, 2SC1815 series. When replacing bipolar transistors, take into account the differences in pinouts.
KBU diode bridges can be replaced with similar ones KVR08, BR36, RS405, KBL06. Instead of 1N4006, you can use 1N4004 - 1N4007, KD243G, KD247V, KD105V. Zener diodes: 1N5352 - KS508B, KS515A, KS215Zh; 1N4737A - KS175A, KS175Zh, 2S483B; 1 N4741A - D814G, D814G1, 2S211ZH, KS221V.
LEDs can be of any general use, for example, AL307, KIPD40, L-63 series. Oxide capacitors are imported analogs of K50-35, K50-68. Varistors - any low or medium power for a classified operating voltage of 430 V, 470 V, for example, FNR-14K431, FNR-10K471. The gas resistor GZR-2B, sensitive to air humidity, was taken from an old domestic video recorder “Electronics VM-12”. A similar gas resistor can be found in other faulty domestic and imported VCRs or in old cassette video cameras. This gas resistor is usually bolted to the metal chassis of the tape drive. Its purpose is to block the operation of the device when the tape mechanism fogs up, which prevents the magnetic tape from wrapping and damaging. The device can be mounted on a printed circuit board measuring 105x60 mm. It is preferable to place the gas resistor in a separate box made of insulating material with holes, installed in a cooler place. It is also recommended to screw it to a small metal plate, perhaps through a thin mica insulating spacer. To protect the mounted board from moisture, the mounting and printed conductors are coated with several layers of FL-98, ML-92 varnish or tsaponlac.
There is no need to paint over the gas resistor. To check the device’s functionality, you can simply exhale air from your lungs onto the gas resistor or bring a container of boiling water closer. After a few seconds, the HL1 LED will flash and the fans connected as loads will begin to fight the increased humidity. In standby mode, the device consumes current from the network about 3 mA, which is very little. Since the device consumes less than 1 W of power in standby mode, it can be operated around the clock without worrying about power consumption. Since the device is partially galvanically connected to the 220 V AC mains voltage, appropriate precautions should be taken when setting up and operating the device.
As a result of numerous experiments, this soil sensor circuit appeared on one single chip. Any of the microcircuits will do: K176LE5, K561LE5 or CD4001A.
The air humidity sensor, the diagram and drawings of which are attached, makes it possible to fully automate the process of monitoring and managing the relative humidity of the air in any room. This humidity sensor circuit makes it possible to measure relative humidity in the range from 0–100%. With very high accuracy and stability of parameters
Light and sound alarm for water boiling. - Radio, 2004, No. 12, pp. 42, 43.
. - Circuitry, 2004, No. 4, pp. 30-31.
Constant" in the cellar. - CAM, 2005, No. 5, pp. 30, 31.
All experiments use KT315B transistors, D9B diodes, and 2.5V x 0.068A miniature incandescent lamps. Headphones are high-impedance, type TON-2. Variable capacitor - any, with a capacity of 15...180 pF. The power battery consists of two 4.5V 3R12 batteries connected in series. The lamps can be replaced with series-connected AL307A LEDs and a 1 kOhm resistor.
EXPERIMENT 1
ELECTRICAL DIAGRAM (conductors, semiconductors and insulators)
Electric current is the directed movement of electrons from one pole to another under the influence of voltage (9 V battery).
All electrons have the same negative charge. Atoms of different substances have different numbers of electrons. Most electrons are tightly bound to atoms, but there are also so-called “free” or valence electrons. If voltage is applied to the ends of the conductor, free electrons will begin to move towards the positive pole of the battery.
In some materials, electrons move relatively freely and are called conductors; in others, movement is difficult, they are called semiconductors; thirdly, it is generally impossible; such materials are called insulators, or dielectrics.
Metals are good conductors of current. Substances such as mica, porcelain, glass, silk, paper, cotton are classified as insulators.
Semiconductors include germanium, silicon, etc. These substances become conductors under certain conditions. This property is used in the production of semiconductor devices - diodes, transistors.

Rice. 1. Determination of water conductivity
This experiment demonstrates the operation of a simple electrical circuit and the differences in conductivity between conductors, semiconductors, and dielectrics.
Assemble the circuit as shown in Fig. 1, and bring the bare ends of the wires to the front of the board. Connect the bare ends together, the light bulb will light. This indicates that an electric current is passing through the circuit.
Using two wires you can test the conductivity of various materials. To accurately determine the conductivity of certain materials, special instruments are required. (The brightness of the light bulb can only determine whether the material being tested is a good or bad conductor.)
Connect the bare ends of the two conductors to a piece of dry wood a short distance apart. The light will not light up. This means that dry wood is a dielectric. If the bare ends of two conductors are connected to aluminum, copper or steel, the light bulb will light. This suggests that metals are good conductors of electric current.
Dip the bare ends of the conductors into a glass of tap water (Fig. 1, a). The light is not on. This means that water is a poor conductor of current. If you add a little salt to the water and repeat the experiment (Fig. 1, b), the light bulb will light, which indicates the flow of current in the circuit.
The 56 ohm resistor in this circuit and in all subsequent experiments serves to limit the current in the circuit.
EXPERIMENT 2
DIODE ACTION
The purpose of this experiment is to clearly demonstrate that the diode conducts current well in one direction and does not conduct in the opposite direction.
Assemble the circuit as shown in Fig. 2, a. The lamp will light up. Rotate the diode 180° (Fig. 2, b). The light will not light up.
Now let’s try to understand the physical essence of the experiment.
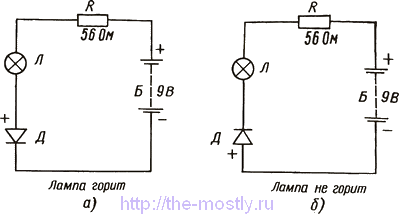
Rice. 2. Action of a semiconductor diode in an electronic circuit.
The semiconductor substances germanium and silicon each have four free, or valence, electrons. The semiconductor atoms are bonded into dense crystals (crystal lattice) (Fig. 3, a).

Rice. 3. Crystal lattice of semiconductors.
If an impurity is introduced into a semiconductor having four valence electrons, for example arsenic, which has five valence electrons (Fig. 3, b), then the fifth electron in the crystal will be free. Such impurities provide electronic conductivity, or n-type conductivity.
Impurities that have a lower valency than semiconductor atoms have the ability to attach electrons to themselves; such impurities provide hole conductivity, or p-type conductivity (Fig. 3, c).

Rice. 4. p-n junctions in a semiconductor diode.
A semiconductor diode consists of a junction of p- and n-type materials (p-n junction) (Fig. 4, a). Depending on the polarity of the applied voltage, the p-n junction can either facilitate (Fig. 4, d) or hinder (Fig. 4, c) the passage of electric current. At the interface of two semiconductors, even before applying external voltage, a binary electric layer with a local electric field of intensity E 0 is created (Fig. 4, b).
If an alternating current is passed through the diode, then the diode will pass only the positive half-wave (Fig. 4 d), and the negative will not pass (see Fig. 4, c). The diode thus converts, or “rectifies,” alternating current into direct current.
EXPERIMENT 3
HOW DOES A TRANSISTOR WORK
This experiment clearly demonstrates the basic function of a transistor, which is a current amplifier. A small control current in the base circuit can cause a large current in the emitter-collector circuit. By changing the resistance of the base resistor, you can change the collector current.

Assemble the circuit (Fig. 5). Place resistors in the circuit one by one: 1 MOhm, 470 kOhm, 100 kOhm, 22 kOhm, 10 kOhm. You will notice that with 1 MΩ and 470 kΩ resistors the light bulb does not light; 100 kOhm - the light bulb barely lights up; 22 kOhm - the light bulb burns brighter; Full brightness is observed when connecting a 10 kOhm base resistor.
|
Rice. 6. Transistor with n-p-n structure. |
Rice. 7. Transistor with p-n-p structure. |


A transistor is essentially two semiconductor diodes that have one common area - the base. If in this case the region with p-conductivity turns out to be common, then a transistor with an n-p-n structure will be obtained (Fig. 6); if the general area is with n-conductivity, then the transistor will have a p-n-p structure (Fig. 7).
The region of the transistor that emits (emigrates) current carriers is called the emitter; The area that collects current carriers is called a collector. The area enclosed between these areas is called the base. The transition between the emitter and the base is called the emitter, and between the base and the collector is called the collector.
In Fig. Figure 5 shows the inclusion of an n-p-n transistor in an electrical circuit.
When a pnp transistor is connected to the circuit, the polarity of battery B is reversed.
For currents flowing through a transistor, there is a relationship
I e = I b + I k
Transistors are characterized by a current gain, denoted by the letter β, which is the ratio of the increment in the collector current to the change in the base current.
The value of β ranges from several tens to several hundred units depending on the type of transistor.
EXPERIMENT 4
CONDENSER PROPERTIES
Having studied the principle of operation of a transistor, you can demonstrate the properties of a capacitor. Assemble the circuit (Fig. 8), but do not attach the 100 µF electrolytic capacitor. Then connect it to position A for a while (Fig. 8, a). The light will come on and go off. This indicates that a capacitor charging current was flowing in the circuit. Now place the capacitor in position B (Fig. 8, b), but do not touch the terminals with your hands, otherwise the capacitor may discharge. The light will light up and go out, indicating that the capacitor has discharged. Now place the capacitor again in position A. It is charged. Place the capacitor aside for a while (10 s) on the insulating material, then place it in position B. The light will turn on and off. From this experiment it is clear that the capacitor is capable of accumulating and storing electric charge for a long time. The accumulated charge depends on the capacitance of the capacitor.
|
Rice. 8. Diagram explaining the principle of operation of a capacitor. |
Rice. 9. Change in voltage and current across the capacitor over time. |


Charge the capacitor by placing it in position A, then discharge it by connecting conductors with bare ends to the terminals of the capacitor (hold the conductor by the insulated part!), and place it in position B. The light bulb will not light up. As can be seen from this experiment, a charged capacitor acts as a power source (battery) in the base circuit, but after using the electric charge, the light bulb goes out. In Fig. Figure 9 shows the time dependences of: capacitor charge voltage; charge current flowing in the circuit.
EXPERIMENT 5
TRANSISTOR AS A SWITCH
Assemble the circuit according to Fig. 10, but do not install resistor R1 and transistor T1 into the circuit yet. Key B must be connected to the circuit at points A and E so that the connection point of resistors R3, R1 can be connected to a common wire (negative bus of the printed circuit board).

Rice. 10. The transistor in the circuit works like a switch.
Connect the battery, the light in the T2 collector circuit will light up. Now close the circuit with switch B. The light will go out, since the switch connects point A to the negative bus, thereby reducing the potential of point A, and therefore the potential of the T2 base. If the switch is returned to its original position, the light will come on. Now disconnect the battery and connect T1, do not connect resistor R1. Connect the battery, the light will come on again. As in the first case, transistor T1 is open and electric current passes through it. Now place resistor R1 (470 kOhm) at points C and D. The light will go out. Remove the resistor and the light will come back on.
When the voltage at the T1 collector drops to zero (when installing a 470 kOhm resistor), the transistor opens. The base of transistor T2 is connected through T1 to the negative bus, and T2 closes. The light goes out. Thus, transistor T1 acts as a switch.
In previous experiments the transistor was used as an amplifier, now it is used as a switch.
The possibilities of using a transistor as a key (switch) are given in experiments 6, 7.
EXPERIMENT 6
ALARM
A feature of this circuit is that transistor T1, used as a key, is controlled by photoresistor R2.
The photoresistor included in this kit changes its resistance from 2 kOhms in strong lighting to several hundred kOhms in the dark.
Assemble the circuit according to Fig. 11. Depending on the lighting of the room where you are conducting the experiment, select resistor R1 so that the light bulb burns normally without dimming the photoresistor.

Rice. 11. Alarm circuit based on a photoresistor.
The state of transistor T1 is determined by a voltage divider consisting of resistor R1 and photoresistor R2.
If the photoresistor is illuminated, its resistance is low, transistor T1 is closed, and there is no current in its collector circuit. The state of transistor T2 is determined by applying a positive potential to the base of T2 by resistors R3 and R4. Consequently, transistor T2 opens, collector current flows, and the light bulb lights up.
When the photoresistor is darkened, its resistance increases greatly and reaches a value when the divider supplies a voltage to the base of T1 sufficient to open it. The voltage at the collector T1 drops almost to zero, through resistor R4 it turns off transistor T2, and the light goes out.
In practice, in such circuits, other actuators (bell, relay, etc.) can be installed in the collector circuit of transistor T2.
In this and subsequent circuits, a photoresistor of the SF2-9 type or similar can be used.
EXPERIMENT 7
AUTOMATIC LIGHT SWITCH
Unlike experiment 6, in this experiment, when photoresistor R1 is dimmed, the light bulb lights up (Fig. 12).

Rice. 12. Circuit that turns on the light automatically.
When light hits the photoresistor, its resistance decreases greatly, which leads to the opening of transistor T1, and consequently to the closing of T2. The light is not on.
In the dark, the light turns on automatically.
This property can be used to turn lamps on and off depending on the light level.
EXPERIMENT 8
SIGNAL DEVICE
A distinctive feature of this scheme is its high sensitivity. In this and a number of subsequent experiments, a combined connection of transistors (composite transistor) is used (Fig. 13).

Rice. 13. Optoelectronic signaling device.
The operating principle of this scheme is no different from the scheme. At a certain value of the resistance of resistors R1 + R2 and the resistance of photoresistor R3, current flows in the base circuit of transistor T1. A current also flows in the collector circuit T1, but 3 times greater than the base current T1. Let us assume that (β = 100. All current flowing through the emitter T1 must pass through the emitter-base junction T2. Then the collector current T2 is β times greater than the collector current of T1, the collector current of T1 is β times the base current of T1, the collector current of T2 is approximately 10,000 times the base current of T1. Thus, the composite transistor can be considered as a single transistor with a very high gain and high sensitivity. The second feature of a composite transistor is that transistor T2 must be quite powerful, while the transistor T1 controlling it may be low-power, since the current passing through it is 100 times less than the current passing through T2.
The performance of the circuit shown in Fig. 13, is determined by the illumination of the room where the experiment is being carried out, so it is important to select the resistance R1 of the upper arm divider so that in a lit room the light bulb does not burn, but burns when the photoresistor is dimmed by hand, the room is darkened with curtains, or when the light is turned off if the experiment is carried out in the evening.
EXPERIMENT 9
HUMIDITY SENSOR
In this circuit (Fig. 14), a compound transistor with high sensitivity is also used to determine the moisture content of the material. The base bias of T1 is provided by resistor R1 and two conductors with bare ends.
Check the electrical circuit by lightly squeezing the bare ends of two conductors with the fingers of both hands, without connecting them to each other. The resistance of the fingers is enough to trigger the circuit, and the light bulb lights up.

Rice. 14. Humidity sensor circuit. The bare ends of the conductors penetrate the blotting paper.
Now pass the bare ends through blotting paper at a distance of approximately 1.5-2 cm, attach the other ends to the diagram according to Fig. 14. Next, dampen the blotting paper between the wires with water. The light comes on (In this case, the decrease in resistance occurred due to the dissolution of the salts in the paper with water.).
If blotting paper is soaked in a saline solution, and then dried and the experiment is repeated, the efficiency of the experiment increases and the ends of the conductors can be separated over a greater distance.
EXPERIMENT 10
SIGNAL DEVICE
This circuit is similar to the previous one, the only difference is that the lamp lights up when the photoresistor is illuminated and goes out when it is darkened (Fig. 15).

Rice. 15. Signaling device on a photoresistor.
The circuit works as follows: with normal lighting of the photoresistor R1, the light bulb will light up, since the resistance of R1 is low, the transistor T1 is open. When the light is turned off, the light will go out. Light from a flashlight or lit matches will cause the light bulb to light again. The sensitivity of the circuit is adjusted by increasing or decreasing the resistance of resistor R2.
EXPERIMENT 11
PRODUCTS COUNTER
This experiment should be carried out in a semi-darkened room. All the time the light falls on the photoresistor, the indicator light L2 is on. If you place a piece of cardboard between the light source (bulb L1 and the photoresistor, light bulb L2 goes out. If you remove the cardboard, light bulb L2 lights up again (Fig. 16).

Rice. 16. Product counter.
For the experiment to be successful, you need to adjust the circuit, i.e. select the resistance of resistor R3 (the most suitable in this case is 470 Ohms).
This scheme can practically be used to count a batch of products on a conveyor belt. If the light source and photoresistor are placed in such a way that a batch of products passes between them, the circuit is switched on and off as the flow of light is interrupted by passing products. Instead of the L2 indicator light, a special counter is used.
EXPERIMENT 12
SIGNAL TRANSMISSION USING LIGHT

Rice. 23. Transistor frequency divider.
Transistors T1 and T2 open alternately. The control signal is sent to the flip-flop. When transistor T2 is open, light bulb L1 does not light up. Lamp L2 lights up when transistor T3 is open. But transistors T3 and T4 open and close alternately, therefore, lamp L2 lights up with every second control signal sent by the multivibrator. Thus, the burning frequency of light bulb L2 is 2 times less than the burning frequency of light bulb L1.
This property can be used in an electric organ: the frequencies of all notes in the upper octave of the organ are divided in half and a tone is created an octave lower. The process may be repeated.
EXPERIMENT 18
SCHEME “AND” BY UNITS
In this experiment, a transistor is used as a switch and a light bulb is the output indicator (Figure 24).
This circuit is logical. The light will light if there is a high potential at the base of the transistor (point C).
Let's say points A and B are not connected to the negative bus, they have a high potential, therefore, at point C there is also a high potential, the transistor is open, the light bulb is on.

Rice. 24. Logic element 2I on a transistor.
Let’s assume conditionally: high potential - logical “1” - the light is on; low potential - logical “0” - the light does not light.
Thus, if there are logical “1” at points A and B, there will also be a “1” at point C.
Now connect point A to the negative bus. Its potential will become low (fall to “0” V). Point B has high potential. Current will flow through the circuit R3 - D1 - battery. Therefore, at point C there will be a low potential or “0”. The transistor is closed, the light does not light.
Let's connect point B to ground. The current now flows through the circuit R3 - D2 - battery. The potential at point C is low, the transistor is closed, the light bulb does not light up.
If both points are connected to ground, point C will also have a low potential.
Similar circuits can be used in an electronic examiner and other logic circuits, where the output signal will only be generated if there are simultaneous signals in two or more input channels.
Possible states of the circuit are shown in the table.
Truth table of the AND circuit
EXPERIMENT 19
"OR" SCHEME BY UNITS
This scheme is the opposite of the previous one. In order for there to be “0” at point C, it is necessary that there should also be “0” at points A and B, that is, points A and B must be connected to a negative bus. In this case, the transistor will close and the light will go out (Fig. 25).
If now only one of the points, A or B, is connected to the negative bus, then at point C there will still be a high level, i.e. “1”, the transistor is open, the light is on.

Rice. 25. Logic element 2OR on a transistor.
When point B is connected to the negative bus, the current will flow through R2, D1 and R3. No current will flow through diode D2, since it is turned on in the opposite direction for conductivity. At point C there will be about 9 V. The transistor is open, the light bulb is on.
Now we connect point A to the negative bus. The current will flow through R1, D2, R3. The voltage at point C will be about 9 V, the transistor is open, the light bulb is on.
OR circuit truth table
EXPERIMENT 20
CIRCUIT "NOT" (INVERTER)
This experiment demonstrates the operation of a transistor as an inverter - a device capable of changing the polarity of the output signal relative to the input signal to the opposite one. In the experiments, the transistor was not part of the operating logic circuits; it only served to turn on the light bulb. If point A is connected to the negative bus, then its potential will drop to “0”, the transistor will close, the light will go out, and at point B there will be a high potential. This means logical “1” (Fig. 26).

Rice. 26. The transistor works as an inverter.
If point A is not connected to the negative bus, i.e. at point A there is “1”, then the transistor is open, the light bulb is on, the voltage at point B is close to “0” or it is a logical “0”.
In this experiment, a transistor is an integral part of a logic circuit and can be used to convert an OR circuit to a NOR circuit and an AND circuit to a NAND circuit.
Truth table of NOT circuit
EXPERIMENT 21
"AND-NOT" SCHEME
This experiment combines two experiments: 18 - AND circuit and 20 - NOT circuit (Fig. 27).
This circuit functions similarly to the circuit, forming a “1” or “0” on the basis of a transistor.

Rice. 27. Logic element 2I-NOT on a transistor.
The transistor is used as an inverter. If a “1” appears at the base of the transistor, then the output point is “0” and vice versa.
If the potentials at point D are compared with the potentials at point C, it is clear that they are inverted.
NAND circuit truth table
EXPERIMENT 22
"OR-NOT" SCHEME
This experiment combines two experiments: - OR circuit and - NOT circuit (Fig. 28).

Rice. 28. Logic element 2OR-NOT on a transistor.
The circuit functions exactly the same as in experiment 20 (a “0” or “1” is generated at the base of the transistor). The only difference is that the transistor is used as an inverter: if “1” is at the input of the transistor, then “0” is at its output and vice versa.
Truth table of NOR circuit
EXPERIMENT 23
“AND-NOT” CIRCUIT ASSEMBLED WITH TRANSISTORS
This circuit consists of two NOT logic circuits, the transistor collectors of which are connected at point C (Fig. 29).
If both points A and B are connected to a negative bus, then their potentials will become equal to “0”. The transistors will close, at point C there will be a high potential, the light bulb will not light up.

Rice. 29. Logic element 2I-NOT.
If only point A is connected to the negative bus, at point B there is a logical “1”, T1 is closed, and T2 is open, the collector current flows, the light is on, at point C there is a logical “0”.
If point B is connected to the negative bus, then the output will also be “0”, the light will be on, in this case T1 is open, T2 is closed.
And finally, if points A and B are logic 1 (not connected to the negative bus), both transistors are open. Their collectors are “0”, current flows through both transistors, the light bulb is on.
NAND circuit truth table
EXPERIMENT 24
PHONE SENSOR AND AMPLIFIER
In the experimental circuit, both transistors are used as an audio signal amplifier (Fig. 30).

Rice. 30. Inductive phone sensor.
The signals are captured and applied to the base of transistor T1 using an inductive coil L, then they are amplified and sent to the phone. When you have finished assembling the circuit on the board, place a ferrite rod near the phone perpendicular to the incoming wires. Speech will be heard.
In this scheme and in the future, a ferrite rod with a diameter of 8 mm and a length of 100-160 mm, grade 600NN, is used as an inductive coil L. The winding contains approximately 110 turns of insulated copper wire with a diameter of 0.15..0.3 mm, type PEL or PEV.
EXPERIMENT 25
MICROPHONE AMPLIFIER
If an extra telephone is available (Fig. 31), it can be used instead of the inductor in the previous experiment. As a result, we will have a sensitive microphone amplifier.

Rice. 31. Microphone amplifier.
Within the assembled circuit, you can get something like a two-way communication device. Phone 1 can be used as a receiving device (connection at point A), and phone 2 can be used as an output device (connection at point B). In this case, the second ends of both phones must be connected to the negative bus.
EXPERIMENT 26
PLAYER AMPLIFIER
Using a gramophone amplifier (Fig. 32), you can listen to recordings without disturbing the peace of others.
The circuit consists of two audio amplification stages. The input signal is the signal coming from the pickup.

Rice. 32. Amplifier for player.
In the diagram, the letter A indicates the sensor. This sensor and capacitor C2 are a capacitive voltage divider to reduce the initial volume. Trimmer capacitor C3 and capacitor C4 are secondary voltage dividers. Using C3 you can adjust the volume.
EXPERIMENT 27
"ELECTRONIC VIOLIN"
Here the multivibrator circuit is designed to produce electronic music. The scheme is similar. The main difference is that the base bias resistor of transistor T1 is variable. A 22 kΩ resistor (R2) in series with the variable resistor provides the minimum base bias resistance for T1 (Figure 33).

Rice. 33. Multivibrator for creating music.
EXPERIMENT 28
FLASHING BUZZER MORSE
In this circuit, the multivibrator is designed to generate pulses with a tone frequency. The light comes on when the circuit is powered on (Fig. 34).
The telephone in this circuit is connected to the circuit between the collector of transistor T2 through capacitor C4 and the negative bus of the board.

Rice. 34. Generator for learning Morse code.
Use this chart to practice learning Morse code.
If you are not satisfied with the sound tone, swap capacitors C2 and C1.
EXPERIMENT 29
METRONOME
A metronome is a device for setting rhythm (tempo), for example, in music. For these purposes, a pendulum metronome was previously used, which provided both a visual and audible indication of the tempo.
In this circuit, the indicated functions are performed by a multivibrator. The tempo frequency is approximately 0.5 s (Fig. 35).

Rice. 35. Metronome.
Thanks to the telephone and the indicator light, it is possible to hear and visually feel the given rhythm.
EXPERIMENT 30
AUDIBLE ALARM DEVICE WITH AUTOMATIC RETURN TO STARTING POSITION
This circuit (Fig. 36) demonstrates the use of a one-shot device, the operation of which is described in experiment 14. In the initial state, transistor T1 is open and T2 is closed. The phone is used here as a microphone. Whistling into the microphone (you can just blow) or light tapping excites alternating current in the microphone circuit. Negative signals, arriving at the base of transistor T1, close it, and therefore open transistor T2, a current appears in the collector circuit T2, and the light bulb lights up. At this time, capacitor C1 is charged through resistor R1. The voltage of the charged capacitor C2 is sufficient to open the transistor T1, i.e. the circuit returns to its original state spontaneously, and the light goes out. The lamp burns for about 4 seconds. If capacitors C2 and C1 are swapped, the burning time of the light bulb will increase to 30 s. If resistor R4 (1 kOhm) is replaced with 470 kOhm, the time will increase from 4 to 12 s.

Rice. 36. Acoustic signaling device.
This experiment can be presented as a magic trick that can be performed among friends. To do this, you need to remove one of the phone's microphones and place it under the board near the light bulb so that the hole in the board coincides with the center of the microphone. Now, if you blow on a hole in the board, it will seem like you are blowing on a light bulb and therefore it will light up.
EXPERIMENT 31
AUDIBLE ALARM DEVICE WITH MANUAL RESET
This circuit (Fig. 37) is similar in principle to the previous one, with the only difference being that when switching, the circuit does not automatically return to its original state, but is done using switch B.

Rice. 37. Acoustic warning device with manual reset.
The circuit's readiness state or initial state will be when transistor T1 is open, T2 is closed, and the lamp is not lit.
A light whistle into the microphone gives a signal that turns off transistor T1, while opening transistor T2. The warning light comes on. It will burn until transistor T2 closes. To do this, it is necessary to short-circuit the base of transistor T2 to the negative bus (“ground”) using key B. Other actuators, such as relays, can be connected to similar circuits.
EXPERIMENT 32
THE SIMPLE DETECTOR RECEIVER
A novice radio amateur should begin designing radio receivers with the simplest designs, for example, with a detector receiver, the diagram of which is shown in Fig. 38.
The detector receiver works as follows: electromagnetic waves sent into the air by radio stations, crossing the receiver antenna, induce a voltage in it with a frequency corresponding to the frequency of the radio station signal. The induced voltage enters the input circuit L, C1. In other words, this circuit is called resonant, since it is pre-tuned to the frequency of the desired radio station. In the resonant circuit, the input signal is amplified tens of times and then goes to the detector.

Rice. 38. Detector receiver.
The detector is assembled on a semiconductor diode, which serves to rectify the modulated signal. The low-frequency (sound) component will pass through the headphones, and you will hear speech or music, depending on the transmission of that radio station. The high-frequency component of the detected signal, bypassing the headphones, will pass through capacitor C2 to ground. The capacitance of capacitor C2 determines the degree of filtering of the high-frequency component of the detected signal. Typically, the capacitance of capacitor C2 is chosen so that for audio frequencies it represents a large resistance, and for the high-frequency component its resistance is small.
As capacitor C1, you can use any small-sized capacitor of variable capacity with a measurement range of 10...200 pF. In this designer, a ceramic tuning capacitor of the KPK-2 type with a capacity of 25 to 150 pF is used to adjust the circuit.
Inductor L has the following parameters: number of turns - 110±10, wire diameter - 0.15 mm, type - PEV-2, frame diameter of insulating material - 8.5 mm.
ANTENNA
A correctly assembled receiver begins to work immediately when an external antenna is connected to it, which is a piece of copper wire with a diameter of 0.35 mm, 15-20 m long, suspended on insulators at a certain height above the ground. The higher the antenna is above the ground, the better the reception of radio signals will be.
GROUNDING
The reception volume increases if grounding is connected to the receiver. The ground wire should be short and have low resistance. Its end is connected to a copper pipe going deep into the ground.
EXPERIMENT 33
DETECTOR RECEIVER WITH LOW FREQUENCY AMPLIFIER
This circuit (Fig. 39) is similar to the previous circuit of the detector receiver with the only difference that a simple low-frequency amplifier, assembled on transistor T, is added here. The low-frequency amplifier serves to increase the power of the signals detected by the diode. The oscillatory circuit tuning circuit is connected to the diode through capacitor C2 (0.1 μF), and resistor R1 (100 kOhm) provides the diode with a constant bias.

Rice. 39. Detector receiver with single-stage ULF.
For normal operation of the transistor, a 9 V power supply is used. Resistor R2 is necessary to supply voltage to the base of the transistor to create the required operating mode.
For this circuit, as in the previous experiment, an external antenna and ground are required.
EXPERIMENT 34
SIMPLE TRANSISTOR RECEIVER
The receiver (Fig. 40) differs from the previous one in that instead of diode D, a transistor is installed, which simultaneously works both as a detector of high-frequency oscillations and as a low-frequency amplifier.

Rice. 40. Single-transistor receiver.
Detection of a high-frequency signal in this receiver is carried out in the base-emitter section, therefore such a receiver does not require a special detector (diode). The transistor with the oscillatory circuit is connected, as in the previous circuit, through a capacitor with a capacity of 0.1 μF and is decoupling. Capacitor C3 serves to filter the high-frequency component of the signal, which is also amplified by the transistor.
EXPERIMENT 35
REGENERATIVE RECEIVER
This receiver (Fig. 41) uses regeneration to improve the sensitivity and selectivity of the circuit. This role is performed by coil L2. The transistor in this circuit is connected slightly differently than in the previous one. The signal voltage from the input circuit is supplied to the base of the transistor. The transistor detects and amplifies the signal. The high-frequency component of the signal does not immediately enter the filter capacitor C3, but first passes through the feedback winding L2, which is located on the same core as the loop coil L1. Due to the fact that the coils are placed on the same core, there is an inductive coupling between them, and part of the amplified voltage of the high-frequency signal from the collector circuit of the transistor again enters the input circuit of the receiver. When the ends of the L2 coupling coil are correctly connected, the feedback voltage supplied to the L1 circuit due to inductive coupling coincides in phase with the signal coming from the antenna, and an increase in the signal occurs. This increases the sensitivity of the receiver. However, with a large inductive coupling, such a receiver can turn into a generator of continuous oscillations, and a sharp whistle can be heard in telephones. To eliminate excessive excitation, it is necessary to reduce the degree of coupling between coils L1 and L2. This is achieved either by moving the coils away from each other, or by reducing the number of turns of coil L2.

Rice. 41. Regenerative receiver.
It may happen that feedback does not give the desired effect and the reception of stations that were clearly audible earlier stops altogether when feedback is introduced. This suggests that instead of positive feedback, negative feedback has formed and the ends of coil L2 need to be swapped.
At short distances from the radio station, the described receiver works well without an external antenna, using only one magnetic antenna.
If the audibility of the radio station is low, you still need to connect an external antenna to the receiver.
A receiver with one ferrite antenna must be installed so that the electromagnetic waves coming from the radio station create the greatest signal in the oscillating circuit coil. Thus, when you tune in to a radio station signal using a variable capacitor, if audibility is poor, turn the circuit to receive signals in your phones at the volume you need.
EXPERIMENT 36
TWO-TRANSISTOR REGENERATIVE RECEIVER
This circuit (Fig. 42) differs from the previous one in that it uses a low-frequency amplifier assembled on T2 transistors.
Using a two-transistor regenerative receiver, you can receive a large number of radio stations.

Rice. 42. Regenerative receiver with low frequency amplifier.
Although this kit (set No. 2) only has a coil for long waves, the circuit can work on both medium and short waves, using the appropriate trimming coils. You can make them yourself.
EXPERIMENT 37
"DIRECTION FINDER"
The design of this experiment is similar to that of Experiment 36 without the antenna and ground.
Tune in to a powerful radio station. Take the board in your hands (it should be horizontal) and rotate until the sound (signal) disappears or at least decreases to a minimum. In this position, the axis of the ferrite points precisely towards the transmitter. If you now rotate the board 90°, the signals will be clearly audible. But the location of the radio station can be more accurately determined using a graph-mathematical method, using a compass to determine the angle in azimuth.
To do this, you need to know the direction of the transmitter from different positions - A and B (Fig. 43, a).
Let's say we are at point A, we have determined the direction of the transmitter, it is 60°. Let us now move to point B, while measuring the distance AB. Let us determine the second direction of the transmitter location, it is 30°. The intersection of the two directions is the location of the transmitting station.

Rice. 43. Radio station direction finding diagram.
If you have a map with the location of broadcasting stations on it, then it is possible to accurately determine your location.
Tune to station A, let it be at a 45° angle, and then tune to station B; its azimuth, let’s say, is 90°. Taking these angles into account, draw lines on the map through points A and B, their intersection will give your location (Fig. 43, b).
In the same way, ships and planes orient themselves while moving.
CIRCUIT CONTROL
In order for the circuits to work reliably during experiments, it is necessary to make sure that the battery is charged, all connections are clean, and all nuts are securely screwed. The battery leads must be connected correctly; When connecting, it is necessary to strictly observe the polarity of electrolytic capacitors and diodes.
CHECKING COMPONENTS
Diodes can be tested at ; transistors - in; electrolytic capacitors (10 and 100 µF) - in. You can also check the headphone by connecting it to the battery - a “crackling” sound will be heard in the earphone.
Diagram of a humidity controller, which is designed to automatically maintain relative air humidity in the range from 20 to 95% with an accuracy of no worse than ± 1.5%.
Regulator circuit
The device consists of a hygrometric sensor - hygristor R1, a relay device on transistors V2-V4, V7 and a power supply. A Schmitt trigger is assembled on transistors V2-V4 of the relay device.
When the relative air humidity is below that set on the scale of the variable resistor R3, transistor V4 is open to saturation, and there is a voltage on diode V5 that closes transistor V2. Transistor V7 of the output stage is also closed by the positive voltage on capacitor C2. Relay K1 is de-energized.
Rice. 1. Air humidity regulator diagram.
The air is humidified. As relative humidity increases, the resistance of hygristor R1 decreases, and therefore the negative voltage at the base of transistor V2 increases. When it exceeds the voltage on diode V5, the Schmitt trigger will switch: transistor V2 will open and V4 will close. Transistor V7 will open, relay K1 will operate, the contacts of which control the actuator.
To increase the stability of the Schmitt trigger response levels, transistors V2 and V4 are connected through an emitter follower on transistor VЗ.
Lamp H1 signals the switching on of the supply voltage and the operating modes of the regulator. When the regulator is plugged in and the relative humidity is low, the flow through the lamp is limited by resistor R9, and it glows dimly. An increase in relative humidity will cause relay K1 to operate, resistor R9 to be shunted by contacts K1.1, and lamp H1 to glow brightly.
Details and design
In the regulator, relay K1 is RPU-2 or RPG for a voltage of 24 V. In facilities with aggressive or explosive environments, relay K1 is sealed.

Rice. 2. Design of the air humidity sensor.
Transformer T1 is wound on a magnetic circuit ШЛ12 X 16. Winding I contains 5300 turns of PEV-1 wire - 0.1, winding II - 480 turns of PEV-1 wire - 0.35, III - 145 turns of PEV-1 wire - 0.21. Signal lamp H1 - KM for 24 V and 35 mA.
The humidity sensor - hygristor R1 - can be made independently from one-sided foil fiberglass 1 mm thick according to the dimensions shown in the figure. The etched electrodes of the sensor are silvered or tinned, then degreased, coated with a saturated solution of lithium chloride or table salt and dried.
The resistance of the manufactured sensor is 120...30 kOhm at a relative air humidity of 20...55%. To operate in conditions of high humidity (50...95%), the sensor is made of double-sided fiberglass without subsequent coating with a moisture-sensitive compound.
The sensor is connected to the regulator with a shielded wire.
Setting up
Setting up the regulator begins with selecting resistor R2 to set the scale limits of resistor R3, and then calibrate the scale. To do this, the hygristor and control psychrometer are placed in a chamber with varying humidity. Using a psychrometer, the humidity in the chamber is determined and, by changing the resistance of resistor R3, relay K1 is activated.
Each humidity value in the chamber corresponds to its own position of the resistor R3 slider. Based on the points obtained, a humidity control scale is built.
When operating an automatic regulator, moisture condensation on the hygristor should be avoided. Dust can prevent the sensor from changing its performance by mounting it vertically and enclosing it in a protective housing.
So I wanted to automate the process of drying the bathroom after bathing. I have had many reviews on the topic of humidity. I decided to introduce into life (so to speak) one of the methods of combating it. By the way, in the winter we dry our clothes in the bathroom. It is enough to turn on the exhaust fan. But monitoring the fan is not always convenient. So I decided to install automation on this matter. If anyone is interested, let's go.
When I moved into a new apartment, I almost immediately installed a fan with a check valve in the hood. A fan is necessary to dry the bathroom after bathing. A check valve is needed to prevent foreign odors from neighbors from entering the apartment (when the fan is silent). It happens. The fan is not simple, with a timer and time interval adjustment.
It was in this Chinese industry product that I wanted to install the purchased module. 
Since I live in an apartment “anthill”, the only place for drying clothes is the balcony. It may go dark in the bathroom. Air circulation is necessary. A fan should have solved this problem. At first, that's exactly what they did. The main thing is not to forget to turn it off. While the fan is operating, the window must be opened slightly. Don’t you need to remind me about the school problem with a swimming pool and two pipes? In order for the air to escape into the hood, it must enter the apartment from somewhere. Those who have wooden windows and not plastic will have no problems. Enough cracks. But with plastic ones, the apartment turns into a terrarium.
That’s when I started thinking about automating the process. This is exactly why I ordered the module. Its task was to turn off/on the fan at certain humidity levels.
It's time to see what form it arrived in. The parcel took about three weeks. The module was packaged well. Such a package would contain about twenty of them. 
The device itself was sealed in an antistatic bag. Everything is in the mind. The soldering is neat. I have no complaints about the appearance. Even the board was washed.

There were no instructions. Only what you see.
Here's what it says on the store page:
Specification:Supply voltage: 5V
Weight: 18g
Size: 5 x 2.5 x 1.7 cm (L x W x H)
Current will be more than 150mA
Supply voltage: 5V DC
Maximum load: 10A 250VAC / 10A 125VAC / 10A 30VDC / 10A 28VDC
Maximum load: 10A 250V AC and 10A 30V DC.
It remains to check how it works. To do this, I took an old (no longer needed) phone charger.

This charger does not have a USB connector. Well, very old. Therefore, the output is 7V (not 5V). I had to solder the MC of the KREN5 stabilizer. There is nothing complicated about this. Anyone who is familiar with a soldering iron knows.

Don’t be too scared, I made a temporary one.
Connected according to the diagram. I found a diagram of something more or less suitable on Ali. Then I edited it myself according to what came.

The red LED indicates the presence of supply voltage. Green – relay activation. The humidity sensor is highlighted in blue. The circuit is based on a comparator based on LM393. The trimming resistor is designed to adjust the response threshold of the humidity relay. Everything is simple and clear. There's just one BUT. The scheme does NOT work.
I had to figure it out. To do this, I climbed into a thermohygrometer. There was a review (and more than one) about him.

The autopsy did not cause any difficulties. I did this more than once.

In this case, I am only interested in the humidity sensor. But with him it’s not that simple. Doesn't call a tester. I had to look for Datasheet.

But it doesn’t ring because it changes its frequency impedance (operating frequency 1 kHz). Direct current does not ring. Here the usual multimeter will not help.
Curiosity led me to connect an oscilloscope in parallel with the hygrometer sensor.
Here's a short video of what I saw.
The device updates its readings every 10 seconds. Therefore, every 10 seconds, oscillations appear on the sensor, which are recorded by an oscilloscope. And nothing else! The sensor changes its resistance only in relation to frequency.
The blot-brain catches these changes and displays the result on the display.
I also had to surf the Internet.
Table of the dependence of the sensor resistance on humidity and temperature (at a frequency of 1 kHz):

The sensor is very clumsy. Its resistance changes not only depending on humidity, but also on temperature. Moreover, the dependence is so nonlinear that it cannot be analyzed.
Now we can draw an unambiguous conclusion: The module under review (humidity relay) cannot work IN PRINCIPLE! A comparator is not a device that can supply a frequency to a humidity sensor and then analyze the received data. The most it can do is compare the voltage levels at its inputs.
But no, no longer trusting my conclusions, I went to the nearest radio parts store and bought an LM393 MS, albeit in a different case. I bought it in which one I wore, 30 or 40 rubles, I don’t remember. I quickly assembled the breadboard.

Connected. DOES NOT WORK. All! We have to quit.
But no. Hope dies last.
I decided to buy a similar, but simplified module (without relay) on Ali for $1.29. At that time it was about 70 rubles. 
I thought that even in case of failure, I would still have a humidity sensor and a ready-made comparator circuit for homemade products for mere pennies. No antistatic bag this time. 
A regular ziplock bag. 
The module is different, but the circuitry is the same. 
I copied this scheme from my Chinese comrades. Everything is the same, only there is no relay.
Connected. DOES NOT WORK. All!
The last hope has died: (This is where I ended my “misadventures.”
The Chinese are accustomed to using diagrams.
All the modules you received will not remain idle. I'll find a use for them. You can make a thermal relay, or a photo relay. The scheme is already ready. You only need to install a thermistor or light sensor (photoresistor). But that will be a different story.
And this device also has the right to life. Just not in this guise. The humidity switch in the form that I received is a BLUFF. Perhaps they exist on the Chinese market, but not with such circuit design.
That's all.
Everyone decides for themselves how to properly use the information from my review. If something is unclear, ask questions. I hope it helped at least someone. Perhaps someone will want to help me. I'll be very grateful.
Good luck everyone!
I almost forgot to remind you. The humidity sensor (snake) is covered with a special active layer, which allows it to change its resistance. Do not touch the active layer with your hands! It is also necessary to be attentive to flux or rosin vapors.


