A hammock is a comfortable and lightweight hanging bed, which is usually used in camping conditions or for landscaping a personal plot.
It is difficult to establish today who owns this invention and the time of its appearance. Various versions of fabric hanging beds have been known since ancient times in many cultures.
Today they occupy a place of honor not only in tourist equipment, but also in personal plots. This is a great way to organize a comfortable place to relax in the garden at minimal cost.
If you wish, you can make a hammock yourself. And if you don’t have suitable trees on your site, then you can assemble a reliable stand with your own hands.
Types of hammocks
 Like any other convenient thing, the hammock has gone through many metamorphoses throughout its history. Today the most popular execution options are:
- Classic hammock bed(woven or fabric on slats with two hanging points);
- Moroccan hammock cocoon, fabric, without strips. Thanks to its soft design, it completely wraps the body of a lying person. Suspended at two points;
- Hammock swing(suspended at two points on a special structure that allows it to swing);
- Hanging rocking chair(has one suspension point at the top).
Today, hammocks are used not only in open spaces, they can often be found in the interior of living rooms. They fit well into a variety of styles, save space and are simply convenient.
DIY hammock
Materials and tools
So, as we have already found out: a hammock is a hanging one made of fabric. This means that to make it you will need:
- textile– it is better to take something dense and natural (jeans, tarpaulin, canvas), although it is heavier than synthetics and is inferior to it in durability, but it is much more pleasant to the touch and allows air to pass through;
- ropes, capable of withstanding a load of 150-200 kg, they can be made of any material, but natural ones are easier to knit, they slip less and are easier to work with;
- wooden sticks, with a diameter of 30-50 mm, which are sold in any hardware store;
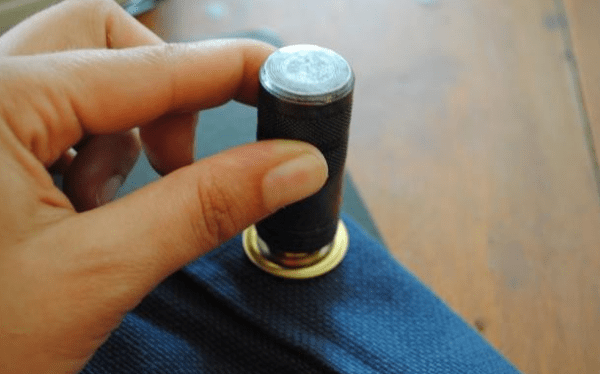
- also, depending on the design and complexity of the model, you may need padding polyester or other soft filling, eyelets (metal or plastic cylinders of two parts with caps, which are used for edging holes in the fabric).
Tools for work:
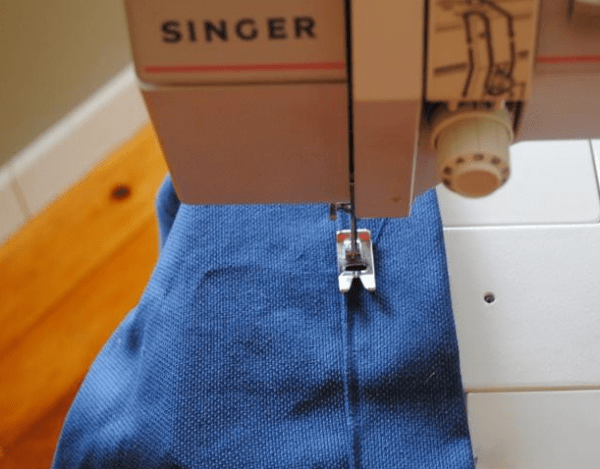
- a sewing machine that will sew thick fabric in several layers; it must be adjusted and thick needles installed;
- chalk for marking and measuring tape;
- square and ruler;
- sharp and large cutting scissors.
Project (drawings and dimensions)
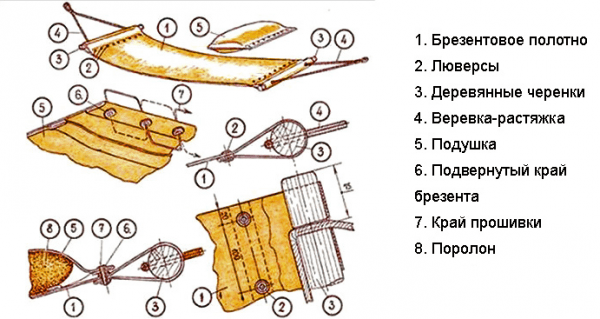
A hammock is a very simple product and does not require any special cutting and sewing skills. This is a simple rectangle of fabric with slings (rope attachments) for hanging.
The main thing is to choose the right size of the hammock so that everyone is comfortable in it. The length is calculated using the formula: height of the tallest family member + 60 cm. If the model involves hemming, allowances for hems and seams must be added to the resulting value.
The width for models without slats is 140-160 cm. For a hammock on slats, we need a canvas width: the length of the slats minus 7-10 cm.
Moroccan hammock cocoon
 The simplest hammock is a cocoon without slats. It is good because it allows you to completely relax, it is impossible to fall out of it in your sleep or when rocking, which is especially important for those who have.
Its main drawback is that it is uncomfortable to turn on and difficult to get out of. For the prepared fabric, it is necessary to process its edges with a hem seam along the entire perimeter.
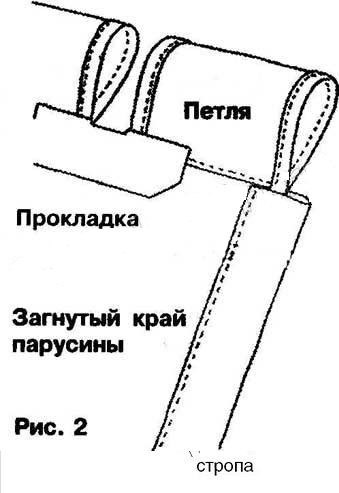
After that, small loops are sewn to the smaller sides of the resulting rectangle in increments of no more than 20 cm.
Helpful advice! The size of the loops is made such that a cord can be threaded through them, on which the hammock will be suspended. Strong and neat loops are made from thick braid or luggage strap.
Very important fasten the loops well, so they are sewn in several lines. To hide the attachment points and make the edge of the hammock denser, thick and wide braid is sewn along the entire length.
We thread rope fastenings into the resulting loops - slings made of cord at least 8 mm in diameter.
The simplest option for making a reliable suspension for a cocoon hammock:
- leave the end of the cord 70 cm long;
- after which we thread the main part of the rope into the first loop;
- put 70 cm on it, bend it, return to the second loop;
- you should get a large 70-centimeter loop of cord;
- We repeat the procedure until the end, where we also leave 70 cm of rope;
- we tie the long loops together, leaving about 10 cm;
- From this residue, we form a loop, which will be attached to the supports.
Hammock on slats
 The plank model is not much more complicated. The size of the canvas is calculated in the same way as in the previous case.
The width may be smaller than for a Moroccan hammock (from 90 cm). To the length, if the canvas will cover the wooden handle, and the slings will be threaded through the eyelets, you need to add 15 cm on each side to the hem.
The edges of the fabric are finished with a hem seam. After which it is attached to the planks.
There are two ways to do this:
- Fold the edge by about 15 cm, lay a double stitch at a distance of slightly more than 1.5 times the diameter of the cutting used. Having retreated from the resulting seam at a distance slightly larger than the diameter of the eyelet, lay another double line. In the resulting dense area, closer to the edge of the hem, we insert the fittings for the loops in increments of 10-15 cm (the slings will be threaded through them). The second edge is also processed;
- If it is not possible to purchase eyelets, then loops made of thick fabric or a luggage belt are sewn to the edge of the fabric, of such a size that the strap can be threaded through them freely. They should be done as often as possible in increments of 5-10 cm.
 In general, the main part of the product is ready. Now you need to insert the strips into loops or a drawstring (a folded and stitched edge into which you can thread a lace or, in our case, a wooden stick).
When fastening on hinges, it is worth drilling holes for the slings in advance, in increments of 7-10 cm. When marking, they are shifted so that they fall in the middle of the distance between the loops.
Slings are made of cord that can withstand a load of 150-200 kg. It can be either natural or synthetic; it does not come into contact with the body.
For a model with loops, measure a meter of rope from the end and thread it through the first hole from the edge. We make a loop a meter long, and again insert the cord into the first hole.
Then we thread the rope into the second hole so that a stitch is formed from the inside of the hammock. We repeat the procedure until the end of the bar.
Then all the resulting sling loops are carefully aligned and tied so that the knot is in the middle of the wooden handle at a distance of 30-50 cm from it. It is very important to securely secure the loose ends of the cord. A loop is formed from free loops after the common knot.
Note! For the model with eyelets, the same procedure is followed, with the difference that the twine is pulled through the holes in the eyelets so that the loops pass through the upper side of the fabric.
How to weave a hammock
 Another way to make a hammock with your own hands at home is to weave it. To do this, you don’t need deep knowledge of macrame; it will be enough to learn how to make a simple flat knot.
Its diagram can be viewed on the Internet, it is very simple, and you can master it in five minutes.
For work we will need:
- the already familiar strong wooden planks;
- cord, preferably natural;
- drill.
Holes for slings are drilled in the slats in increments of 5-7 cm. Then we hang ropes on them, cut into equal parts equal to 6 hammock lengths, so that the middle of each rope is on the wooden part.
And simply tie them in a checkerboard pattern at equal distances with a flat knot. To make all the cells the same, you can place a piece of square-section timber between the knots, with a side equal to the size of the cell, as if tying it.
In this way, a mesh of the required length is woven, which is fixed to the second bar. The slings and loop are made in the same way as in fabric models.
Of course, the simplest models are described here. And there is always room for creativity. Craftswomen who are well acquainted with the macrame technique weave bright and “lacey” hammocks from cords of different colors, decorating them with fringe or openwork edges.
You can also make an original hammock with patchwork skills. For example, many housewives give a second life to old jeans in this way, which usually gather dust in the closets of any modern family. You can also weave a sitting hammock from an old metal hoop.
How to hang a hammock
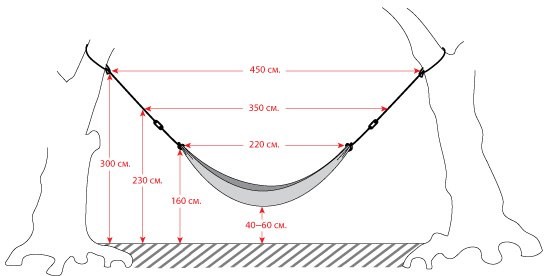
 Typically, a hammock is mounted on trees at least 20 cm in diameter, standing at a distance of about three meters. It can also be hung by attaching one end to any building, or on poles.
It should be remembered that the supports must be buried at least a meter and be strong and stable.
But sometimes there is no suitable place on the site, then a stand can come to the rescue. You can buy it in a store, but usually this design is not cheap. That is why many craftsmen take on making their own stands.
The easiest way to make it at home is from wood. To do this, you can use a thick board, at least 50 mm thick and at least 100 mm wide.
All we need:
- two beams for the bases, approximately 2.5 meters each;
- two beams for posts approximately 1.8 meters;
- two beams for cross supports approximately 1.2 meters.
The pillars themselves are attached with several bolts or self-tapping screws to the base at an angle of approximately 60 degrees. For greater stability of the structure, supports are attached to the ends of the base in specially prepared grooves.
A more complex frame, similar to that used in garden swings, can be welded from metal.
Where to buy a hammock
 Today, hammocks are quite popular, and they can be purchased at almost any retail outlet, from the related goods department of a supermarket to a specialized camping equipment store. And their prices can also vary greatly.
The simplest wicker model can cost from 600 rubles, and a structure with a stand, canopy and mosquito net will cost more than 50 thousand rubles.
To learn how to make a hammock with your own hands, watch this video:
The history of the origin of hammocks dates back to the Mayan tribe. It was they who came up with the idea of getting off the ground and resting, swinging in the air. They made similar beds from tree bark and called them “hamak”.
Sofas, chaise lounges and armchairs are banal and boring pieces of furniture for everyone. Therefore, everyone who has a dacha or a private house is simply obliged to have a hammock. After all, resting in it allows you to relax all the muscles of the body, and is also a great place for reading and drinking tea. Currently, there is a huge selection of ready-made hammocks of various types, but you must agree that relaxing in a hammock made with your own hands is doubly pleasant. Therefore, let's talk about how to create a hammock with your own hands.
Types of hammocks
Manufacturers of hammocks, competing with each other, are constantly improving their products and producing more and more new types. Currently, the following types of hammocks are considered the most popular:
Hanging hammocks are a traditional look. Its popularity is due to the fact that it is light in weight and easy to install and dismantle.


Frame hammocks can have a wide variety of shapes. They differ in that they can be installed absolutely anywhere; you don’t need to look for trees or poles for them. Their strength is also their advantage.


Non-standard hammocks are distinguished by their interesting design. The most popular models of custom hammocks are: a chair hammock, a hammock swing and a hammock with a canopy.


Technology for creating a hammock with a frame with your own hands
Making a frame
To make the frame you will need:
- two beams 245*10*5 cm;
- two beams 180*10*5 cm;
- two beams 120*10*5 cm;
- eight bolts M10*160mm;
- four bolts M10*140mm;
- 24 M10 washers;
- 12 M10 nuts.
The work of making the frame consists of the following steps:

Making the base
First way
You don't need any special skills to make a hanging hammock. You just need to have:
- sewing machine;
- a piece of thick fabric of a suitable color;
- strong rope (40 m);
- sewing machine needles No. 90-120;
- triangle;
- scissors;
- measuring tape;
- knife

Step 1. Prepare the base.
When choosing fabric for the base, preference should be given to fabrics with a fabric width of 3.6 m. You can calculate the length of the hammock as follows: add 60 centimeters to the height of the tallest family member, which will be used for allowances.

The first step is to straighten the edges using scissors. Next, markings must be applied on both narrow sides of the fabric every 18 cm. According to the markings, the fabric is cut by 30 cm. These cuts are necessary for the subsequent creation of a drawstring (the folded edge into which the rope will be pulled). Then all the edges of the fabric are hemmed, making a hem of 10 cm. In the places of the cuts, additional zigzag stitches should be made for greater strength.
Step 2. Making the drawstring.
The drawstrings will be located on both narrow sides of the canvas. The cuts made in advance in 2 layers are folded and then stitched with double seams.

Step 3. Making loops and preparing the rope for installation.
The rope is threaded through the drawstrings so that there is a margin of 180 centimeters. And from all the slots they pull out one meter. The two ends of the rope are tied on one side with a “bayonet with two hoses” knot. In this case, the 4 loops that are in the middle are pulled forward a little, straightened, and tied at the top of the bend, then collected together and wrapped with rope. To wrap these loops you will need about 10 meters of rope.
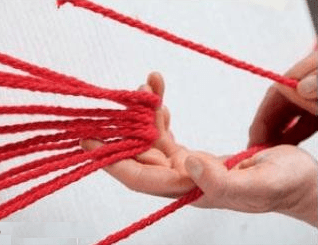
The transverse winding begins after all the loops have been laid and the rope has been secured. It is better to make a longitudinal loop from a thinner rope; the length of this loop should be about 0.5 meters. The longitudinal loop ensures reliable fastening of the ends of the winding. The final turns should be pressed against each other as much as possible and should not overlap each other.

Before starting to wind the longitudinal part of the fixing loop, a rope is pulled into it. When the fixing loop is completely wrapped, both ends of the rope are combined and wrapped together. After two turns are made, the ends of the rope are tied into a strong knot.

Step 4. Fastening.
The hammock can be attached to two nearby trees. Also, reliable fastenings can be pillars dug in nearby or a stand made by yourself.


Step 5. Design.
To make relaxing in a hammock even more enjoyable, you can sew pillows for it. Pillows that have a contrasting color to the hammock look beautiful. You can use holofiber, padding polyester or down as a filler for pillows.

Second way
You will need:
- about 3 meters of tarpaulin (you can use other durable material);
- 22 eyelets;
- tools for installing eyelets;
- 35 meters of rope having a diameter of 6 mm;
- 2 metal rings;
- drill with 12 mm drill bit;
- hardwood beams (2 pcs.) size 30*50mm, the length of the beams should be equal to the width of the hammock;
- sewing machine.
Step 1. Create the base.
If the hammock will be located outdoors, then when choosing a fabric it is better to choose a material that is resistant to getting wet, such as tarpaulin. If there is a roof over the hammock, then you can use any thick fabric.
The edges of the selected fabric are folded 6 cm and hemmed. To make hemming easier, the hem is ironed. It is better to place a hemmed hem on the bottom side, so it will be invisible.
If the fabric is thick enough, then the side edges do not need to be hemmed.
Step 2. Installing eyelets.
Before installing the eyelets, mark their attachment points with chalk or a pencil.

The eyelets should be located on the narrow side of the material at the same distance from each other. 11 elements must be installed on each side.

Round holes are cut out in the places marked for the eyelets.

They don't have to be perfectly round, just the right size. Once the holes are cut, you can begin installing the eyelets themselves, using special tools.


Step 3. Making a wooden spacer.
Spacers are bars with holes for pulling the rope. The spacers are designed to keep the hammock from collapsing under load.
The length of the bars, as already mentioned, should match the width of the hammock, and the holes should be exactly opposite the eyelets. The timber must have a thickness of at least 25 mm and a width from 50 to 120 mm. Finished timber must be sanded and varnished.

Step 4. Attachment
The first step is to install the slings; for this you can make a special frame, but you can do without it. A metal ring is installed on a hook fixed in the frame. The base material of the hammock is laid out on the floor and secured with something heavy. Next, the spacer is installed.

Each sling is threaded through a separate grommet, then into the hole in the spacer, and then into the ring, after which the sling is returned back. After the slings are threaded through all the holes, the ends of the rope are tied.

To create a small decorative effect, you can braid the ends of the rope into a ring. The same operations are performed with the opposite end of the hammock. The finished product is installed on any suitable supports.

Advice ! If you use supports for the hammock that you dig in yourself, then the distance between them should be greater than the length of the hammock so that over time, when it sags, you do not have to reinstall them, because it is much easier to tension the hammock itself.
What could be better than relaxing in the country on a fine summer day, especially if you know how to make a hammock that will give you a lot of pleasant emotions. To do this you will need the following materials:
- high-strength ropes;
- strong fabric in your favorite color;
- sewing machine and minimum skills.
When sewing a hammock, the mass of people who plan to relax in it is of great importance, and the colors should be selected in accordance with the upholstery of other pieces of furniture in the garden.
Selecting quality and quantity of material
Among the huge selection of durable fabrics, preference should be given to canvases with a width of 3.6 m, although material with a width of 1.4 m can be an alternative. When choosing canvas for a hammock, keep in mind that sewing it on a regular machine will be difficult.

To determine the length of the hammock, you need to add 60 cm to the height of the tallest family member, which will be the allowance on both sides for the drawstrings for the ropes. Prepare machine needles No. 90-120, a measuring tape, a triangle, sharp scissors and a knife.
Aligning edges

If this is not done, then uneven edges will cause a lot of difficulties during the work, so it’s worth straightening them out with scissors. On both narrow sides, at a distance of 18 cm from each other, apply markings according to which the fabric must be cut by 30 cm. These places are intended for making drawstrings for the rope. You need to do this as follows:
- cut the edges on the narrow sides of the material using a triangle;
- make the necessary markings;
- When making cuts, make sure that they are located along the thread of the fabric.
Material binding
You don't need a lot of sewing experience to build a hammock, and all operations can be easily performed on a household sewing machine. Hem all edges of the material with a 10 mm hem. Since the maximum load will occur at the ends of the slots, in these places it is necessary to make additional zigzag stitches with stronger threads.
Kuliska

Having processed the edges, proceed to the drawstrings located at the narrower ends of the material and necessary for pulling the rope. Areas with cuts are folded in two layers, the first of which is 30 mm, and the second - to the end of the slot. These places are stitched with a double seam: at a distance of 10 mm and 90 mm from the top edge. Don't forget to securely fasten the seams.
Forming loops and inserting rope
 The rope is threaded through the manufactured drawstrings. In total you will need 40 m of rope. Pull the rope through the drawstring and leave a margin of 180 cm, and pull 1 meter from each slot.
Since the rope is quite rough, when pulling it through, be careful not to damage the integrity of the seams. Using a double bayonet knot, tie the two ends of the rope on one side, pulling the 4 loops in the middle slightly forward.
Combining the resulting loops into one
 Using a cotton rope, wrap all the resulting loops, gathering them together in your hand. For high-quality winding you will need approximately 10 meters of thin rope. Before wrapping the loops, they must be carefully straightened and tied behind the top of the bend. The transverse winding is done only after a longitudinal loop is laid on it and a thin rope is carefully fixed. The longitudinal fixing loop should be approximately 40 cm long. It is also made from thin rope used for winding. The end of the rope protruding from under the first layer of winding should be 10 cm.
The function of the longitudinal loop is to secure the two ends of the winding with a knot. The last turns of the winding should not be crossed. They must be pressed as tightly and tightly as possible against one another. Before wrapping the longitudinal part of the fixing loop, a rope is pulled through it. After winding the entire supporting loop, the two ends must be combined and wound together. After making two turns, tie the ends into a strong knot.
Fasteners

The hammock can be secured to thick tree branches or by threading another rope through the loops and tying it directly to the trunk. Also, for hanging, you can screw two reliable hooks on opposite sides, the main thing is to make sure that the fastening is secure.
To make being in a hammock even more pleasant, you can sew several small soft pillows from the same fabric as the suspended bed, or, on the contrary, take a contrasting material. The filling for pillows is chosen arbitrarily - it can be down, padding polyester or holofiber.
Since the main functional purpose of a hammock is to relax in the summer, it should be placed in a shady, windless area. Only in this case will you be able to relax well, enjoying the creation of your own hands.
Photo


Video
We bring to your attention several video instructions.
A hammock is an indispensable attribute of a summer holiday. You can sleep well in it during a siesta at the dacha. A hammock can be hung not only on a summer cottage, but also on the veranda. As a wonderful alternative to an armchair and sofa, it is placed in small apartments, because the hammock can be easily removed and put away, freeing up space. You don’t have to spend a lot of money to buy one - you can sew a hammock with your own hands. The scheme for its creation is not so complicated. Give it a try, and next weekend your loved ones will be lining up to enjoy the hammock you made.
History of appearance
The “parents” of the hammock are considered to be South American Indians. It provided excellent protection from dampness and insects, which is important for spending the night in the jungle. The hammock was also appreciated by Spanish sailors, replacing their uncomfortable bunks. The first settlers of the New World also used hammocks for sleeping. They were cheap (those who had very little money sewed a hammock with their own hands), saved space, and were comfortable to sleep in. Europe did not appreciate the “hanging bed”; the hammock did not become a full-fledged item for sleeping and was used only for short-term rest.
Master class “We sew a hammock with our own hands”
To sew a hammock you will need: thick natural fabric 1 m wide and 2.10 meters long, thick canvas tape or belt, scissors, strong ropes, leather scraps, threads, sewing machine.

Step-by-step instructions: how to make a hammock with your own hands
1. Lay the fabric out on a flat surface and measure out a rectangle 2.10 meters long and 1 meter wide. Turn in 1 centimeter on each side and hem them.
2. Prepare two canvas ribbons 4-5 centimeters wide. Fold one short side of the fabric over the width of the ribbon, placing the ribbon inside. Stitch. Repeat the same procedure on the other edge.

3. From scraps of leather (you can use very thick fabric), cut 18 strips 15 centimeters long and 2-3 centimeters wide.
4. Mark on the short sides of the panel the places where the leather parts will be located. They should be equidistant from each other. Fold each strip of leather in half to create a loop.
5. Using a sewing machine, securely fasten each loop. For greater strength, sew with a rectangle, inside which place the seams crosswise. This must be done so that the hammock, created with your own hands, will last as long as possible.

6. Cut 18 two-meter pieces of rope. Thread each one through a leather loop. Line up the ends.

7. Connect all the ropes together. Then make one large loop and tie a knot. Trim off any protruding ends. Then wrap the loop first with rope and then with strong cotton thread. Repeat on the other side.

Installing a hammock
Hang the hammock between two suitable trees. If there are none, then install supports and hang the hammock on them. You can make your own supports from different materials: metal, wood or concrete pillars. For greater reliability, it is better to fill the holes in which you will place the supports with cement mortar. Let it harden and only then place the hammock. Another option is to install hammock hooks into nearby walls.


