Sveta
How to glue carrot seeds onto paper?
Carrots are a popular crop. Almost every summer resident tries to sow at least a small bed of this root crop on his plot. Many people use paper tape with seeds glued to it for planting. You can make such planting tapes yourself, you just need to understand how the process of preparing them occurs. A video on this topic will clearly show how you can quickly glue the seed.
What is the best way to glue carrot seeds onto paper?
During normal sowing, carrots often emerge in bunches. Some of the root crops simply have to be pulled out. If expensive seeds are taken for planting, this may not be very rational. This can be avoided by planting seeds already glued to paper. This method allows you to:
- significantly speed up the process of sowing carrots;
- avoid labor-intensive work of thinning seedlings;
- get a harvest of even and large root crops.
To cut planting tapes, you can use toilet paper or old newspapers. The selected paper is cut into strips 2 cm wide and about 1-1.5 m long. Then the seeds are glued onto these strips. You will need to prepare an adhesive composition. Paste is good for this purpose. It can be made from water and flour or starch.
Additionally, you can add a little mineral fertilizer to this composition (a tablespoon per liter of water) for future plant nutrition, but this is not mandatory.
Advice. Two-layer toilet paper is especially convenient for making planting tapes. In its case, the layers are separated. Seeds are glued onto one of them, after which they are covered with a second layer of paper.
How to stick seeds on paper tapes?
After the paper is cut into strips, you can start gluing carrot seeds onto them. The process consists of several stages:
- apply with a toothpick to paper tapes drops of paste at intervals of 2.5-5 cm;
- pour the seeds into a flat container and use the same toothpick to take them one at a time, placing them in drops of paste applied to the paper. The tip of a toothpick, wet from the paste, will easily catch the seeds;
- Dry the prepared planting tapes thoroughly before storing them.
By spending a little time making planting tapes, you can greatly simplify your spring sowing work. When choosing this method of sowing carrots, the root crops are not damaged during thinning and turn out beautiful and even.
Carrot seeds on tape: video
Hello, dear readers!
When carrot crops are too dense, the seedlings interfere with each other and develop very weakly. In addition, thin plants are very difficult to thin out. Therefore, it is sometimes recommended to mix small seeds with sand: take one glass of sand per tablespoon of seeds, and distribute this mixture over approximately 3 square meters of bed.
However, in practice, due to the difference in weight and consistency, it is almost never possible to mix the seeds with sand evenly and scatter them evenly on the garden bed.
It is much more convenient to carry out liquid sowing of carrot seeds. To do this, the sprouted seeds are mixed with a paste made from potato starch. This mixture is then carefully poured from the kettle into the prepared grooves.
How to make paste for carrot seeds
To prepare a paste for seeds, first mix three tablespoons of starch thoroughly in a glass of water. Then to a liter hot water pour the diluted starch in a thin stream with constant stirring. Then the resulting gel is heated until thickened, and then cooled. All this is done with constant stirring.
The shelf life of such a paste is no more than a day, and sprouted seeds can remain in it for no more than six hours. One liter of paste is enough to sow 10 g of carrot seeds. At the same time, it will be easy to achieve uniform distribution of carrot seeds in the liquid; you just need to stir them carefully so as not to damage the seedlings. Before sowing carrots, the grooves must be watered, and immediately after sowing the seeds they are covered with a layer of loose soil no more than 2 cm thick. Then, in order to keep the soil moist, it is advisable to cover the bed with film or any non-woven material until carrot sprouts appear.
Carrot seeds should be sown so that the soil below is compacted and the soil on top is soft and loose. To do this, the furrows need to be trampled or compacted with a plank. Then the furrows are watered with water, and the seeds are sown across the entire width, doing it in a sort of zigzag pattern, after which they are covered with loose, dry soil. It is very convenient to mix carrots with seeds of beacon crops that germinate very quickly (usually radishes or lettuce). Lettuce or radish sprouts will indicate the position of the furrows, making it easier to weed the bed.
See you soon!
All gardeners love to grow carrots. This is a tasty and very healthy root vegetable, without which not a single dish can do. Carrots are rich in vitamins and carotene, they help maintain good vision, well-being, and so on. Like any other crop, carrots have their own growing characteristics. Carrot seeds are different in that they are very small and inconvenient to sow. Therefore, many summer residents are looking for ways to sow carrots without thinning them. After all, thinning plantings is a pointless waste of seed and extra work. And if you leave carrots to grow without thinning, the harvest will be small. Due to lack of space and dense plant growth, the root crops will be small and deformed, which significantly impairs the quality of the crop. Therefore, methods for sowing carrots have been developed for decades.
Carrots on toilet paper. Basic landing rules
How many times have you sowed a few little tiny seeds - like onions and carrots, or worse, those little specks called basil! - And it’s a pity that you didn’t have a magnifying glass? Or sowed a row of tiny tiny seeds only to thin out half the seedlings?
Tatyana Savchenko Siberia
But it's not just a matter of crossing eyes when sowing seeds. Sometimes the weather doesn't cooperate and the wind decides to pick up when you spill your fingers of seeds. Sometimes all you need is a couple of seeds when you carefully shake out the bag and it lasts a whole year.
To plant any type of vegetables, including carrots, you first need to carefully prepare the soil. Approximately two weeks before sowing, a section of soil, dug up in the fall to a depth equal to the bayonet of a shovel, should be well loosened and then harrowed with a rake.
Planting carrots without thinning with a pinch
Seed tape—basically a strip of paper with seeds embedded for precision planting—is sold at many nurseries, but you probably won't find seed tape in the variety you need. You can make your own seed tape at home with nothing more than toilet paper and school glue!
First, find a cheap roll of single-ply toilet paper. You can also use a two-ply layer and simply separate the toilet paper. Roll out the length to fit your garden bed. Using washable, non-toxic glue, place small dots of glue on the toilet paper according to how far you want your seeds to be spread. For most plantings 1 to 3 inches a good start, since some seeds cannot germinate.
Next, you need to draw furrows no more than two centimeters deep, lay a strip of seeds in them, water them and cover them with soil. Upper layer It is recommended to level the soil well and water it again, being careful not to wash away the soil on the tape.
Paste for planting carrots on toilet paper
Starch. We will prepare 500 ml of paste. Place a container with 400 ml of water on the fire and bring to a boil. Turn off the fire. In a separate bowl of 100 ml warm water dissolve 1.5 - 2 tbsp. l. dry starch, stirring well. Then pour this starch solution into boiling water in a thin stream. Stir thoroughly. The paste should not be too thick.
Now, using your fingers or tweezers, drop the seeds onto each glue dot. You may ask how this is different from simply going outside and dropping a seed into the ground. Why take the extra step to create the seed tape? The advantage is that you don't have to deal with the elements, especially when you want to save your seeds. Now you can control the exact spacing of your seeds and figure out if you need more seeds. Since the tiny seeds barely need to be covered, the paper makes it easy to see how much soil you're adding on top.
Also check out our articles
Flour. Fill an enamel pan with water and bring to a boil over heat. Add flour in a thin stream in small portions, stirring regularly. Flour paste is cooked at the rate of 1 tablespoon per 100 ml of water. Once the mixture reaches the consistency of a batter, remove from heat. Let the solution cool and use it as glue for seeds.

You can make and save several varieties of seed tape to sow throughout the year, quickly and easily. Once you have applied all of your seeds, allow enough time for the glue to dry and make sure the seed tape does not stick to your surface.
If you are gluing one row in a row, you can glue your seeds to the bottom half of the paper and fold the top half to secure them while the glue dries. This keeps things neat and your seeds will still germinate through the paper. Once those little dots of glue have hardened, roll up the seed tape and tuck it into an envelope or ziploc bag until you're ready to use. Be sure to label your seed tape!
Tape method of sowing carrots on toilet paper
You can buy carrot seed tape at the store. Of course, it will be easier and faster than making it yourself. But, firstly, such packaging of seeds is quite expensive, and, secondly, you don’t always come across the type of plant that you want to plant. Therefore, many experienced gardeners have adapted to sticking the seeds onto the tape themselves.
When planting, simply water the soil and smooth the surface. Unroll the seed tape, place it on top of the soil, and cover lightly with more soil. It's normal if the toilet paper shows a little; It decomposes quickly and will decompose in the ground.
Carrots on toilet paper - the main advantages of this method
Like all the little tiny seeds sown with a seed tape or even traditional way, gently simmer the soil until the seeds germinate and establish strong roots; You don't want a large explosion of water to dislodge your careful work. Within a week you should see perfectly spaced rows of small seedlings!
But you can also make such a tape yourself from a roll of toilet paper. Prepare a thick paste that you will use to glue the seeds onto the tape. We arm ourselves with a regular needle, toilet paper, glue and seeds:
- dip the needle tip into the sticky mass so that a small drop remains on it;
- we touch the carrot seed with this drop - it is almost weightless and will easily stick to the needle with the paste;
- transfer the seed on the needle directly to a ribbon of toilet paper folded in half lengthwise (regular);
- place the seeds at a distance of 4 cm from each other;
- We wait for the paste to dry and roll the tape into a roll convenient for planting.
In the garden bed, the paper will liquefy perfectly and, together with the paste, will provide additional nutrition for the plants. Working with such tapes is a pleasure!

Unlike honey, the glue will dry, so you can store your tape without making everything sticky.
- My salad came out just fine, but the carrots never sprouted.
- What effect does glue have on seeds?
- Also, can you use honey instead?
No doubt other combinations will work too. You can also replant your vegetables using useful flowers, such as marigold and yarrow. Mixing seeds - great idea! . The ability to install a seed belt will make this much easier. My husband and I are taking this one step further. We made a starter seed rack with five shelves and a grow light hanging from each shelf. We can put trays under the growing lights and will have healthy seedlings as soon as we get our last frost.
Advantages of the “paper” method of sowing carrots
This method of planting root crops, in this case carrots, has its advantages:
- seed preparation is carried out in a room where everything necessary for work is conveniently located, in contrast to a summer cottage, when work is carried out in the field;
- the seeds are located in the soil at the same distance from each other, since they are evenly applied to the paper strips;
Articles about unusual growing of seedlings
- all seeds lie at the same depth, as they are applied to one tape, which is evenly placed in the soil along its entire length;
- seed consumption is approximately 20 - 30 times less than with the usual way sowing, and the yield is several times higher"
- there is no need to weed and water the seedlings for some time - after the spontaneous burning of the weeds, the carrot sprouts will not have competition with the weeds for some time;
- the carrot fly - one of the main pests of sprouts, feeding on their root crops - will not be able to lay eggs in the garden bed, since it will be covered with covering material
 Disadvantage of the “paper” method of sowing carrots
The disadvantage is that the seeds in the tape are more expensive than regular ones, but to make it yourself you need to spend a lot of time.
We planted our first seed tape the other day. We sprayed the seed tape with water and were happy to see it splash into the dirt. Some seeds are so small that when you try to plant them, the wind blows them away. This tutorial will show you a very easy way to make seed ribbons. It's really just a way to temporarily attach small seeds to a surface that holds them in place while you plant them.
Since they are on the tape, you can also control how far apart they are planted. It's all about the garden. The toilet paper will disintegrate and the seeds will sprout right where you planted them. This method will work with any fine seeds.
Planting carrots on napkins
Found another one interesting option planting carrots on napkins. The principle is similar to tapes, the only difference being that you immediately form a bed by gluing the seeds in the same way as your root crops will grow.
Well, you already lay out your napkins on the garden bed and sprinkle it with a layer of soil. The result is an immediately formed bed that does not need to be thinned.
The flour and water glue should be thick enough to sit on the end of a brush or pencil without dripping. Decide how close you want to place the seeds. If you are unsure, follow the advice for your seed packet. Pour the amount of seeds you will use onto a clean plate and arrange them so they are easy to pick up one at a time. Brush into the glue and then take the seed with you.
- You only need about a teaspoon of flour to glue several strips together.
- Tear off the toilet paper you need and write the name of the type of seed on it.
This year, to make our work easier, we decided to sow carrots using a sowing tape. I love this idea because planting carrots on paper makes gardening so much easier! No need under scorching sun thinning, but in the summer it is very tiring and takes up a lot of time, which can be spent on relaxation...
Use your finger to help if you need to. Take small sections of toilet paper, write the name of the seeds on them and glue on more seeds. To place the tape, prepare your growing area as usual and lay the tape down. As mentioned, this works well with other seeds too, not just carrots. If you're not ready to plant them yet, simply leave the seed strips flat, stacking one on top of the other. As long as they aren't wet or shaken, they should be fine until you're ready to use them. Seeds do best in cool, dry storage, just above freezing. Use only the amount of seeds you want to plant without having to dilute them. If you're like me and want to try a variety of seeds but don't have a garden buddy to share shipping prices and packages with, precision planting with seed bands is a frugal alternative.
- When you're done, leave everything to dry.
- Even when the glue has dried, the seeds remain firmly attached to the paper.
- Cover it with the appropriate depth of soil and water as usual.
- The toilet paper gradually dissolves and the seeds take root.
- I also have very sandy soil which carrots really like.
- Saving on seed costs.
- Creating seed ribbons is a little slow, but surprisingly relaxing.
Background
Last year I was so dissatisfied with the germination of carrots, I even told myself that this year I didn’t want to plant them at all, but then spring came and I wanted to have my own young carrots in July - from my garden, they are 100 times sweeter.

It is ideal for planting tiny seeds such as carrots that are difficult to place in the garden. The "ribbon" is made from biodegradable paper that is planted directly into your garden. I like to use seed tape, although it tends to be expensive. But you can make your own seed tape for a fraction of the cost of pre-made tape.
Making homemade glue for sowing carrots on toilet paper
Seed tape has a number of advantages. No seed is wasted; The seeds are inserted into the paper strip one at a time and are perfectly arranged and ready for gardening. This also means that no dilution is required. They are especially useful for tiny seeds that may be difficult to plant, such as radishes, carrots, lettuce or parsnips.
And one more point in favor of the sowing tape - if after planting the carrots there is a good rainfall, then the carrots sown just like that may “leak” - most likely this is exactly what happened to me last year (after planting it rained for several days).
I think that many gardeners are now trying to sow carrots on tape, and I decided to deepen this issue not only for myself, but also for you, dear readers. So, how can you use seed tape correctly to get the best germination results? And are there any alternative options to the tape? We'll figure out…
The process of planting carrots on toilet paper
Start by mixing about 2 tablespoons of white flour with 1 tablespoon of water to make a thick paste. This will act as glue to hold the seed in place. You don't want it to be watery and thin because you want it to dry quickly so the seeds don't have a chance to absorb the water.
Unroll the toilet paper until several feet of it are on the table in front of you. Fold the toilet paper twice as long and then unfold it. You will place the seeds in the middle of the toilet paper half. From the seed packet, determine how far apart you need your seeds to be. Don't use the spacing suggested in the planting bag - use the spacing suggested by the thinning bag.
Preliminary soil preparation
Very important carrots require properly prepared soil for germination. And our beds will have to be prepared two weeks before planting, and not according to the principle of coming to the dacha, digging, loosening, planting, and all this in two weekends.
A week before planting, or better yet two weeks, you need to loosen the soil to a depth of 10 cm, after which you must immediately take a rake and level the bed. Of course, this means the earth dug up in the fall using a spade.
Planting carrots on a tape
Place the seeds on a sheet of paper. If it helps, you can use a pen or marker to mark the spot on toilet paper where the seed will go. Now dip the tooth in flour to get a small amount of paste on the tip. Use this to pick up just one seed. Using a ruler as a guide, place the seed on the toilet paper at the correct distance apart for the seeds you are working with.
Once you have "planted" a few feet of toilet paper, add a few dots of flour paste a few inches near the edge of the toilet paper and fold the toilet paper in half. Rub gently so that the paste can stick both sides of the toilet paper together.
Laying a ribbon with seeds
Immediately before sowing, we loosen the bed again, make shallow furrows - about two centimeters, and place a seed tape in the furrow. Then carefully pour in a small amount of water and cover with soil. We very easily level the ground and water it again - carefully so as not to wash off the soil from the tape.
Continue working in this manner until you have used all your seeds, or until you have made as many seed tapes as needed. Be sure to leave the toilet paper on until the paste is completely dry. Write the name of the seed on one end of the seed tape, and then you can roll it up and store it in a cool, dry place until you are ready to plant.
How to glue carrot and beet seeds correctly, what kind of paper is better, how to make the glue correctly???
When you are ready to plant the seeds, unroll the seed tape and cut it to whatever length is needed for the area you are planting. Place the tape over the soil and cover it with the amount of soil that the seed packet recommends for planting. For achievement best results be sure to keep the seeds stable.
Gardener's secret: Using ripe compost, laid in a half-centimeter layer, you can significantly increase germination!
Glue the seeds onto paper yourself
Another great recipe is that you can make a sowing tape with carrot seeds yourself! To do this, take paper with a loose texture (toilet or newspaper works well), cut it lengthwise into strips 2 cm wide.

We make a seeding tape from each half as follows: make a paste of starch or flour, drop it onto paper and place carrot seeds in increments of 2.5 cm.
The paste is made like this: for 1 glass of water, 1 tsp. starch or flour.
There is another tricky way - take two-layer toilet paper, peel it a little from the edge and put seeds between the layers.
Met more interesting offer from one summer resident on the forum - do not cut a roll of toilet paper lengthwise, but simply fold the paper in half, gluing the seeds, gradually winding up the roll, see photo below... It saves a lot of time both in making the tape itself and in planting!

You can additionally fertilize our seeding belt by adding mineral fertilizers to the water for boiling the paste. The ratio is as follows - based on 1 liter of water, a tablespoon mineral fertilizer.
You can glue the seeds in winter, before summer season. Agree, in winter there is most often nothing special to do, so there is more than enough free time.
Planting carrots on napkins
I found another interesting option for planting carrots - on napkins. The principle is similar to tapes, the only difference being that you immediately form a bed by gluing the seeds in the same way as your root crops will grow.

At home, prepare napkins by sticking carrot seeds in 5 cm increments in the row and between the rows.
Well, you already lay out your napkins on the garden bed and sprinkle it with a layer of soil. The result is an immediately formed bed that does not need to be thinned.
What seeds to take
For gluing, it is better to take high-quality, varietal seeds, their germination will be better, and the result in the fall will please you. And this method of gluing seeds onto paper will save them from disappearing.
There are also coated carrot seeds on sale; they are easier to stick, but they require more watering at first, since the seed is, as it were, inside a pea made of fertilizer and filler. They need some time to swell and give moisture to the seed inside. But the plus is that the sprout will immediately have nutrition and the growth of the seedling will be optimal.
conclusions
In the same way you can make a sowing tape with seeds of other vegetable crops and greens with small seeds, such as lettuce, dill, celery. Instead of doing thinning in the summer in a kneeling position, it is better to make a paper strip with seeds in advance and not know grief. The winter is long, what else to do but prepare for the sowing season.
These are the tricks I learned about planting carrots on paper. As you can see, there are options that are both more expensive and more economical, with more labor (which, of course, will pay off later) and with less! Let's approach the garden creatively, comrades! Let's enjoy the process, so to speak!
Finally, watch the video that shows how to plant carrot seeds on a tape in the ground
Proper sowing of carrots on tape and planting on toilet paper
| Categories: |
And I really love this method
I have carrot seeds and some other small Dutch seeds, there are not many of them in the bag and this method saves seeds (no need to pull through), but also saves time.
I pour the seeds into a glass with saline solution (1 tsp per glass), stir, after 15 minutes I splash out everything that has surfaced, the rest in gauze, rinse and dry on a saucer near the radiator. That's it, the seeds are ready
I put an incomplete roll of toilet paper in a bowl with Azofoska solution, it soaks quickly, then I dry it near the radiator and cut it into strips (a skill that comes with experience!). The strips are not long, up to 1.5 m.
I scatter the seeds on the table, next to a saucer with paste (a little bit of Kemira-Lux in there) and a cotton swab (the girls know!). That's all...
The tip of the stick into the glue, onto the tape, then the same stick into the seed and into the droplet.
Everything goes off with a bang, like a conveyor belt. I dry the ribbons on a rope, roll them up and, after signing them, tie them with thread.
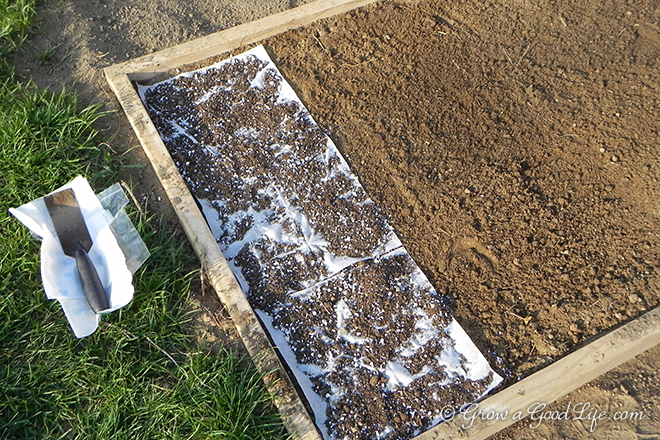
It's quite simple in the garden. I make a groove with the edge of the board, spill it and lay out the tape. I fall asleep, compact it with the same board....voila
By the way, parsley, dill and other herbs can be glued onto paper without cutting it into strips. Ribbon.
PS: How about this method? It’s convenient to sow small flowers ❗ Mmmmmmm
How to properly glue carrot seeds onto tape
|
It's better to take cheap two-layer toilet paper and separate one layer from the other slightly at the edge. Drop pre-cooled glue, cooked like a starch paste, into the resulting pocket, but add an additional flat tablespoon of complete mineral fertilizer with microelements per liter of water and put a seed. The paper sticks well, soaks well in the spring after watering, the seeds do not fall off during storage, as if glued to single-layer paper on top. But it’s better if you see coated seeds on sale. Especially carrots. The seeds are in a dragee of a dry gel with microelements; they swell well, dissolving the shell, and the supply of nutrition and water in the soaked and swollen seed gel is simply heaven. Alexei |
|
About the tape: The most ordinary toilet paper, I cut two round pieces from the roll with a sharp knife, put glue on one, and cover it with the other. Paste - flour with boiling water. You can use fertilizers, but why? Nutrition is needed when the plant is vegetating. What is in the paste, once in the ground, will not play any role for the sprouted seed. It is better to water after germination, for example, with humate. So, with a regular toothpick I apply drops or pieces of paste at a distance of 2-2.5 cm and with the same toothpick I apply the seeds. The seeds are scattered on the saucer and easily cling to, because the toothpick is sticky from the paste. On winter evenings there is time to do this. But in the spring it is easy to sow by laying out the tape in a row. By the way, I advise you to place such a tape, like store-bought tape, edge-on, and not lay it flat! Summer is a miracle! There is no need to crawl between the rows and pull. I pull it once when it just sprouted - through one carrot. That is, there remains 5 cm between plants. Why I switched to this method: in addition to saving time and effort in the spring-summer period, there is also saving of seeds. Not even in terms of money. I am prescribing good hybrid seeds. Naturally, they are more expensive and there are fewer of them in the bag. And somehow I don’t want to “scatter in the wind.” But two 1g packets of seeds are enough for me to get wonderful harvest excellent carrots for your entire large family! Be successful! Vitaly |
Return to contents
Based on materials from answers@mail. ru and the answers from our readers.
Planting carrots on tape (toilet paper)
Sticking carrot seeds on toilet paper Just. A couple of evenings of work in front of the TV - and planting material ready. It is better to take soft, white paper (it will get wet faster in the soil).
Before gluing, we calibrate the seeds:
Prepare a saline solution in a glass (salt dosage by eye) and drop the seeds into it and stir. Those that surfaced are bad, we merge them. Those that sank to the bottom are good, we leave them and wash them in water at room temperature. Now Carrot seeds need to be dried so that they are comfortable to take with your hands and Stick on paper.
In the meantime, cut the toilet paper to fit the width of the bed - usually 80 or 90 cm. Then cut it into strips 2-3 cm wide.
To glue carrot seeds onto paper you will need paste. It can be cooked from flour (rye, wheat) or potato starch.
Carrot paste: recipe
Starch. We will prepare 500 ml of paste. Place a container with 400 ml of water on the fire and bring to a boil. Turn off the fire. In a separate bowl, dissolve 1.5 - 2 tbsp in 100 ml of warm water. l. dry starch, stirring well. Then pour this starch solution into boiling water in a thin stream. Stir thoroughly. The paste should not be too thick.
Flour. Fill an enamel pan with water and bring to a boil over heat. Add flour in a thin stream in small portions, stirring regularly. Flour paste is cooked at the rate of 1 tablespoon per 100 ml of water. Once the mixture reaches the consistency of a batter, remove from heat. Let the solution cool and use it as glue for seeds.
So, Can be glued:


On long winter evenings, you can start preparing for spring sowing and glue the seeds onto paper. This will make it possible to use precious time more efficiently in the spring, when every minute counts and it is necessary to have time to plant all the crops in a timely manner. With tape, seeding takes just minutes, leaving time for more important matters.
You will need
Paste or office glue;
- toilet paper or paper towels;
- scissors;
- brushes for applying the adhesive base;
- toothpick or tweezers.
Instructions
You can stick it on toilet paper strips seeds of radishes, carrots, radishes, head lettuce, cabbage, dill, celery, nigella onions. The distance between the glued seeds should depend on the crop.
To carry out pre-plant gluing, cook a thick paste from wheat flour or starch and cool it. If you don’t want to cook the paste, you can glue the seeds onto office glue.
Cut toilet paper or paper towels into strips 2.5-3 centimeters wide. Make marks with a pencil or marker at the distance where the seeds will be glued. Apply a thick layer of paste or office glue to the resulting tape and begin gluing the seeds. To do this, pour the seeds from the bag into a flat saucer. Since almost all of them are very small, take them with a toothpick dipped in water or carefully with tweezers.
Glue carrots, radishes and parsley at a distance of 5-6 cm from each other. Make the distance between turnips and beets at least 10 cm. Between radishes for summer use - 6-7 cm. Glue winter radishes at a distance of 12-14 cm. Leave a distance between leaf celery - 5 cm, root vegetables - 20 cm. Leave between cabbage seeds 50 cm, between dill and parsley - 2 centimeters. For seed onions for greens - 5 cm, for turnips - 10 cm.
Also keep in mind that such a distance can only be done for full-weight, high-quality seeds. If you doubt their fullness, then reduce the distance between the seeds of all crops by two or three times. After planting and germination, simply thin out the plants.
Dry all ribbons with glued seeds thoroughly, twist them, tie them with an elastic band, sign them, put them in a canvas bag and store them in a dry, dark, cool place until sowing. In the spring you will make beds, furrows and simply spread ribbons with seeds, mulch and water. This will take several times less time than with conventional sowing. In addition, it will significantly reduce the number of seeds for sowing.