Any home, be it an apartment or a house, needs furniture. It is required not only for decoration, but also for practical purposes, namely, placing things. IN Lately The cabinet with sliding doors. But not all models are suitable for small spaces, and the high price is not always justified. You can purchase an option that is no worse and at a reasonable price: the Basya wardrobe from a Russian manufacturer.

Features and Benefits
The Basya wardrobe stands out among similar designs with its compact size and reasonable price. It will fit perfectly into the interior of not only any room, but also the hallway. A small, but at the same time, spacious closet does an excellent job of storing not only items of clothing, but also shoes.


The cost of this wonderful model with a mirror is three times lower than other products with a similar design. Its low price does not in any way affect either the appearance or the quality of the components.


Material and color
The sliding wardrobe "Basya" is produced Russian manufacturer from sheet composite material made by pressing. To give it a wood-like pattern, it is laminated, and to be resistant to moisture it undergoes special treatment.


Color solutions of the proposed model are presented in three options, based on the contrast of two colors, and in one monochrome. In three versions, the frame and central door are made of a dark, rich shade, and the two remaining hinged sliding doors are made of light colors. The color versions of the produced models are presented in combinations:
- bleached oak with wenge, Wallis plum with wenge;
- light shimo ash with dark ash
There is also a single monochrome cherry oxford option.

photos
Size and filling
The three-door wardrobe is produced by the manufacturer in one size.

The assembled height of the product is 200 cm, which allows it to be installed in a room with low ceilings. The length of the cabinet is only 130 cm, which makes it possible to place this piece of furniture even in small space. The depth of 50 cm makes it possible to place quite a large number of clothes and bed linen.

The sliding wardrobe "Basya" is externally beautiful, modern, consisting of a strong body and a magnificent facade, the design of which is represented by three sliding doors. Attached to the central part large mirror. Behind the attractive external facade there is a functional internal device.

The cabinet frame is divided into two spacious compartments. One contains a rod attached parallel to the rear wall. Here you can place clothes, hanging them on hangers, and below, if desired, you can store boxes of shoes. In another compartment there are three shelves for storing folded clothes and bed linen.

Assembly instructions
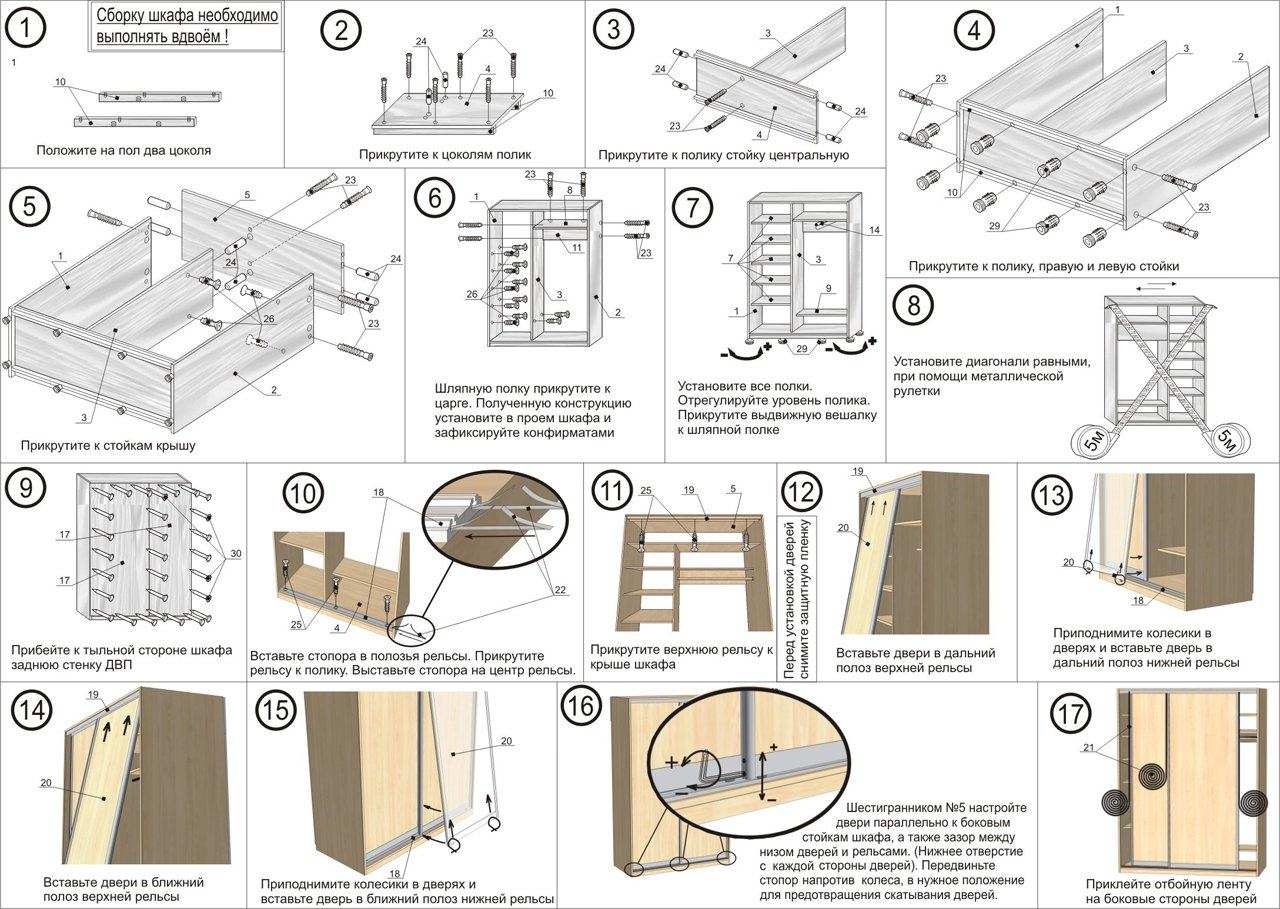
In order to start assembling according to the diagram, you must first unpack all the parts. One box contains doors, another contains walls, and the third contains a mirror.

Assembling a wardrobe involves phased implementation the following actions:
- First of all, we unpack the box with the walls and begin to assemble the frame, arranging the parts so that the assembled structure is located front side down.

- To fasten the parts to each other, you need to use special screws - confirmats or, as they are also called, Euroscrews. This fastening element does not destroy the material and is able to withstand tearing and bending loads.

- We begin mounting from the bottom corner, attaching the side wall to the bottom part.
- We install a parallel wall and a stand dividing the frame into two halves.
- We fasten the side wall with the stand-up shelf located in the center. This is necessary for a more rigid attachment.
- To complete the installation, screw the cabinet lid, but not all the way.

- Using a tape measure, we measure first one and then the second diagonal. At correct fastening they should be equal. If there is a difference between them, then it is necessary to align the frame by shifting it to a smaller direction. The structure is considered correctly fastened if each of the four corners is equal to 90 degrees, and both diagonals are of equal value.
- Now you can begin attaching the rear wall, consisting of three parts. Each part is fixed with nails nailed at a distance of 10-15 cm into the ends of all elements. We start from the side on which the shelf is located. Having laid and leveled the sheet, we draw a segment that determines the level of the previously fixed shelf. This must be done in order to nail back wall not only to the ends of the structure, but also exactly to the shelf. After all the parts are nailed, you need to fasten them with special profiles.
- We proceed to the doors - we screw the running roller to each from the top on both sides.

- Then we begin to work on the middle door, on which we will attach the mirror. We place it on the surface face up and apply a mirror to it, which we trace, having previously placed it evenly. Degrease the prepared surface, and inside remove the mirrors protective films double sided tape. In order for the mirror to stick evenly, you need to lay linings between the mirror and the door; their thickness should be greater than the tape. Then we begin to carefully remove them.

- Now we install the shelves in the linen compartment from top to bottom, and then attach the dress rod. We screw in the upper rails and lower guides, having previously drilled holes in them. We start with the bottom guide, stepping back from the edge about 2 cm, and finish with the top.

- Carefully install the doors into the grooves of the profiles. We check the movement of the doors: it should be smooth and without unnecessary sounds, and the doors should fit tightly. If necessary, we make adjustments by tightening the running roller. Next, tighten the fixing screws and install the lower guides on each door. After that, we hang the doors and fix the top bar with self-tapping screws.

More detailed instructions You can see how to assemble the Basya wardrobe in the following video:
Reviews about the manufacturer
Reasonable price, coupled with attractive appearance The Basya wardrobe, proposed by a Russian manufacturer, attracts many people. Therefore, most reviews of it are mostly positive.

Almost all buyers note the very good packaging of this product, thanks to which all parts of the cabinet reach the consumer completely intact. The mirror is packaged especially carefully, for which many buyers express gratitude to the manufacturer when writing reviews.


Many agree that this cabinet is an excellent option for those who are used to saving money, but not at the expense of the functionality and quality of the purchased product.


But there is one negative point. Almost all customers agree that the instructions included with the product should be clearer and better if they are printed in a larger font.
But for those who are well versed in assembling furniture, there should be no problems with this process.


Options in the interior
Thanks to its size, the sliding wardrobe “Basya” can be placed in small room. At the time of buying of this product It is necessary to take into account the color of already installed furniture.
The most the best option The placement for this closet will be in the bedroom. Due to their compact form and availability sliding doors, it will not take up much space, but at the same time, you can fit quite a lot of things in it. In addition, the presence of a mirror not only helps to visually increase the space, but also performs a practical function.
You can assemble Basya's wardrobe yourself. You will have new experience, while you will save money and raise your authority in front of your family.
The Basya wardrobe is suitable for a hallway or bedroom. Thanks to its small dimensions, it is spacious, but the main advantage for small apartments is a sliding door. This article will not talk about its advantages, but about how to properly assemble a cabinet.
Make room on the floor for ease of use during assembly. There are times when this is not possible, then find an assistant and assemble the wardrobe while standing. Understand the instructions, lay out all the components and arrange the racks, shelves, and other components in order.
The internal parts of the external racks have many holes for shelves and other elements. In order not to confuse them during assembly, marks can be placed on the sides - left and right sides.

To assemble Basya you will need:
- hammer,
- rubber mallet,
- roulette,
- metal square,
- screwdriver,
- screwdriver,
- 4 mm hex key.
Assembly order
The base (bottom sheet of laminated chipboard) is screwed with euroscrews (confirmats) to two longitudinal legs made of laminated chipboard. The supporting part must have an edge so that the material does not swell from moisture while standing on the floor. You can immediately nail the thrust bearings - 3 pieces per strip.
The work takes place on the floor and therefore the box is assembled face down.
You need to attach the middle post to the base of the Basya cabinet and then the side ones, and in order not to return to the bottom again, put plugs in the holes of the Euroscrews. Don't forget to install heel supports on the side racks of the cabinet.
The next step is to tighten the top lid of the cabinet and install the plugs. To give rigidity to the box, install shelves that are tightened with euroscrews between the sections (in some configurations such shelves are not available).

We measure the diagonal and nail the back wall
Before nailing the back wall, make sure that the wardrobe has rectangular shape. This is done with a square, placing it on the corner of the cabinet, or using a tape measure to measure the diagonals. You can use two options at once to make it more accurate. All angles should be equal to 90º, and the diagonal of the two sides should be the same. In case of unevenness, it is necessary to level the housing by moving it to a smaller direction.
If the box has the exact shape and details, then you can nail the back wall of the cabinet. The reinforcement wall is attached not only around the perimeter, but also to the shelves.
Now the structure should be rigid and can be installed in a vertical position.
Installation and configuration of doors
To every door on top part Two rollers are screwed on. It happens that mirrors come attached to the middle door of Basya's closet, but if the manufacturer did not glue it, then you will have to do it. To do this, you need to attach a mirror and outline it in a circle. Then plant it on liquid nails.
Now you need to install the lower guides and upper rails for the rollers. Stepping back 2 cm from the edge, screw the guide at the bottom and the rail at the top in the same way.

Then carefully insert the doors into the grooves of the profile. The motion of the rollers should be soft, and the doors should fit well and not touch or cling to anything. In case of poor running, the rollers can be adjusted. After this, screw the rollers with a fixing screw. We screw the guides onto the lower parts of the doors. Now we install the top front strip and install shelves and a rod for dresses. The Basya cabinet is ready for use.
To save on assembling a wardrobe without turning to specialists, you can do it yourself. The furniture set, in addition to all the parts, should contain instructions on how to assemble 3 door wardrobe, which will help you assemble the cabinet correctly and quickly.
Required Tools
Almost every cabinet model comes complete with the necessary bolts, nails and washers, but you need to prepare the tools yourself. To assemble the wardrobe, you will need the following tools:
- Phillips screwdriver.
- Bit PZ2.
- The screwdriver is straight.
- Screwdriver or drill.
- 4 mm drill bit for metal.
- Hammer.
- Level.
- Pliers.
- Stationery knife.
- Hex key.
You may also need additional parts to assemble a 3-door wardrobe. For example, if the floors are uneven, it is necessary to prepare the underlays in advance. Depending on the model, a confirmat and 6 mm drill may be required.
Assembly Basics
Exist standard rules wardrobe assembly:
- You should not unpack all the details at once, otherwise you may get confused and search required part it will take a lot of time.
- You must carefully study the instructions on how to assemble a 3-door wardrobe before starting assembly.
- Make sure that all components are in place and are the right size and color.
- Assembly is carried out in stages, starting from the bottom of the cabinet.
- Mirrors and glass are installed last.
- The space for the cabinet must be chosen exactly in size and not have openings or other obstacles during its installation.
Assembly example using the Basya wardrobe as an example:
Assembly steps
First of all, the frame is assembled. It is necessary to connect the frame elements. To do this, you need to insert the choppers into the prepared holes and screw the confirmations into them, with the help of which the frame is secured. It is more convenient to connect cabinet parts lying down. You should start from the bottom shelf, so to speak, the bottom of the closet.
After the frame is ready, we proceed to placing the partitions of the three-door cabinet. It is very easy to determine where the top and bottom of the partitions are, since there are holes for dowels in the lower part of the partition. There are also blind holes on the bottom shelf (bottom of the cabinet) into which dowels are inserted, and only then we install partitions on them. It is worth noting that initially you should not fasten the confirmations to the end; you must leave them free to move.
To provide rigidity to the structure and protect it from loosening, it is necessary to install the rear wall of the cabinet. The wall must be strengthened with the laminated side facing out. The wall is secured with small nails, which are driven in around the entire perimeter of the cabinet.
For each shelf, special holes are prepared into which you need to install corners or other fasteners provided in the kit, and it is on them that you need to install the shelf. The shelves are fastened using corners or confirmations.
After this, you can install the cabinet. Here it is important to level the structure and only after that it is necessary to tighten all the fasteners completely. To ensure that the doors open freely when using the cabinet and do not jam, it is necessary to level it using a level. After this, you need to install the guide rails for the cabinet doors. Using a screwdriver, holes are made for fastenings along the entire perimeter of the rails. The holes must be chamfered for screwing the screws flush and you will need to make 4 holes for each strip. The first thing you need to do is secure the bottom rail.
For the top rail, you need to make staggered holes in both strips. Screws are included in the wardrobe kit for attaching the slats. The distance from the front end of the top cover to the beginning of the edge of the rail must be at least 3 mm.
The next step is to install the rods and fittings inside the cabinet. First of all, we mark the attachment points for the holders, drill holes and tighten the screws. It is important to install the rod mounts correctly so that they are level. Whether the fasteners are installed correctly or not can be checked using a level.
The final stage is installing the doors. Installing the doors must begin from the top, for which we insert the doors into the upper rails, and then the end rollers are placed in the groove of the lower rail. Thus, all 3 doors are inserted in order, the main thing is not to confuse the front and inner sides.
6253 0 0
DIY wardrobe assembly diagram in 5 steps
Out of a desire to save money, people often buy disassembled cabinet furniture in the hope of assembling it themselves. Indeed, instructions are included in any kit, but in reality, the assembly diagram of a sliding wardrobe has many nuances, and so that upon completion you do not have “extra parts” and the wardrobe is durable, we will analyze the entire process in detail and, for convenience, we will break it down into 5 steps.
Tools and preparation for assembly
You won’t need too many tools, but you won’t be able to get by with just one screwdriver; manufacturers issue the kit with 90% readiness, the remaining 10% is written off for fitting the furniture to a specific location.

- Confirmed key, manual hexagon (often included in the kit);
- Steel hammer;
- Rubber mallet;
- Screwdrivers – Phillips and straight;
- Roulette;
- Awl;
- Confirmed drill;
- Metal drills – 4 mm and 6 mm;
- Screwdriver;
- Square;
- Pliers;
- Level (regular bubble).
Now we need to prepare workplace, on the assembly site the cabinet must be placed in any position - lengthwise, across, diagonally and even lying down. All this is needed so that you can attach the back panel made of fiberboard, and then get out of there and push the cabinet into the place intended for it.
Do not hope that the set is complete; be sure to check the presence of all parts when purchasing; furniture is assembled by hand at the factory and the human factor must be taken into account.

Assembling a closet in 5 steps
Furniture in the budget sector is made either from laminated chipboard or laminated MDF; assembling these cabinets by hand is not difficult, but it is advisable to take care of an assistant, at least for support.

Step #1: Assembling the base
In this case, we need to install the legs on the base plate and secure the fittings for subsequent installation vertical walls closet
| Illustrations | Recommendations |
 |
Legs are marked.
In some models, legs are not provided at all; they are installed on stands made of the same laminated chipboards, but more often the set includes adjustable legs. Here you need to see if there are holes in the base plate for these legs; if they are there, then assemble according to the diagram shown in the photo on the left. |
 |
Legs are not marked.
This situation occurs in budget models. You need to mark the mounting points and screw the legs to the base with self-tapping screws.
|
 |
Mounting hardware.
The vertical walls are secured with pins for minifixes, the standard diameter is 4 mm, but there are other models. |
 |
Installation of pins.
There are ready-made holes in the base for these pins; you just need to take a tool and screw them in.
|
Step No. 2: assembling the body
If up to this point you could do everything yourself, now it’s time to call an assistant. It is needed to keep the walls vertical. There is no need to fix the cage to the base right away; first install the shelves so that the cage stands on its own.

Horizontal shelves are assembled using furniture confirmants; they are also called Euroscrews. In ready-made kits, the holes for them are already drilled; you just need to insert the confirmant into these holes and screw it in tightly using a hex key, then cover the head with a plastic plug.
It is better to screw in the confirmands manually with a wrench; if you use a screwdriver, you can overtighten and break the thread.

Now it's time to firmly attach the cage with shelves to the base and top cover. For these purposes, so-called minifixes are used; they are something like a “tablet” with an eccentric inside.
The diameter of furniture minifixes is 16 mm when you install vertical racks onto the pins, the head of the pin will be visible in the side hole of the post. A minifix is inserted into this hole and turned clockwise.

Thus, the two elements are tightly pulled together. In this case, the technology is the same both for fastening the base and for fixing the top cover.
Step #3: back wall
The back wall in such cabinets is made of painted hardboard (dense fiberboard). The sheets are cut on machines, so there is no doubt about their shapes, the problem is that the back wall is composite, that is, it is assembled from several sheets, so assembly takes place in 3 stages:

- First, you need to check how smoothly you assembled the box. To do this, we use the old-fashioned method - we measure the diagonals. The size of both diagonals should be the same. If something is wrong, check the tightness of the minifixes; usually small deviations are caused by uneven tightening;
- Now call an assistant and ask him to hold the box in the desired position (so that it does not skew in any direction). At this time you apply bottom panel hardboard to the back wall and nail it to the posts with nails or screw it with small screws;
- Next, put the plastic H-shaped connecting profile on installed panel and mount the next one in exactly the same way. The minimum step for fixing panels on racks is 100 mm, well, this is at your discretion, for example, in soviet cabinets The back wall was fastened with self-tapping screws at 30 mm intervals.

Step No. 4: installation of door guides
Before installing the guides under the sliding doors, the base of the cabinet should be aligned clearly to the horizon, with level control. This can be done using adjustable legs.
| Illustrations | Recommendations |
 |
Equipment.
Budget models use roller doors supported on a bottom rail, with rollers running along it. On top there are W-shaped profiles that control the movement of the door leaf. |
 |
Attaching the upper profiles.
All profiles come without mounting holes; you will need to drill them with a drill with a diameter of 4 mm. Then screw the profile with self-tapping screws to the top lid of the cabinet. |
 |
We put stoppers.
Stoppers are needed so that the door rollers are fixed in them and the doors do not move apart spontaneously. You just need to take pliers and insert the lock into the groove of the profile. |
 |
Lower profile fastening.
The instructions are similar: drill holes with a diameter of 4 mm and attach the profile to the base with self-tapping screws (the stoppers should already be in place). |
Lately, sliding wardrobes have become increasingly popular. They are compact and convenient for storing all your daily necessities. The sliding door hides not only clothes, but also shoes, accessories and even necessary household appliances. This allows you to save a lot of space in your room due to rational use every centimeter of your room.

A sliding wardrobe can be installed not only in the bedroom, but also in the living room or hallway. It does not take up much space, so it will fit even in a small apartment. All these characteristics are relevant for a simple and inexpensive Basya wardrobe, which will be discussed in this article.

Characteristics and Features
This cabinet is perfect for those who are slightly on a budget and looking for an inexpensive cabinet in a compact size. This model costs two or even three times less than its analogues, but at the same time it looks just as good and serves no less. It is available in several basic colors, so you can choose a cabinet that will fit perfectly into any interior you choose. The closet is spacious enough, so you can fold and hang in it not only things from your basic wardrobe, but also things that you don’t currently wear or use.

The only drawback that almost all buyers note is the difficulty in assembling it. More precisely, the lack of simple and clear instructions, which explains in detail how and in what sequence you need to assemble Basya’s wardrobe.

How to mount
The easiest way to deal with all the complexities of installing a Basya wardrobe is to entrust this process to professionals. But, if you don’t want to spend extra money, or are simply used to doing everything yourself, then you can try to assemble your furniture yourself.

This process begins with the installation of the frame. All design details are marked with a special number, which is also indicated on the drawing. Assembling the wardrobe body begins from the bottom corner. To do this, one of the side walls is attached to the bottom. A parallel wall is installed nearby. The installation is completed by fastening the roof.
When the frame is ready, you can nail the back wall to the base. Chipboard sheets are attached using self-tapping screws. They begin to be fixed from above and fall down. The back wall must be secured both from the outside and from the inside. After completing this process, it is advisable to check whether all parts are securely fastened - an installation error can significantly reduce the life of the cabinet.


Having secured the main parts, you can fix individual shelves inside the cabinet. To secure the five shelves, you will need self-tapping screws, wooden dowels, glue and a drill. Top tip, which is worth remembering when installing shelves - you need to start at the top and work your way down. When installing shelves, pay attention to the fact that their front edge is in front, and not rough, raw edges.

The most difficult step is installing the door. Sliding mechanism Wardrobe doors must be installed so that the door opens and closes well. How convenient it will be for you to use the wardrobe depends on how correctly the mechanism is installed. All rollers and fixing elements are included with the main parts. Additionally, there is also a mirror for the facade on a film basis. Finally, after all these procedures, close all visible holes with the decorative plugs included in the kit and check the quality of the assembly.


You can determine the quality of the Basya wardrobe based on several simple details. First of all, a well-mounted cabinet stands level on the floor, without tilting anywhere. There are no cracks or openings at the fastening points. And the compartment door slides smoothly when opening and closing and does not make any unnecessary sounds. A properly installed closet can be moved to the desired area and you can start filling it with things.


