Annual grasses are what those inexperienced in modeling disparagingly call “weeds.” You and I, dear colleagues, understand that not a single diorama, even the tiniest one, can do without grass; it is an integral element of the overall holistic picture, helping to create the illusion of the authenticity of what is happening.
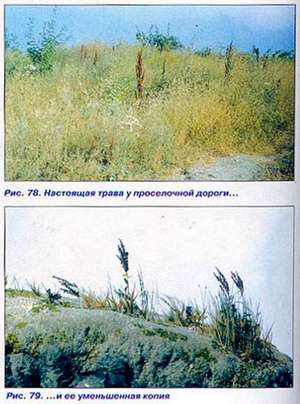
Hundreds or even thousands of species of grass grow on any given section of virgin steppe or the side of a country road (Fig. 77. 78); of course, we will not copy all of them. Our task will only be to convey the general impression of the forbs - texture, color, volume (Fig. 79. 80). And, I must say, our means of expression here are quite limited. Let's see what we have? First of all, it makes sense to organize an expedition into the forest or the nearest wasteland to collect natural materials. Moreover, this must be done throughout the summer, or rather from early spring until autumn, throughout the entire process of plant formation. Not the entire plant will be used, but only some of its elements. For one it is inflorescences, for the other it is roots. For example, a panicle of a reed inflorescence, disassembled into elements of three leaves, conveys the impression of bushes of some kind of cereals (Fig. 81).
In the forest, your attention will be attracted by the deliciously cute mounds of moss. Here are the seemingly ready-made lawns, take them and place them in a diorama. After a detailed analysis, you come to the conclusion that the moss is too recognizable and cannot be used without its radical transformation. Having wandered around the fields to your heart's content, you understand one thing: little in nature resembles anything on the scale we need.

Dry plants are very fragile and crumble to dust when touched. Therefore, the collected and dried natural material must be properly processed and soaked for a day in an aqueous 15-20% glycerin solution. You can add aniline dye of the desired shade to the water (Aniline dyes, chemically prepared dyes, dissolve in water without sediment. Designed for dyeing fabrics, in stores household chemicals sold packaged in sachets in powder or tablet form. They paint not due to hiding power, but by penetration into the structure of the material. They don't have a partner, they get divorced hot water and in glassware and can be stored indefinitely). At the same time, the color of fresh, juicy greenery is best restored on a plant that has completely turned yellow (or has been prepared as such) during the drying process, while what was green yesterday, dried and soaked in a bright green solution, becomes dirty brown.
Collected natural materials Let's add some helpers. For example, sawdust sifted through a fine sieve and painted dark green with aniline will depict low-growing grass spreading along the ground - knotweed.
We cut a rope from a natural long-fiber material - sisal - into small pieces and dye it with aniline in the colors of withered dried grass, young juicy greens and dark grass. Dry and finely cut with scissors (1-1.5 mm). We will mix the resulting “palette” and different proportions, obtaining areas with dried grass and more juicy ones (Fig. 82).


It would seem that stems could also be made from sisal tall grass, cutting the pieces longer, but the fibers are relatively thick and the ends cut at right angles on a 35 scale will be noticeable. Therefore, I advise you to use pig bristles here, for example from a paint brush (Fig. 83). Its advantage is that each bristle becomes thinner towards the end, moreover, it bifurcates and spreads out, which makes it even more similar to a grass stem. The bristles can also be given various vegetable flavors using anilink (without glycerin). We remind you once again that it is used only top part stubble.
Let’s start “planting” by applying drops of glue onto the textured soil with a brush (do not use “Moment”, it darkens over time). Apply drops haphazardly in single “patches”, groups merging into the lawn and sprinkle with finely trimmed sisal or sawdust. Sweep away those that do not stick and use them again (Fig. 84-86).
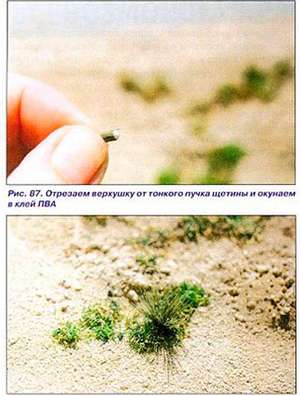
Now let’s create, as it were, a second tier of taller vegetation. We cut off the ends of tufts of bristles 5-10 mm long, dip the root end in glue, glue it, and fluff the top in different sides(Fig. 87, 88). Such bushes can be green and “yellowed”, or if you get really sophisticated, they can be green at the roots and yellow at the top. In the same tier you can place the bushes, roots, and twigs you have collected.
Plants of the same species are often not located at the same intervals across the lawn, but their closest relatives are grouped in a unique area in one area. There are botanical explanations for this, this must be taken into account, and this, in turn, corresponds to human ideas about aesthetics.
Now there is a layer of tall growing grass. Long bristles can be glued individually, orienting their bend in one direction and thereby creating the illusion of a breeze. Species diversity The plants can be slightly expanded by smearing some of the bristles with glue and sprinkling with sawdust to imitate inflorescences.
Plants with lamellar leaves: burdock, bear's ear, rosebud, etc. are made in the same way as described in the chapter on deciduous trees.

And final reliable appearance your forbs will be given several custom-made plants with a “portrait” resemblance. For example, among the general golden-green background of the mass of grasses, the red-brown panicles of horse sorrel stand out with contrasting strokes. Let's try to make a mini-portrait of him. Dip the ends of the bristles into glue and sprinkle with fine sawdust of the appropriate color. Cut it off and glue it onto the “stem” with a whisk. We supplement it with several narrow oblong leaves (Fig. 89).
Deciduous trees
Each type of tree has its own external distinctive features, silhouette. Before starting work, decide what kind of tree you will choose, so that it is not some abstract tree in general, but something specific: poplar, maple, chestnut, etc. Having chosen, take a close look at the original, sketch, photograph. In this case, we will describe the method using the example of making a “model” of oak.
Based on your sketches, select a suitable branch for the trunk. It is desirable that it somehow resembles your prototype, but does not necessarily have a developed system of branches; we will glue the missing ones and form a crown of the main skeletal branches (Fig. 90, a).

Place the trunk on the table, try on how the branch will be positioned in space, adjust it in place, cut the tip at an angle, dip it in PVA glue and put it in place, fix the branch in space by placing a support. After the glue has dried, pour PVA onto the gluing area a couple of times. This process is not labor-intensive, but time-consuming. Attach the next thread completely dry previous one.
No matter how much your branch resembles a real trunk, we clear it of bark, which on an adult tree should be covered with a network of cracks. We will imitate this by using the smallest number of the gravel (a cutter for graving on linoleum) or make such a tool specially. We cut the grooves, guided by a photograph or sketches (Fig. 90. b).

The cracks should not be located geometrically correctly, like a mesh pattern on women's stockings; allow for some artistic cement without order, randomness (Fig. 90. c).
Growths and sagging of bark can be imitated using putty (Fig. 90. d). The places where the main large branches extend from the trunk can also be puttied and then ring-shaped grooves can be applied.
We paint the trunk and main large branches before gluing small branches and foliage. Carefully paint the grooves with dark brown, almost black paint, which can be made from mascara. Once dry, use tempera of a dark gray color, lighter than the previous one, to paint the “scales” of the food with a semi-dry brush, being careful not to get into the cracks (Fig. 90, f, 97).
We glue smaller ones to the main skeletal branches, which will give the silhouette of the tree an openwork pattern (Fig. 90. f). For them you can use the stems of annual herbaceous plants, selecting suitable similar ones, i.e. having many branches. These may be differences in inflorescence, so harvest them better in spring When the plants are formed, dry and preserve them by immersing them in an aqueous 5-10% glycerin solution for about a day. They should be glued as described above. If they differ in color, then the finished crown can be blown out with tempera using an azrograph.
Until now, the leaves were considered the most difficult stage. It was proposed to dress trees, instead of foliage, in foam rubber crumbs or paper cut with scissors. But the diorama is designed to be viewed at close range, and any falsehood or obvious props immediately catches the eye. Meanwhile, everything ingenious is simple and the solution to the problem hung over our heads all the way - the leaves are already there and always have been. You just need to reduce them to the right size. This does not require any complex devices and all the necessary equipment can be made in 10-15 minutes.
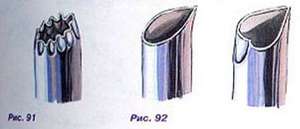
For the purity of the experiment, let’s take the most complex oak leaf of all in configuration. Select a thin-walled brass tube, slightly larger in diameter linear dimensions sheet (the circumference of the tube must correspond to the perimeter of the sheet, taking into account all its bends). We sharpen the edge and bend it with a wave inward and outward; like a bottle cap (Fig. 91). Make sure that the cutting is symmetrical about the axis and slightly elongated.
We check whether we have damaged the cutting edge, correct it if necessary - the tool is ready! Have you timed it? And it’s not worth talking about such “trifles” as birch, poplar, and linden leaves. I selected the tube according to its diameter, sharpened it, squeezed it with a “boat” or a “heart” - ready! And trees, and shrubs, and herbaceous annual plants burdocks, budyaki, bear's ear and coltsfoot, from now on nothing will restrain the flight of your imagination (Fig. 92).
We harvest foliage in bulk. Naturally, we take “fresh” thin, not pubescent leaves, preferably from trees (for example, cherry trees). We must place a piece of rubber on the floor of the sheet (a mat, a tire or a special mat for cutting), and cut it out with our tool. To make work easier and to avoid the danger of injuring your hands, you can put a cap from shampoo or cosmetics on the non-working end of the tube. If you were cutting leaves out of paper, you would have to hit the tube with a hammer and cutting edge I was constantly dull, but here the efforts made are insignificant, a light pressure of the hand is enough.
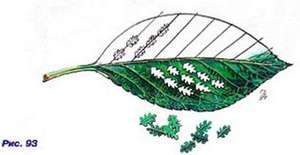
Position the tool along the veins of the leaf so that it runs exactly along the axial line (Fig. 93). Thus, we kill another hare and gain unexpected benefits, because... Our leaves are all similar to natural ones - they have a vein running along the axis of symmetry, turning into a stalk, and all this in one operation!
You can cut out 10-15 pieces in a row, and then push them out of the tube with a rod from the opposite side. Dry the prepared leaves overnight. We have received a semi-finished product for now; they cannot be used in this form. They are fragile, deformed and lost color. You can restore their freshness and elasticity by placing them in an aqueous solution of glycerin (5-10%) for a day. In this case, it is advisable to immediately tint the water with green aniline paint to match the color of the foliage. The water that was previously in the leaves is replaced by glycerin, they will straighten, the paint will give them a fresh, natural look. After soaking, strain through cheesecloth and, without squeezing, place on several layers. toilet paper for drying.
Aniline dye is used that is intended for home dyeing of cotton or woolen fabrics (the type of fabric, in this case, does not matter).
If you need to make autumn leaves, then look for yellow ones, because... You cannot repaint green ones with anilink. Autumn leaves You also need to tint it with paint when wet.
It is better if the leaves are not all the same size, but at least two - “main” and “slightly smaller”.
You can glue leaves to a tree like this: grease each branch with diluted PVA glue and sprinkle with leaves. Or you can do this: dip the stalk of each leaf in glue and glue it to a branch, arranging them naturally the way they grow in nature, which is probably preferable (Fig. 94). Still, you have already done a colossal job, it’s a pity to spoil it with leaves glued somehow, at random, at random, but it is wiser to combine both methods and glue it inside the crown “sprinkling”, and along the perimeter and, especially in the foreground, “leafwise” "(Fig. 95. 96). In addition, some small branches, for ease of work, can be equipped with leaves before gluing them to the tree.
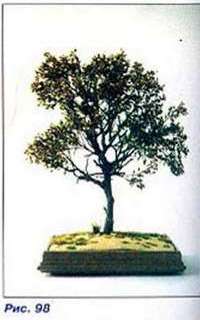

As you know, the oak tree is the last to shed its leaves and turns yellow in the fall not because chlorophyll breaks down, but because it dries out on the tree. Moreover, in early autumn the leaves first seem to brown at the top of the crown (Fig. 98. 99). It is this period of autumn that I try to convey by blowing out the top of the tree tangentially with golden tempera from an airbrush. Keep in mind that after drying the leaves will decrease slightly in size.
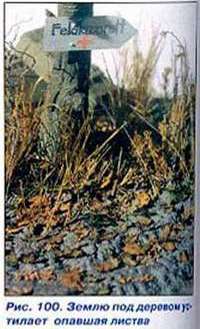
The ground under the tree should be strewn with “fallen” leaves (Fig. 100).
Coniferous trees
This is perhaps the only case of using moss in modeling, but in this case it fits perfectly both “anatomically” with the structure of the “legs” and the texture is very reminiscent of pine needles.
So, again there is a reason to go to the forest. Harvest fluffy moss with long, “spreading” stems. Dry it thoroughly, and contrary to the recommendations of pharmacists for preparation medicinal plants, fry in the sun, spread out on the windowsill, until the moss turns yellow, the better it will then restore its natural color when soaked to aqueous solution glycerin and aniline.
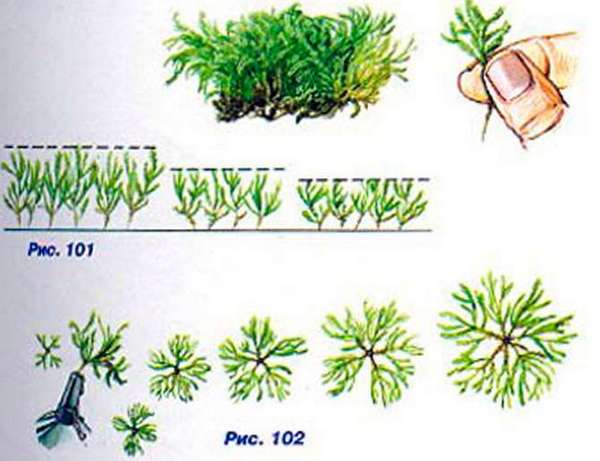
We disassemble the “cap” into separate branches (Fig. 101) and place them in the solution. Since moss absorbs moisture very well, 5-6 hours will be enough.
Lay the material on several layers of toilet paper and let it dry for at least a day.
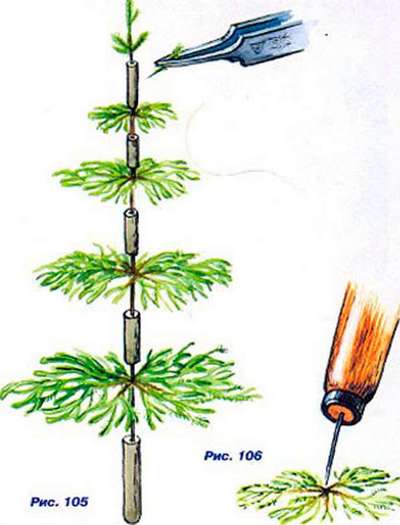
We used the old "grandfather's" method of making artificial Christmas trees, when tiers of branches and cylinders of segments of trunks are strung alternately on a steel knitting needle.
Let's sort the "legs" by size, the 5-6 longest are the bottom tier, the same number are shorter, etc., according to the number of tiers on the future tree. We glue branches of the same size together in the form of a “star”. To do this, dip each tip into Moment glue and, after drying it a little, connect it (Fig. 102). In order for the “tiers” to acquire an orientation primarily in horizontal plane, they can be placed under a small press for a day (put 1-2 magazines on top).
Let's make a barrel. We wind several turns of thin paper onto a piece of thin copper wire, fixing the last turn with glue. Moreover, the thinner the paper, the easier it is to wind it tightly, the less noticeable the joint will be and the thinner the trunk can be made at the top (Fig. 103). Three such tubes need to be made different diameters: minimally thin apical part, thicker - the middle part of the trunk and even thicker basal part.
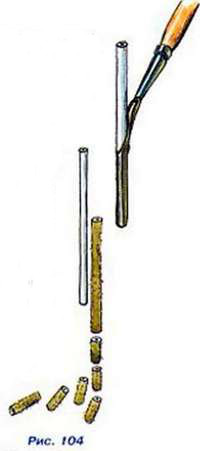
Paint the tubes a grayish-brown color and sprinkle a little fine powder over the wet paint sawdust to create a “spiky” texture. Now you can start assembling the tree. We will cut the trunk blanks into cylinders 5-6 mm long (Fig. 104) and alternately string pieces of the trunk onto a piece of wire, starting with the thick one, and tiers of branches (Fig. 105). Before stringing, the branches at the gluing point must be pricked with an awl (Fig. 106). We string the last upper cylinder slightly longer than the remaining tip of the wire, and glue a short branch-top into the resulting hole.
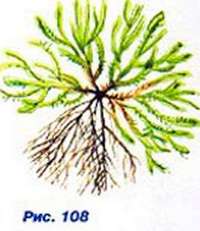
Of course, this is true only in the general case, but in reality such regular pyramidal Christmas trees grow only near the city administration building (Fig. 107). In the forest there are all sorts of them, both young and old, and some of their branches have no needles, especially the lower ones. Intertwined, they create a kind of openwork, which can be imitated by dill leaves dried between the pages of a book (Fig. 108).
When creating dioramas or a beautiful figurine stand, artificial grass is often used.
I'll try to tell and show how I make grass from sanitary flax in 35th scale. Tools and materials I need:
* Actually the plumbing itself. When purchasing from a hardware store, you should choose flax that has a uniform structure without large components.
* Supergel. It's supergel, not superglue.
* Acrylic paint green/grass/, white, Brown. I use AKAN.
* Paint thinner. I use technical alcohol. (It smells bad, but dries quickly).
* Airbrush. Unfortunately, it’s impossible without him.
* Latex gloves. To avoid staining your hands when dyeing linen.
* Dental probe. Or a large sewing needle. It’s just that the dentist’s tool is very easy to use.
* Scissors and tweezers.
* Well, and the very base of the diorama/vignette. Here, everyone does it in their own way. It is important that the supergel securely fixes the flax to the surface of the base.
Linen must be thoroughly “fluffed”. Otherwise, when painting, everything will stick together.
We paint it, preferably with an airbrush, in three or four shades of green. We simply add different shades to the base green paint.
We take the dyed flax and cut it with scissors into various lengths, approximately 1.5-2.5 cm - according to the height of the future grass. We cut all dyed flax in this way... and undyed flax too!
Mix each pile of chopped flax. With your hands, you need to spare no effort. Then we “cross” them with each other, gradually adding other shades to the main color. At the same time, we remove such stuck together “blades of grass” from the “batch”. After obtaining a homogeneous mass, add undyed flax to it. Of course, stirring. We get a haystack.
We take out a bunch of greenery from the general pile and use scissors to straighten it on one side. Apply a little supergel to the trimmed part of the bun. Now we plant our grass on the ground in small portions. Then we pick up a large sewing needle or something like it. We insert it one or two millimeters from the base into the grass. And we begin to thin out too thick growth with movements from the base. We remove unnecessary things. Then, by the way, it can be reused.
We trim what sticks out too much. The photo shows that our grass is very uneven in height. It turns out there is grass in the yard. On the grass - “for firewood”, this is for scale :).
It is better to plant grass when the purpose for which it is there is well defined, since grass made from sanitary lint turns out to be tough. And it will be vitally impossible to press anything into it. But, in principle, after landing, you can pull it out in accordance with the design and location of what should be in it/on it...
I will be glad if my vision of the embodiment of grass from sanitary lint in miniature will be of interest to you and will be useful when building a diorama or vignette.


Using weed from artificial materials limitless. This is an excellent basis for creative exploits for those who like to create original crafts, and for novice room designers.
Artificial grass in the interior
As a rule, indoors such material is usually used for modern original approaches to design. Therefore, artificial decorative grass is most often found in projects where styles such as minimalism or the Scandinavian modern trend are chosen.
As for the place where this material is used, it is most often small original sculptures or a replacement for traditional textiles. Just imagine that on your balcony instead of bedding you have soft green lawn. They also decorate children's rooms where a soft covering is needed.
There are more original options using artificial grass for apartment decoration. Don’t limit yourself to anything and replace your usual textiles and plastic with this material. Eg, original pillows made of grass, some even decorate the head of the bed like this. Moreover, pillows can be small on the sofa or huge as a relaxation area. It is important that the artificial grass adhesive you choose is suitable for indoor use. Typically, manufacturers recommend so-called polyurethane types of glue for artificial grass. They securely fix and are not dangerous to human health.
Artificial Grass for Crafts
While large designer interior and decor items can cost an impressive amount, it is quite possible to make decorations for a medium-sized room yourself. For example, tall artificial grass for decoration in interesting flowerpots is in itself an excellent decoration for higher shelves in dark corners. And if you use it to create topiaries or simply original compositions, it will turn out great.
Artificial decorative grass is perfect for Christmas or Easter compositions with a rabbit, it will become the basis for wall panels, and you can also use it for decoration. Even regular wall made from grass will look very original. Artificial grass for decoration it will best fit into the rooms where they were used light shades natural colors, white, many glass objects. The room will be light and spacious, full of air.
 |
 |
 |
 |
Creating naturalistic landscapes in 3D is enough complex process. After all, the creation of objects such as trees, bushes, grass, lawns, etc. can contain a huge amount of detail, and if you start creating each object separately and adding it to the scene, it will take a lot of time and the computer may freeze during rendering. This tutorial is about creating 3d herbs in 3D max and will help those who create scenes with nature. In this lesson we will look at creating 3d herbs(lawn) using the Hair and Fur modifier.
To start creating grass, let's create a plane on which our 3D lawn will be.


Select our plane, and then in the modifiers menu we find the Hair and Fur modifier and turn it on.


As you can see in the picture, the 3d grass we created needs adjustments, so we need to adjust the Hair and Fur modifier. In the General Parameters menu, we find: Hair Count – the number of blades of grass on the plane, set it to 120000, Hair Segments – the number of segments on a blade of grass, leave it at 8, Denisty – for the density of hair placement, set to 100, Scale – scale, set it to 25, Tip Thick – the thickness of the blades of grass at the tip is 0, Root Thick is the thickness of the blades of grass near the roots 3 and the Displacement parameter is the distance from the grass to the surface.

Now we need to adjust the color of the grass. Open Material Parameters, Tip Color – the color of the tips of the grass, Root Color – the color of the roots of the grass, set the parameters as in the picture below.

Then open Tools, Style Hair and adjust the shape of our grass.

Now our field is ready and the scene can be embellished by adding a tree, sky, sun, or you can give the scene a more realistic look by changing the relief of the clearing.


