With redevelopment or capital, many have an irresistible desire make communications less visible. This is quite natural, because thin pipes that run on almost every wall can cause deep irritation. Needless to say how much they can spoil even dear and modern interior? Of course, it is possible to make the room more aesthetic and neat, but it is necessary to approach the work process wisely. So that you don't have any questions after reading this article, we will take a closer look at what types of pipes can be used in the bathroom, regulations their disguises and most used ways to hide pipes In bathroom.
1. Types of pipes and their purpose
Material quality, from which are made or, directly affects their strength, reliability and wear resistance. Not all types of pipes can be used, for example, for hot water, or for, if there is one in the bathroom. All variety of pipes can be divided into three categories:
Metal pipes
Which, in turn, share on two kinds:

Plastic
Exists three varieties of this product:

Reinforced plastic
In order to perform plastic sheathing, it is necessary to make frame base. As materials, you can use wooden strips, metal profiles or plastic U-shaped corners. The process is very similar plastic ceiling installation technology. Before attaching the frame, be sure to mark it with a plumb line or. Now fix all the planks around the perimeter of the selected area. If the area is large, do not forget to add some elements in the middle for stiffening. Now cut the plastic panels into pieces of the required size. The first panel will be attached to the profile. They should be screwed into the locking part. Next, simply connect the panels to each other using special latches. The last element is also fastened with a fixing screw. For reliability, you can screw in a self-tapping screw in the middle of the first and last panels from above and below. But not on every one, otherwise it will be difficult to disassemble the structure as needed. Now, to give the screen a cleaner look and hide all the fasteners, use decorative corners.
Installation of the screen under the bathroom will have similar technology. The lower bar is attached directly to the floor, and the upper one end to the wall, and then held with spacers, which must be placed at a distance of no more than 40 cm from each other. Plastic cladding is performed in the same way. With the help of the screen, you can also hide the communications that go to the sink itself and to the sink, if it is nearby. And if you equip it with a small window, then you will also store household chemicals there. And the bathroom, decorated in this way, looks more aesthetically pleasing. In the same way hiding and pipes passing over the most gender and even counters. This step will be narrow and neat. It can even be used as a small shelf. 
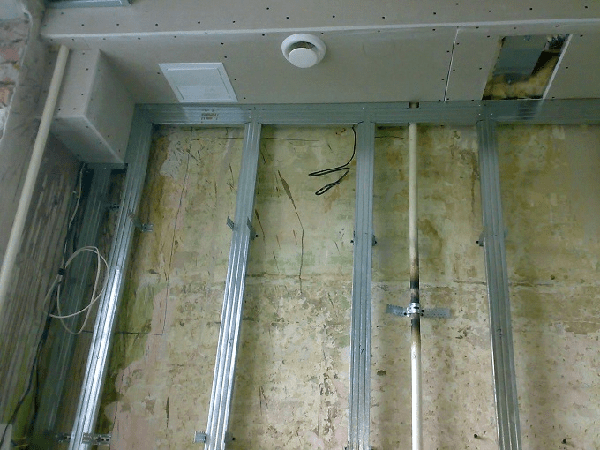
No. 4. Plasterboard box or false wall
It's already over complex ways disguises that require large financial costs and time to complete them. With the help of a box, you can hide pipes that oriented how vertically, and so horizontally. And just like plastic, they can sheathe the bath. The only difference is that drywall needs subsequent additional cladding. Remember that in rooms with high humidity, you should only use moisture resistant materials!
The actions will be similar to those described above. A frame of the required size is mounted from metal profiles in the desired location. Naturally, before this, the straightness of all faces must be checked using a level. After that, pieces of drywall of the required size are cut, and with the help of self-tapping screws suitable for the installation of this particular material, they are attached to the frame. When the frame is assembled, it is necessary to prime the surface, stick a special mesh on the joints and apply a layer of putty. After that, you can carry out the finishing cladding with suitable materials. Such trimmed frames look very good. Thanks to its small size they do not spoil, but, on the contrary, complement the interior premises and create additional accents in it. Thus, even flaws can be turned into something beautiful and useful.  Concerning false walls. It is most appropriate to build it in front of the location of the risers, especially if installed in front of them, as is the case in most cases. There is no need to transfer it. After all, modern models involve installation close to the wall, in which we will hide the lower volumetric corrugation. The only one disadvantage such element is usage useful area of the room. Here you have to choose - aesthetics or dimensions. A maximum of such a ledge will have a width of 30 cm. But behind the false wall, you can hide both filters and counters. It is not recommended to make her deaf. Above the toilet, you can make a cutout, equip it with hinges and hang a beautiful door. A box is made of metal profiles, which will fence off the pipes from the general space of the room, and sheathed with plasterboard. Further finishing is strictly according to your taste.
No. 5. Tiled frame
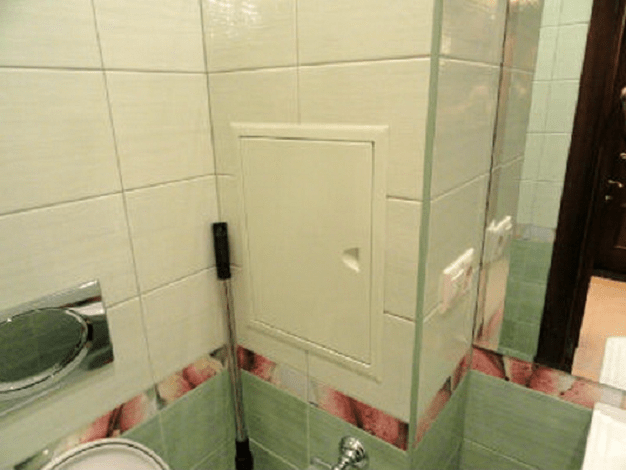
This does not mean just a plasterboard surface sheathed with tiles, namely collapsible tile structure. It is good because at any time you will get access to problem areas. without having to destroy walls. Dismantling can be done using the usual, and then collect everything as it was. In addition, if you perform the cladding with the same tiles as on the walls, then no one will understand that there is something hidden there.
For the construction of the frame to you you will need:, tile cutter or hacksaw for metal, metal profiles, plastic corners, self-tapping screws and itself. A frame is installed from the profiles, which is attached to the floor, to the ceiling, and to the adjacent walls. For this, there are special metal staples. After the frame is ready, it is necessary to measure its edges, on which the tile will be attached, and cut the tile. Do not forget to take into account the thickness of the tile if you want one face to go over the other. Now, with the help of a drill and feather drills, it is necessary to drill two holes along the edges of the tile for self-tapping screws. Then attach the tiles to the frame and make marks on the profile with a marker in the center of these holes. This will ensure you get exactly where you need to be and perform the installation without skewing. But mind you that the holes in the tile should already be such that the self-tapping screw freely passes through them. While in the profile, they should be smaller. Otherwise, you just do not twist them. When all the tiles fall into place, the corners and attachment points are closed with decorative plastic corners. In the right place, you can make a gap between the tiles and install a neat plastic door there, in case there are water meters.  At work with tiled tiles don't forget about your own safety. When cutting, the tiles have very sharp edges, therefore it is recommended to work with gloves. A little advice- If you wet them before cutting, you will reduce the likelihood of chipping at the edges or cracking. Do not forget about safety glasses. In case of destruction, the glazed top layer crumbles into small sharp pieces and scatters over a long distance. In case of contact with eyes, they can cause irreparable harm.
No. 6. Plumbing shutters
Blinds or roller blinds Is very unusual way a disguise that is rarely seen in apartments. However, he is very convenient and original. This design can provide the most full and easy access to pipes practically along their entire length in a matter of seconds. There is a special version of them - two options for raising / lowering - electrical and mechanical. The choice should be based on the size of the canvas. With the width of the closed opening up to 52 cm inclusive, a manual control system on a cord mechanism is sufficient. If the surface area is larger, then such systems are equipped with a spring mechanism. The only thing condition, which is obligatory must be done in the presence of an automated lift - the motor housing must be located in a sealed housing, which does not get moisture and dust. V frame quality a plasterboard structure, a plastic box or a false wall can serve. To provide stable performance roller shutters, it is necessary that the sides of the frame structure are strictly parallel to each other. Otherwise, jamming is inevitable, since the skew, even a slight one, will not allow the rollers to freely slide along the grooves.
There is two mounting options- when the roller shutters are located on top of the box or when the box is located around the curtain. The first option is suitable if the risers are located in a natural niche. Then a profile is simply installed along its perimeter, on which the blinds are attached and form a single plane with the wall. The second option implies protruding structures, the side parts of which are protected with plasterboard and lined with appropriate materials, and the front part is closed with shutters. When installing the canvas with a cord mechanism, it. A significant plus this method is to maintain the size of the room. Remember that according to generally accepted building codes, it is not allowed to shtrob and thin-walled partitions in panel houses. The main disadvantage this method is to restrict access to pipes in the event of an accident. Therefore, before giving preference to this type of disguise, once again carefully read paragraph 2
this article and stick to it strictly. AND necessarily before starting work draw on the paper layout plan. When you have determined exactly the location of all the plumbing elements, you can start chipping the walls.  To avoid distortions and other irregularities, draw preliminary lines on the walls and try to adhere to them. Depending on the material of the walls, you can get by with a perforated drill, in extreme cases, you will have to use it. Will be very a lot of dust, therefore use a respirator and goggles. When all the grooves are ready, remove debris from them, open them with a primer and lay pipes in them. Wait a few days to make sure all connections are tight. Then fix their position with cement mortar. Only after complete drying is it allowed to start facing work.
5. All pros and cons of masking pipes in the bathroom
Naturally, like any process, there is how positive, and so negative sides. Let's start with good:
- First of all - aesthetic interior your room.
- When hiding in the wall - conservation of area premises.
- When masking with furniture elements, the occurrence extra space for storage and the ability to create a beautiful interior.
Now about sad:

That's all basic moments. But you should not completely abandon such an idea. After all, she requires, only, literate and responsible approach to yourself.
A bathroom is a more functional room, however, when designing it, one should not forget about one's own comfort and aesthetics. Very often, during repairs, homeowners strive to tightly hide all engineering communications, brick them inside the wall or cover them with panels. However, this decision is often dubious, because in the event of a leak or other malfunction, it will be necessary to dismantle the pipes and spoil the expensive repairs.
In this article, we will tell the secrets of experienced finishers how to close the riser in the bathroom with drywall or other material so that it looks beautiful, but does not interfere with the maintenance of communications.
Fundamental rules
As a rule, a lot of all kinds of pipes pass in the bathroom, from plumbing to sewer. Excessive, not too aesthetic details spoil the interior of the room, distracting attention to themselves, so most homeowners try to hide them during the renovation process.
If you are determined to close the risers or other utilities in the bathroom, then the following rules must be observed:

Please note that during the installation of the box for plumbing, sound insulation made of mineral wool or foam must be provided in order to reduce the noise level inside the bathroom.
Many, when deciding how to close the risers in the bathroom, opt for drywall. Moisture-resistant drywall is a practical, inexpensive material from which it is very convenient to mount the box.
It is resistant to moisture, any facing material can easily apply to it. To work with this material, you will need steel guides, self-tapping screws for drywall, a grinder or a hacksaw for cutting sheets, a perforator, a screwdriver.

The installation process is as follows:
- First, a frame is constructed for a box with risers. It can be made from steel profiles or timber bars. It is better to use profiles as they are stronger and more durable. If the box is to be tiled, it is better to use a reinforced profile that can withstand a lot of weight.
- The guides must first be attached to the walls and then to the floor.
- Then, using a hacksaw or a grinder, a sheet of moisture-resistant drywall is cut.
- After that, the drywall blanks are fixed on the frame guides using self-tapping screws and a screwdriver.
- Lastly, the plasterboard box is putty, covered with a deep penetration primer, and then revetted with a finishing material.
Note! Many homeowners, when mounting a box under pipes made of moisture-resistant plasterboard, followed by tiling, do not make an inspection window for fear of spoiling the appearance of the structure. However, now in hardware stores, invisible revisions are presented, which are tiled and do not stand out against the general background of false walls.
Plastic panel construction
In addition, in the event of equipment failure and the need for repair, the plastic panels can be carefully removed and then fixed back without causing much harm to the decoration of the room.

To work with plastic you will need:
- Plastic panels of the color you like.
- Bars, plastic or metal profiles for the manufacture of the frame.
- Plastic guides for fixing panels.
- Plastic corners for decorating external corners.
- A hacksaw or jigsaw for cutting plastic sheets.
The advantage of this option is that you can build a plastic structure with your own hands, and even if the repair in the rest of the room has already been done. The work must be done in the following order:
- First, we mount a masking box around the riser made of metal guides, plastic profiles or wooden blocks.
- Then, on the top and bottom of the box, we let the fixing strip for the panels.
- After that, carefully close the box with plastic panels.
- At the final stage, we glue the corners to the outer corners with silicone glue so that the structure looks neat.
Please note that the plastic box cannot be tiled or any other finishing material, it cannot even be painted. Therefore, immediately choose the panels of the color and design that suit you.
Options that do not require installation
It often happens that the appearance of a bathroom with open risers strains homeowners, but there is no way to start something drastic. In this case, you can use the ideas of masking communications with improvised means:

Video instruction
21824 0
Sewer and water pipes with shut-off valves located in the bathroom or kitchen in the visible area do not add aesthetics to the decoration of the room. At the same time, pipes of cold water supply and sewage systems are also an undesirable source of cold, which lowers the temperature in the bathroom. In addition, condensation forms on the surface of these pipes, flowing down to the floor and requiring constant cleaning.
Before hiding the pipes in the bathroom, it is necessary to conduct a thorough inspection.
Consider ways to solve these problems, depending on the location of the pipeline and its purpose.
Installation of new systems during construction or major repairs
This situation simplifies the solution of the issue, since installation "from scratch" with a properly thought out sequence of repair work allows you to repair the bathroom with less effort and time.
Installation of a water supply system for finishing with tiles
The routing of water pipes to hide the water supply system is carried out along the walls before leveling plastering is performed. So that the plaster layer for covering the pipes does not have to be made unnecessarily thick, channels for the water supply are grooved in the walls of the bathroom. Using a grinder with a "dry cutter" according to the markings made on the walls, parallel cuts are made at a distance of the diameter of the pipes used, after which the material between the cuts is cut with a puncher or chisel with a hammer.

The hidden pipes under the tiles must be of excellent quality, then their service life will be as long as possible.
Pipes in channels before plastering are fixed with temporary clamps, which can be removed after the first layer of mortar has hardened. Modern nylon and metal-plastic pipes, which, due to their indisputable advantages, have replaced steel material, do not need thermal insulation. After leveling plastering, the ceramic is laid on top of the wiring.
Sewer pipes, due to their large diameter, are not recessed into the walls, since chipping the wall to such a depth is fraught with a weakening of the bearing capacity.
The sewerage system can be closed with decorative shells made in various ways.
If the sewerage system is installed from scratch, then when choosing plastic pipes, one should give preference to a thick-walled variety that is resistant to hot water, since the lining of the sewer pipes will complicate repairs in the event of a thin-walled material failure.

Sewer and water pipes, being in plain sight, can ruin even the most original design, so you need to hide them
When making major repairs or performing work in an operated room, the technology for finishing the bathroom sewer pipes is the same. To hide the sewer system under an aesthetic shell, you need to make a box from a frame and cover. For horizontal sections of the sewer, a rectangular section of the box is selected, which makes it easier to maintain cleanliness on the floor. The cladding of the riser in the bathroom can be performed on the frame of not only rectangular, but also round, semicircular or oval cross-section.
Frame fabrication
The frame for the subsequent finishing of the pipeline is best made of materials that are not afraid of water - steel, aluminum, plastic. The use for this purpose of galvanized cd profiles with appropriate fasteners, used in the installation of drywall, will save time and effort. The frame is attached to the wall and floor of the bathroom with self-tapping screws, preferably in places that should subsequently be closed with a box. To firmly seal the pins of the frame in the wall and floor, you can cement them there in the holes carefully drilled with "crowns".

Metal gratings are mounted on an installed frame or directly to pipes
Between themselves, the frame parts are fastened with pull-type rivets or also with self-tapping screws. If the frame is made of steel without a protective coating, then after installation in place it is covered with two layers of anti-corrosion paint (you can use lead or iron red lead diluted in drying oil).
Thermal insulation of coated pipes
Thermal insulation is performed in order to exclude the formation and accumulation of condensation under the box, since a slight condensation of moisture will occur on the surface of even plastic pipes, the thermal conductivity of the material of manufacture is close to zero. The pipes are insulated with flexible foamed synthetic rubber ("K-Flex"), which is produced both in sheet and in the form of shell pipes with an inner diameter of 6 to 160 mm.
The sheet material is cut into strips, wrapped around the pipes in a spiral or strip, and secured with nylon cable ties. A longitudinal cut is made on the tubular casing (sometimes it is already there), and the insulation is put on the pipe also with nylon clamps.
If there are remnants of sheet glass wool at hand, then you can use it for the device of thermal insulation, only you need to work with this material in overalls, gloves, glasses and a respirator.
Frame finishing
To hide the pipes, the frame must be covered with a waterproof finishing material. The use of drywall for the manufacture of a box is not excluded, but it requires careful waterproofing of such a coating, since even moisture-resistant drywall (GKLV) is not designed for prolonged contact with water. And if a layer of moisture-resistant material is laid on top of the drywall, in order to hide it too, then the use of gypsum plasterboard generally loses its meaning. Therefore, it is advisable to close the pipes in the box with tiles, plastic, textolite or extruded polystyrene tiles with a thickness of 1-2 cm with a decorative face layer.

Closing the pipes in the toilet with plasterboard will provide free access to hidden communications in case of repair or elimination of an accident
The listed material, in addition to ceramic tiles, is attached to the frame with self-tapping screws. It is better to hide the corner joints and mating of the box with the walls under decorative plastic or metal linings that can be glued with silicone sealant.
Laying tiles on the frame
To properly close the frame with tiles, you need to build a solid base. The possibility of using drywall for this purpose should be considered only as a last resort, in the absence of other materials.
A fine-mesh (2x2 mm) steel or nylon mesh is fastened on top of the frame with self-tapping screws and rivets, on which a layer of tile adhesive 2-3 mm thick is applied with a flat spatula. In a day, the surface is ready for tiling, which is laid in the same way as on a regular base. After another 24 hours, the tile joints are rubbed with a moisture-resistant trowel mixture. Ceramic joints at the corners are trimmed with decorative plastic or metal trims for tiles.

In the bathroom, you can use moisture-resistant drywall - GKLV
If there is a revision window on the sewage section to be trimmed, then access to it must be provided. This can be done by mounting a ready-made hatch of the required size, assembled with a box, which are commercially available, in front of the vents. But you can do it easier - do not put the tile opposite the hatch on the glue, but only wipe its joints with colored silicone. This will allow, if necessary, to pull out the tile without damage, and then also lay it in place, and hide the window.
Riser finishing
The bathroom can have two risers - plumbing and sewer. You can also hide them in a rectangular frame box. Depending on the location of the risers, they can be closed with one box, or each riser is lined separately.
Riser waterproofing
To hide a vertical riser pipe, there is a technology that allows you to simulate a column. A heat-insulating tubular shell "K-Flex" of the corresponding inner diameter and with a wall thickness of 1.5-2.0 cm is put on the riser. The shell is put on the pipe in pieces 0.3-0.5 m long, and gaps of 3 cm.
Mounting the outer sheath
A thin-walled plastic pipe with an inner diameter equal to the outer diameter of "K-Flex" is selected, and a cut is made along its entire length with a grinder. The gaps between the pieces of "K-Flex" -shells around the circumference of the riser are filled with polyurethane foam and, without waiting for its expansion, a thin-walled plastic pipe cut along the riser is put on the riser, expanding the slot.
The pipe is pulled together with nylon clamps so that the expanding foam does not open it, and unfold with a slot towards the wall. A day later, the clamps are cut off and a heat-insulated riser is obtained in a shell of a plastic pipe, attached by its inner surface to the riser with rings of polyurethane foam between the sections of "K-Flex" insulation.
Facing the riser with mosaics
The surface of the plastic sheath is primed with an adhesion-increasing primer and finished with a mosaic, laying it on a white cement-based adhesive mixture or a polyurethane-based compound.
If the mosaic is laid on a reactive composition, then the base does not need to be primed, but it must be degreased.
When the glue hardens, they grout the mosaic and - the sewer or water pipe in the bathroom turns into a column.
Conclusion
Having finished the water and sewer pipes in the bathroom with ceramic tiles and comparing the condition of the room with the situation before the repair, it is impossible not to come to the conclusion that it is not only desirable to equip and close the pipelines in the premises with a beautiful lining for aesthetic reasons, but also necessary to comply with sanitary and hygienic norms.
If you have started a renovation in the bathroom, then you will be interested in how you can equip the bathroom so that the pipes and all related communications are hidden from prying eyes.
In addition, in such a case, it is very important not only to hide the pipes, but also to build the structure in such a way that access to their revision, inspection and, if necessary, repair is open.
To begin with, let's decide what pipes generally run in the bathroom. We will need this in order to clearly understand the whole picture of all kinds of interweaving of pipelines, as well as clearly know where which pipe runs, its length and possible bends.
It is very important to clearly understand the purpose of pipes and their selection according to the material from which they are made, which can be especially useful when plumbing repairs, clearing blockages and other preventive work are required.
The types or types of pipes, according to their purpose, can be divided into pipes leading to such systems:
- tap;
- sewer;
- heating.
Plumbing pipes are easier to replace or install than sewers. Because their layout is much more convenient. It's about, access and connections.
But in sewer piping systems, the angle of inclination towards the drain should always be taken into account.
This applies to pipes connected to the drain holes, not only toilets, but also bathtubs and sinks.
 Photo eyeliner for sink and bath
 Sometimes in the bathroom, whether it is combined with a toilet or not, there are heating radiators, to which pipes leading to the heating system are also connected.
All these communications should be carefully hidden. But this must be done in such a way as to provide free access to them in the future to check the condition of the plumbing.
Types of pipes by material of manufacture:
- ordinary metal pipes, which were used during the Soviet Union, have long outlived their existence in ordinary residential buildings. If they still remain somewhere, it is only because modern plastic pipes have not yet reached there for some reason;
- modern plastic pipes very light in weight, easy to install, durable in operation, because they do not corrode and do not need to be painted. Most often, polypropylene pipes are used to supply water to plumbing, sewerage devices, as well as installing a heating system;
This material is strong enough, the walls of the pipes are made thick enough, and therefore they are most suitable for the installation of indoor piping systems in the bathroom.
- polyvinyl chloride (PVC) pipes have rather thin walls, although their price is attractive. Such pipes do not withstand pressure from water pressure and high temperatures. Therefore, if you use such pipes for supplying water, or connecting to the sewage system, then they will soon fail and require quick replacement;
- polyethylene (cross-linked polyethylene) pipes have their own specifics, which is not suitable for using it in intra-house conditions. The reason is their rather low density, like PVC pipes, least of all such pipes are resilient and durable;
If pipes of this type are used in the bathroom, then it is better not to hide them hermetically, because, most likely, they will need to be replaced soon.
- in addition to polymer pipes, they are also used to connect plumbing or any other devices in the bathroom to sewage, water supply or heating systems;
- welded steel pipes today they are also used, but this is considered a more expensive and not very practical pleasure.
What are the points for supplying pipes in the bathroom
Before you get together to hide the pipes in the bathroom, you need to decide on the full scope of all the work.
These places of suppression and connections must be provided in advance when the house was built, or they can be added independently at the request of the residents.
Such places for connecting pipes are:
- bath- 3-4 points: 2 - for hot and cold water supply; 3 - drain; 4 - control drain (if the bath model provides one);
- sink- 3-4 points: 2 - for hot and cold water supply; 3 - drain; 4 - control drain (if the sink model provides for its presence);
- toilet bowl(in the case of a shared bathroom), bidet or urine - 2 points: 1 - for supplying water to the cistern and then to the toilet; 2 - drain;
- Washer- 2-3 points: 2 - for supplying hot and cold water (depending on the model of the washing machine, which may or may not heat the water itself); 3 - drain;
- heating tank- 2 points: 1 - water supply; 2 - connection to the water tap.
In order to know exactly how to hide the pipes in the bathroom, namely, all those leading to the designated points, as well as to hide various possible branches and pipe bends, it is best to mark on the wall all future communications connecting the plumbing to the systems.
Or you can also try to draw a diagram on paper, either taking into account the scale, or indicating all the exact dimensions in digital form.
 Photo: piping diagram in the bathroom
 This will help you plan ahead and prepare for the installation of pipe-concealing panels, cabinets and other structures.
What can be the ways of hiding
There are several options for hiding pipes in the bathroom. they are similar to ways of doing, and all are very successful in coping with the task entrusted to them.
The choice of each of the methods depends on the specifics of the passing pipes, their accumulation in any one place or the possibility of access to them.
There are ways to hide pipes of this kind:
- hide horizontal pipes in a screed, and vertical pipes under plaster (for this, additional work is used: strobing, plastering, decorating with tiles);
- hide the pipes using a structure made of moisture-resistant plasterboard or plywood (they use the methods of constructing a box, with a solid sealed sheet, decorate with tiles);
- to build real structures in the form of furniture cabinets, roller shutters or simple shelves, inside which pipes will be placed and there will still be space for any household needs (storage of something small, for example);
- approach the problem creatively and simply paint the pipes with paint, decorate them with stucco or colored mosaics, pipe vines made of artificial plants and other finds of fantasy.
Important! Be sure to remember that hiding those parts of the pipeline where there are places with threads, control taps, meters, adapters is strictly prohibited.
Because these places must always be easily accessible and not be sealed.
Consider several options that are most common and widely used in modern repair and construction work.
Hiding pipes in a screed
This method is quite aesthetic in the sense that it hides pipes that run horizontally so well that you can even forget about them.
 Photo: horizontal pipes in a screed
 Pipes, previously placed in the corrugation, are laid "along a short path", then they are covered with a layer of cement or concrete screed 2-3 cm high above the pipes.
On top of this layer, after it has completely dried, the floors are decorated with tiles, linoleum, laminate and other coatings.
Before using the bathroom, after such a repair, you need to wait until the screed is completely dry. Because when hot water is turned on and the pipes are heated, the damp screed may crack.
How to remove pipes in the bathroom into the wall
For this method, it will take a lot of time for preparation and the entire further workflow.
In addition, solving this problem in this way, in fact, contains several more options and methods that need to be considered in more detail.
Strobing
The grooves - grooves for laying pipes - can be done with a grinder.
We make two cuts at a distance from each other completely corresponding to the diameter of the pipes.
And then we just gouge: with the help of a chisel, a strong chisel, as well as a sledgehammer or a hammer, we make a space between the cuts that we made with the grinder.
 Photo: laying pipes in a gate
 The work is painstaking, however, necessary. Pipes are then laid into the grooves, plastered and decorated with tiles for baths.
Gating can also be carried out not only in the walls, but also in drywall installed on an aluminum frame.
This may be the case when it is impossible or impossible to lay grooves in brick or concrete walls.
Inspection wells-boxes must be made in the places of threads, control taps or adapters so that you can easily get to them if necessary.
 Photo: blurring the strobe.
 Video on how to hide pipes in a strobe
We hide pipes with drywall or using a box
With this method you will need:
- mounting strips;
- moisture resistant drywall;
- screws;
- knife for cutting sheets;
- screwdriver, etc.
The installation of the box is carried out in this way:
- first, profiles are installed, which form a kind of frame;
 Photo: plasterboard box hiding pipes
 - drywall is attached to the frame with screws;
Important! In places of crosshairs, connections or control devices (taps, water meters, filters, etc.), be sure to leave viewing windows that can be covered with a door or left uncovered.
 Photo: drywall pipe box
 How to hide tiles
In this case, you can use the same drywall box on which you can glue the tiles.
And you can use the method of strobing, laying pipes, plaster in the grooves, and only then, facing with tiles. The main thing here is not to forget about the viewing windows.
 Photo: inspection hatches
 Video about the installation of the invisible hatch
Roller shutters
The most notable feature of the roller shutters is full access to the entire pipeline when required, which comes in handy when pipes need to be replaced or repaired.
Installed roller shutters in the bathroom look like blinds or roller shutters that fit snugly on the sides of the niche with pipes.
 Photo: roller shutters
 They are installed from the ceiling to the floor or to the level of the panels. Everything that is needed for the installation of roller shutters is included in the set when purchasing them.
The principle of their operation is that metal, plastic or any other roller shutters, when opened, are wound on a shaft.
Similarly, in the opposite way, only they are unwound and fixed at the bottom using a kind of lock or latch.
How to hide behind furniture
Furniture structures and structures are a very interesting and also practical option. Any suitable furniture will always add richness and chic to the interior.
Usually, furniture for hiding pipes in a bathroom means cabinets with shelves inside. Their doors can be either swing or sliding - this choice depends on the convenience and proximity of the location to the plumbing.
 Photo: pipes behind furniture cabinet device
 Of the materials, moisture-resistant laminated chipboard is most often used, and after installation, it is advisable to go through all the cracks, at the corners of the furniture and at the joints with transparent silicone, so that water does not get on the furniture. Chipboard, although moisture resistant, can nevertheless unstick.
 Photo: box for a riser with shelves
 Advantages and disadvantages of each method
Important! If you are going to hide horizontal pipes in a screed on the floor, then you must remember that strobing in a reinforced concrete slab between floors of apartments is strictly prohibited.
There have been cases of irreparable damage to the plates. As a result, cracks formed and collapses occurred.
The disadvantage of this method may be pipe breakthrough and subsequent flooding of neighbors. This usually happens when you have installed poor quality pipes.
Therefore, use pipes of sufficient thickness and quality.
The advantages include more free work space and the ability to achieve high ratings for the aesthetics of the bathroom.
Hide pipes in the wall- this is a good decision. Only it has its own advantages and disadvantages.
The advantage of this method is the leveling of the surface and the ability to tile it with bath tiles.
The disadvantages include:
- limited access (using inspection windows) to pipes when checking their condition and in case of repair;
- if it is necessary to replace the pipes, then the entire box will have to be dismantled, and after replacing the pipeline, a new one will be installed. The hidden pipes under the tiles must be of excellent quality, then their service life will be as long as possible.
Have roller shutters more advantages than disadvantages.
Possible disadvantages include:
- inconsistency of the style of the roller blinds themselves with the interior that already exists in the bathroom;
- roller shutters are also made of a rather soft material, therefore all kinds of blows and leaning against the roller shutters are unacceptable because they will quickly break or bend.
The advantages of roller shutters are their mobility and practicality.
When hiding pipes in the bathroom behind furniture, there is a significant drawback - it is moisture or water.
Countertops and chipboard are used, of course, moisture resistant, however, sometimes this is not enough. Furniture deteriorates quickly.
The only thing that can be done in such a situation is to constantly wipe dry the furniture in the bathroom, plus make sure that the siliconized places are not deformed.
In case of breaking the silicone layer. It should be applied again to a dry surface.
You also need to constantly monitor that the furniture is not scratched.
The advantage of this option, which helps to hide the pipes, is the aesthetic appearance and practicality in terms of using cabinets for storing all kinds of bathroom accessories.
Which pipes can be completely hidden, which cannot and why?
Not all pipes can be hidden in tightly walled coatings or structures. First of all, this may concern those parts of the pipeline that are made of metal-plastic and are called fittings.
These are connections that have a "T", "G" or "X" -shaped shape and are a very voluminous structure in size.
In addition, water can often leak in these places over time, therefore it is better not to seal such sections of the water supply or sewage system.
In those places where there is insulation of sewer pipes, an installed hot and cold water meter, there are any filters for water purification and other connections to hide and close tightly is strictly prohibited.
 Photo: pipe leads and meters cannot be hidden
 It is these pipes that can be hidden in the floor under the screed, in the wall under the plaster or under the tiled drywall.
Behind beautiful panels or walls tiled with tiles, pipeline communications are always hidden. It is very nice and practical. However, it so happens that behind this beauty, pipes can burst or become clogged.
Therefore, it is so important to approach the solution of the problem of hiding pipes in the bathroom very seriously. You should thoroughly study your situation in the bathroom and all possible options that are ideal for your bathroom.
When carrying out the next renovation, any owner of an apartment or house tries first of all to eliminate, close or alter those components and details of the interior that spoil the appearance of the room, interfere with something or "call out" the eyes. It so happened that the designers and builders of apartments and houses did not think much about how to simplify the laying of water pipes and sewer pipes inside the bathroom and toilet, for the most part they have to come up with something on their own and, of course, at the expense of the usable space of the room. Therefore, it is often the dilemma of how to hide the pipes in the bathroom so that both the appearance and the useful space are not lost, becomes the most burning problem of the repair.
What pipes are in the bathroom, and how they can be hidden
Before trying to solve the problem of how to hide pipes under plaster or protective lining in the bathroom, it is worth remembering that there are at least three types of pipelines in the room:
- Sewer pipes;
- Hot and cold water lines;
- Heating system elements, dryer and towel dryer.
Not each of the listed pipes can be painlessly hidden under plaster, even if such a possibility is allowed, based on the bathroom layout.
For your information! According to the requirements of building codes and regulations, it is impossible to hide pipes connected with wedge couplings and locks under the plaster of the bathroom, any detachable connections must be accessible for control and periodic revision.
In addition, metal pipes with cold water or sewer cast-iron blocks often become sources of condensation, so they need to be hidden so that there is a minimum ventilation and moisture removal with an air stream.
In the most difficult position are the bathrooms of houses, in which the general communications are not brought into separate mines, but laid in the old Stalinist way through the ceilings, photo.

In this case, there is only one way out of the situation - to install a plastic pipe box in the bathroom. It is clear that with the right approach to the layout, vertical pipes can be hidden behind a body kit or a box, decorated to match the color and texture of the walls so that the thought of hidden communications will never occur.
In this case, the protective screen is assembled from plastic, PVC or drywall on a galvanized profile frame. If, in addition to the water riser, it is necessary to hide the heating and sewer pipes, then insulation and mineral noise insulation must be placed under the decor layer. It is not enough to hide the pipes, you need to make them inaudible.
Several practical ways to hide a pipe
For many years of practice, the owners of apartments, both in the old Khrushchev houses and in the newer "Czech women", have successfully learned how to hide communications in the bathroom, using all sorts of tricks and interior features.
The most successful ways to hide a pipe in a bathroom are:
- Installation of screens and decorative plastic panels;
- Wall decoration with plasterboard plates;
- Disguise with pieces of furniture and interior.
In fact, all three methods are universal and allow you to hide anything in the bathroom, from pirated electrical wiring to illegal plumbing or heating. Installation of false walls allows not only to hide pipes, but also to additionally insulate and soundproof the bathroom, for example, in panel houses.
How to hide old wall pipes
The use of metal pipes for laying heating and water supply according to the old building codes required an indent of 15-20 mm from the plastered wall. This made it possible to periodically paint the pipes in the bathroom without any problems and regularly inspect the surface for the appearance of fistulas or rusted welds. In a warm and humid bathroom, the fight against steel pipe corrosion never ends.
Advice! Any plastic or drywall decorative panels must provide access to the steel pipes.
It is possible to remove pipes under a protective structure made of plasterboard and galvanized profiles within a few hours, even if there is not a lot of practical experience with these materials. It is enough to buy a moisture-resistant material, a screwdriver, a package of self-tapping screws and several corners of a galvanized profile. All cracks and traces of screw caps can be hidden under a layer of plaster putty. After sanding and staining, the box can be painted in the color of the bathroom walls.

To avoid the accumulation of moisture and condensation on cold metal in a bathroom, you can hide the metal behind mesh and perforated pads, which provide good ventilation of the homemade duct.
In the classic version, the plumbing and heating pipes were laid on the bathroom floor or sewer drain. The entire bundle of pipes could be hidden under one overhead plastic screen. If the communications are laid along the back wall, they can be closed with a bath or furniture set.
Modern ways to hide a pipe in a bathroom
The use of screens and decorative panels made it possible to hide communications, but at the same time greatly reduced the useful volume of the bathroom, therefore, in most cases, the owners of the apartment, at the very first major repairs, tried to hide the water and heating pipes in the wall niches. Steel pipelines were sealed in polyethylene corrugations, insulated and placed in grooved niches, after which the walls of the bathroom were finished with plastic panels.

With the advent of polypropylene and metal-plastic pipes for water and heating, the task of hiding communications in the bathroom has become much easier to solve. The high corrosion resistance of polypropylene and the almost monolithic quality of soldering made it possible to lay pipelines directly into the walls of the bathroom.

Polypropylene has a high coefficient of thermal expansion, so the size of the niche had to be increased and, at the same time, gaps had to be provided to compensate for changes in length and diameter.
To cover the bathroom wall with decorative trim, the entire room had to be sheathed with plasterboard. In some cases, it was possible to close the niche cut in the brick wall with narrow strips of waterproof drywall screwed into plastic plugs hammered into the brick with self-tapping screws. The cracks and joints were sealed with a masking net, leveled and rubbed with plaster putty, after which the walls of the bathroom could be plastered in the usual manner.

To hide a polypropylene plumbing, a niche with a depth of at least 30 cm is required. For brickwork, this is not a problem, and it is no longer possible to cut a thin concrete wall in a bathroom. Therefore, for new projects of apartments in frame multi-storey buildings made of monolithic concrete, three main methods are used to hide pipes:
- Laying metal-plastic pipelines into the walls of the bathroom with the collector method of organizing the water supply system. In this case, for each point of consumption, a thin half-inch metal-plastic supply is laid, which is simply enough to hide under a layer of plaster;
- Transfer of wiring from polypropylene pipes to the ceiling. All water and heating mains, as well as wiring and ventilation ducts can be hidden behind the false ceiling;
- Pouring pipelines in a concrete floor screed. In this way, you can hide pipes even in the bathroom of a Khrushchev. To compensate for thermal expansion, pipelines have to be wrapped in foamed polyethylene and laid in corrugations.
It is clear that hot water cannot be supplied through the pipes hidden in this way, at least until the end of the process of curing the concrete base of the bathroom floor.
How to hide a sewer pipe
It is more difficult to hide a sewer pipe in a bathroom. If we are talking about old cast-iron plums, then they can be hidden by removing under the overlay screen or decorative plastic overlay. The worst option is to embed the cast iron with concrete and decorative tiles. First, cast iron has a coefficient of thermal expansion that is two to three times higher than that of steel. Accordingly, an attempt to hide a cast-iron sink in a bathroom under a layer of concrete will automatically lead to its cracking. Secondly, wet concrete always causes rust and corrosion of cast iron, after 3-4 years the joints between individual sections will become unusable.

More modern plastic 50mm sewer drains can be hidden in niches cut along the junction of the wall and floor slab. Of course, the niche is cut not by the full diameter of the sewer, but by half or two-thirds. The rest of the sewer line can be closed with an overhead plastic skirting board or box. This way of hiding the sewer allows you to reduce the height of the bath drain, but such work can only be done by experienced builders, since you have to cut part of the floor slab in the bathroom.