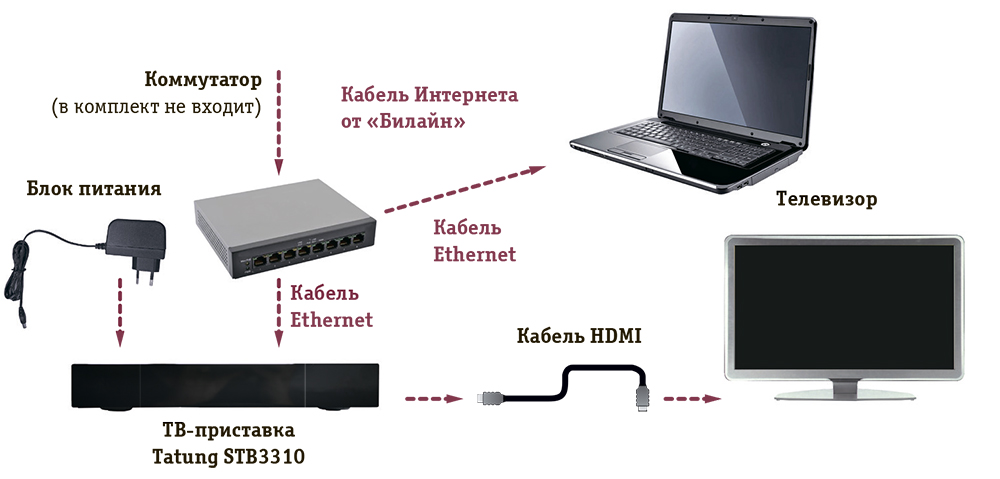
You can connect the TV and computer yourself according to the following scheme:
- Connect your switch* and set-top box to electrical network. To connect the set-top box, use the included power supply.
- Connect any port of the switch to the Beeline Internet line installed in the apartment.
- Connect Ethernet cables (patch cords) (included with the equipment) to any free ports of the switch. After this, the port indicators corresponding to the connected cables should light up on the external panel of the switch, indicating the presence of a signal.
- Connect one patch cord to the computer, the second to the TV set-top box. If you do not plan to use Internet access with personal computer, connect the Internet cable from Beeline directly to the set-top box (without a switch).
- Connect your TV (see below).
If the equipment is connected correctly, then after turning on the TV set-top box, the green LED on the front panel will light up.
Important! It takes longer to boot the device for the first time (about 2 minutes) than to boot the device on subsequent connections (several seconds). Therefore, please be patient and do not turn off the TV set-top box.
*A switch is required for simultaneous use of Home Internet and Beeline TV services. When connecting a separate Beeline TV service, a switch is not required.
Connecting a set-top box to a high-definition TV (HDTV) with an HDMI connector
The HD image is much more detailed and realistic compared to standard definition analog TV.
Attention! To watch a program in HDTV format, you must connect the set-top box to the TV using an HDMI cable.
Connect the HDMI connector of the set-top box to the HDMI connector of the TV:

Any other connection options (for example, via an RCA cable) will reduce the quality of the HD signal to standard definition image quality. In this case, connecting via an HDMI cable will lead to an overall improvement in the image of all channels. If your TV has a DVI input, you will need to separately purchase an HDMI to DVI adapter to connect the DVI input of your TV to the HDMI output of your set-top box.

There are additional services and options that expand the subscriber’s capabilities. For example, a fairly common situation is when you need to connect several devices at once to broadcast IPTV TV channels. In this case, just use this service. And most importantly, it can be not only a TV, but also other mobile devices, such as a tablet or smartphone
As for expanding the capabilities of your interactive TV, which the Beeline operator calls “Home TV,” there are no problems. If you want to watch channels not only on one TV, but on several, then take special equipment (a TV set-top box for several TVs) and activate the service Beeline Multiscreen. In addition, it can also be used on mobile devices such as a tablet or smartphone. In this case, the user just needs to download a special mobile application and connect the devices to the Internet wirelessly.
How to connect Multiscreen
As for the connection, it is simply not required, since the service is automatically provided after connecting to one of the Beeline home TV tariff plans. This applies to TVs, but to use this option on mobile devices you need to download a special application through which you will connect and control the broadcast (record, pause). You can download it on both tablets and smartphones that run Android or IOS. Applications are available in the official app stores AppStore and GooglePlay. This application is provided free of charge; you just need to download and install it on your smartphone, after which you can start using it. Please note that to use the service on a phone or tablet, you need to install a Wi-Fi router through which an Internet connection will be organized. The application is called "Beeline TV".
Number of TV channels
All users will have access to 85 channels in the mobile version. As for additional channel packages, they are not broadcast through the mobile version of the application, and are only available for broadcast on a TV. This is a feature of using the service on mobile devices.
Also, through a mobile device you cannot watch channels that were recorded on HDD consoles. Viewing recordings can also only be done through a TV. As for watching VOD, this section is also not available. But, despite this, you will have the opportunity to view the entire package of standard channels, of which there are also quite a large number.
How to install the Beeline TV mobile application
If you decide to use home TV on a tablet or mobile phone, then you should make sure that you have one of the interactive television tariff plans connected, and that your device supports this application.
- If your device runs on iOS, then you need to go AppStore and download the application "Beeline TV". After that, install it on your device and log in. To do this, you need to enter your username and password for digital television. After this, you will have access to the control and channel viewing menu.
- If your device is running on Android OS, then the application can be downloaded for free from the GooglePlay website. After installation on your device, you should log in and also enter your home television login and password.
Thus, the user can connect no more than 5 devices to one tariff plan.
How to connect home TV from Beeline
If you have not yet become a subscriber of the company and do not use IPTV service. In order to use it, you need to select one of the available tariff plans and connect your account. This can be done either through your Beeline personal account or directly on the service provider’s website. First, you need to clarify the possibility of connecting to this service at your address.
If connection is possible, a company specialist will bring you all the equipment and connect the service. You can find out the possibility of connection by calling the Beeline operator number. The company's support service provides round-the-clock advice to its subscribers.
Beeline “Multiscreen” option - connecting up to 5 devices to IPTV - 4.1 out of 5 based on 11 votes
Remote controls are discussed next. remote control Beeline TV IPTV set-top boxes and they also double as TV remote controls. It's about about Motorola equipment most often supplied to customers (like Motorola VIP 1216 and others). There are two fundamentally different ways to configure this technology in case of failure to work normally: one involves reprogramming the device manually, and the other allows you to do without this, that is, cope by manipulating the standard menus.
It happens that the remote controls are not fully obeyed and then there is no way to control either the TV or the set-top box itself. But it also happens differently: for example, the set-top box listens, but the television receiver does not respond and completely ignores the signals. With all options, our instructions should help you. Let's start with reprogramming.
Programming the remote control
We configure according to the first scheme:
- We launch the equipment under test: TV or set-top box. All we need is the user manual.
- Open the 19th or 20th page of the user manual and read the device code from there.
- We select one of two keyboard combinations of the remote control “SET” + “AUX” - for a set-top box or “SET” + “TV” for a TV. Press these keys simultaneously and hold them pressed for three seconds until the light above the corresponding button on the remote control lights up. Its glow means that the remote control has entered the desired configuration management mode.
- Using the numeric keypad, enter the code previously read in the instructions.
- Click on the custom button. Its indicator will blink and go out, indicating the end of the procedure.
So, we figured out how to set up a Beeline remote control on your TV. How to check the result? Point the remote control towards the TV and try pressing the button labeled “Standby”. The receiver should turn off immediately.
If for some reason this does not happen, then try entering a different manufacturer code (usually there are several of them).
Now let's look at the second alternative for setting up the remote control. 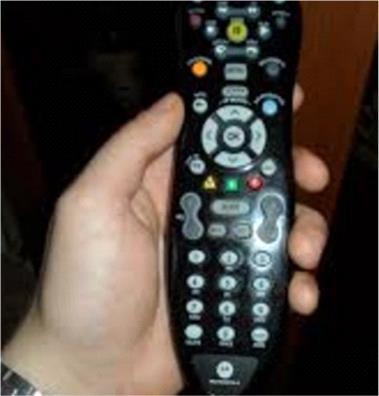
Features of the Find Device function
- As in the first case, turn on the equipment that you want to subordinate to your remote control.
- Press the “SET” button and the device type button for three seconds. Until the light under the button lights up.
- Next, use the arrow buttons on the Beeline remote control to automatically detect your receiver or set-top box. To start searching, press the “Up” or “Down” key, and to continue, press the “Left” and “Right” buttons.
- The signal that the device has been detected and identified by the remote control will be its shutdown.
- Next, press the illuminated key itself and wait until the light goes out. The same code that we previously entered manually will, without your knowledge, be entered into the memory of the remote control.
That's all the wisdom of installing a remote control for digital television.
A minimum of effort and time will be required to enjoy realistic pictures and surround sound. Connect Digital TV it can be simple and fast! How?
- Check if Beeline TV is connected to your home on the website or by phone 8-800-700-8000 .
- Select a tariff plan and additional TV channel packages.
- Submit your application! A Beeline specialist will soon contact you to clarify at what time connecting to Digital Television will be most convenient.
If you simultaneously* connect Home Internet and Beeline Digital Television, our specialist will come to you free of charge and set up the equipment.
If you are already a Home Internet subscriber, then you can connect to Beeline TV yourself. Don't know how to connect channels? The connection diagram and instructions will help you!
Equipment for digital television and the Internet is connected via one cable - no extra wires in the apartment!
To watch Beeline TV you need special equipment - a set-top box, which you can:
Use your Xbox 360 gaming console as your primary or secondary console***!
****From October 1, 2013, the cost of the service will be 95 rubles/month for each connected TV.
If you have an Internet connection from Beeline, you don’t need another cable. An additional cable is needed if you have Internet from another provider.
Anyone will do modern TV, which has HDMI or RCA (tulip) connectors.
Laying cables to the apartment, connecting and setting up equipment is free of charge.
Yes, this is possible, but in this case an additional monthly fee of 120 rubles will be charged. for supporting the line. For subscribers who have connected Beeline TV and Internet, this additional fee is not charged.
To watch Beeline TV, you need to rent or purchase a set of TV equipment, which includes a set-top box and everything necessary to connect it to the TV.
The layout of the wiring and installation of equipment in the apartment depends on where the TV and computer are located (if the Home Internet service is connected). The set-top box should be located next to the TV. An Internet cable is connected to it (connection diagram). Connecting the service only includes work on laying an Internet cable to the apartment. Hidden wiring cable in the apartment is not included in the list of works for connecting the Beeline TV and Home Internet services.
The time is agreed upon when determining the connection date. Our employee will agree on the most convenient time (out of several possible) for you.
Hello, blog site readers. The other day I had to deal with one everyday problem— setting up home Internet and television from Beeline. The fact is that I have an Asus router, which is not standard for Beeline, so all the difficulties of working with it fell on my shoulders. In order not to forget how I did all this, I decided to write this article. Maybe it will help someone else.
I think everyone knows that with Beeline, connecting and setting up home Internet and television is absolutely free, but there is one BUT: the equipment must be Beeline or recommended by them, which is essentially the same thing. If you have, for example, an Asus router, then you will have to configure it yourself.
A specialist from beeline will only extend the cable to the router or television equipment, and then dig in yourself. IN technical service support won't help either, they don't understand technology at all, but they know how to answer some general issues and give standard advice. Usually the conversation with them comes down to the following: “No Internet? Reboot your router! ASUS router?!!! Uh, then we can’t help you with anything.”
In short, beeline will have to rely only on itself when it comes to setting up the Internet.
Beeline Internet tincture on ASUS router
Personally, I have an ASUS RT-N10, but all routers in the ASUS line are similar both in the location of the ports and in the software interface, so if you have a different model, then these instructions will apply to it too.
1. Connect the power, turn on the router and connect the cable that was pulled into your home into the blue port with the Internet icon (mine has no name). Strictly speaking, this is the operating state of our unit; now all that remains is to configure it.
2. Take a network cable with a standard RJ-45 connector on both ends (comes in the box with the router) and insert one end into the laptop, and the other into port No. 1 of the router.
3. Go to the router interface. To do this, open any browser and go to 192.168.1.1. You will be asked to enter a username and password; by default they are standard: admin - admin.

4. Great, we are in the software interface of this miracle box with an antenna! Go to the section in the side menu.

5. Select the WAN connection type L2TP and click “Next”.

6. We indicate the user name (specified in the contract) and password (the same as the password for your personal account on the beeline website, the same can be restored/changed).

7. Next comes the last page with settings. Here we set up dynamic acquisition of an IP address and automatic connection to the DNS server. In the column “Heart-Beat Server or PPTP/L2TP (VPN)” we indicate: tp.internet.beeline.ru. Next, click “Apply all settings” and wait for it to complete. After all this, the Internet will appear, but for now only on ports 1-4.
![]()
Wi-Fi setup
In order not to run around the entire apartment with a cable, you need to set up Wi-Fi. We return again to home page ASUS software interface, but now we go to the section Wireless network. Here you need to create and configure an SSID to access Wi-Fi. Set it up as shown in the figure below:
- Specify the name of the SSID - this will then be the name Wi-Fi networks, which you will catch on your laptop or phone.
- Wireless network mode - Auto.
- Channel width - 20/40MHz.
- Authentication method is WPA-Auto-Personal.
- WPA encryption - TKIP+AES.
- And be sure to set a WPA Pre-Shared Key so that your neighbors do not use your Internet.

We save the settings, after which you can catch wi-fi and use it safely.
Setting up beeline television on an ASUS router
All that remains is to configure Beeline television. The beeline set-top box is very easy to connect, you only need 3 cables:
- The power cable is plugged into a power outlet.
- A cable with an HDMI connector to the corresponding port on the TV.
- A cable with an RJ-45 connector (network) into any of the numbered ports of the router - No. 1 - No. 4.
All this should be done by a beeline specialist, and then quickly retreat. Unfortunately, the standard settings of the ASUS router do not allow beeline television to work normally - after a few seconds of broadcasting, each channel freezes (freeze-frame effect). To prevent this from happening, you need to configure the router port to which our television is connected.
Goes again to the ASUS interface, now we need the WAN section. Here you only need to change the first 3 options manually, leave everything else as it is (don’t forget to check your username and Internet password just below in the settings).
- WAN connection type - dynamic IP.
- Selecting an IPTV STB port is the port to which beeline television is connected.
- Enable UPnP? - no (it works fine for me if I put “no”).

Now the problem of freeze frame on any of the channels is solved.
That's all for today. I hope this article will help you set up beeline Internet and television on your ASUS router. Thanks for your attention, friends!