The desire to make an excellent interior and saturate their lives with bright colors is inherent not only for young entrepreneurs, but also for ordinary people who want to make their lives happier. But you can even make such an interesting piece of furniture with your own hands as a table with iridescent lights.


Views
Backlit tables can be of very different types and purposes.
- Dressing tables with lighting around the mirror. Light bulbs are located around the mirror frame. Lamps should only be white. Multi-colored lamps are not allowed.
- Illuminated, but no mirror. The backlight is a design element and has no technical role to play. As a rule, it is presented in the form of an LED strip. In different versions, the tape can be located in different places. Gives a contrasting, perhaps even "futuristic" shade, suitable for a variety of interiors.


Structurally, tables are:
- A table with no internal storage space. Not highly recommended, but this option may be considered if not needed. There are, of course, tables in the form of a triangle, circle and other shapes.
- Table with a curbstone. This modification allows you to store both cosmetics and many different grooming tools. The number of pedestals does not vary much: one or two. Has a suspended compartment and a stand with drawers. The pull-out drawer is definitely handy when dealing with makeup or hair. From the experience of people, it is believed that it is very convenient for storing cosmetics, body care products and other similar products.


- A table with drawers. Almost the most popular table model. Looks good, takes up little space. Subspecies: hanging, side and corner tables. Do not forget that there are very original solutions that are not available in all stores.


How to choose?
Price, like quality, is one of the most key issues, therefore, before making a purchase, you need to carefully familiarize yourself with the market, study brands. Shopping can only be done in trusted locations. You need to avoid dubious market points, dubious resources on the Internet. Particular attention should be paid to compliance with GOST. Many dishonest manufacturers or craftsmen can use recycled or even hazardous material. Sometimes it is better to pay a third more, but at the same time win several times in quality. The saying “a cheapskate pays twice” does not lose its relevance here.


The material from which the table is made must also match the decor.
Be careful with too heavy, but at the same time small-sized furniture, if there are children or animals at home.


Where can I get it?
Despite the external originality of such a furniture product, it is quite easy to acquire such a miracle.
The simplest, and probably the most obvious, option is a furniture store.
Often these neon tables are part of a set and create an overall design for the room, but you can also find copies that live on their own. It is important that such a table is not only convenient to use and corresponds to the dimensions, but also becomes an integral part of the interior.


The second option is a specialized beauty store.
The advantage of this choice is that the table options offered in them are very practical. This is not just an interior decoration. This is an item that is designed for long-term use. As a rule, it has LED backlighting.


The third option is, in principle, obvious, like the two previous paths. Like all products in the world, the table has not escaped the "showcases" of online stores.
Before purchasing a table, be sure to read reviews on the forums or interview friends who have experience with such tables. It is noteworthy that such tables are still not such sold-out types of furniture, so it is better to look in advance on the search engine for the sites of shops nearby.
As a rule, serious stores have their own managers or sales consultants who are responsible for advising potential buyers over the phone. Perhaps this approach will save a lot of time and reduce shopping trips to a couple of times.


How to do it yourself?
In fact, you can make such a table yourself, at home. This does not require deep technical knowledge or special ingenuity. To do this, you will need sheets of wood or plywood, an LED strip, a special microcircuit, wires, and a round mirror.
In addition to this, you will need glue (possibly several types), paint and screws.
The work begins with the most basic. We cut out two round rims of the required diameter (usually 45-100 cm). The mirror is selected with the appropriate diameter.


Of course, the table top can have more than just a circle shape, respectively, the shape of the cut-out table top and mirrors can be chosen at your discretion.
We put a mirror between the two rims and carefully circle the mirror with LED strip. Next, a hole is made to pass the wire there. We attach the microcircuit to the lower part of the tabletop and fasten the legs.
After the brainchild is ready, you can cover the legs and edges with varnish or special paint.


If you still have difficulties with manufacturing, you can contact a familiar carpenter. For a carpenter, this will not be difficult, since this is a daily activity for him, and in half an hour he will do something that would take several hours or even days. Such a person is most likely well versed in dyes and adhesives. Most likely, he has experience in other industrial or construction areas, has a “well-trained hand”.
You will have to look for diode tape, plywood, electrical filling and other elements of the product yourself.


Again, this is okay. Plywood and wood sheeting can be found at a hardware store, and paint-lacquer glue can also be found there. The diode strip is also sold at a hardware store. Small parts can be ordered online, possibly even at better rates.


Don't limit yourself to templates. It is worthwhile to think carefully about creating a table, perhaps there will be a desire to make an original stained glass window. The variety of stained glass tables is huge. For example, you can make a 3D table. This solution is also called the infinity effect. This will require some neon ribbons and some mirrors. Due to the reflection of light, the surface acquires a three-dimensional image. There are many photographs of colored tables on the Internet. You can look at the websites of furniture stores or ready-made design solutions. The interior, thought out by a professional designer who has posted his work on the web, can become the basis for an idea when creating your table.


When working with a diode tape, you must be extremely careful. Keep your hands dry and wear rubber slippers on your feet.
In fact, it is possible that doing it yourself will be the cheapest and fastest way. Another plus is that you can choose the interior yourself.
And if you like it, you can open a shop of such tables yourself. This table can be a great gift.
Reading time ≈ 6 minutes
You can make the interior unique and distinctive with the help of unusual pieces of furniture, for example, a table with an infinity effect. Making such a little thing yourself is not difficult if you use a simple instruction. The finished product will organically complement any modern interior and will cause genuine delight among households and guests!
LED backlit table.
Feature of the table
Externally, the table is not much different from any ordinary coffee table. However, it is worth turning on the backlight, as the tabletop of the product begins to flicker and glow with hundreds of lights, creating the illusion of infinity. You want to admire such magic all the time, and there are no adults or children who are indifferent to the unusual table.
A backlit coffee table looks especially impressive when the lights are off in the evening.
The infinity effect is achieved thanks to the special design of the tabletop - its box consists of two mirrors, and a diode strip is installed on the sides. In this case, a semitransparent mirror is selected for the top cover so that the light pattern is more noticeable and pronounced.
In more detail, the design of the product is shown in the photo below:

Design.
You can turn on the product using a remote control or a special switch on the box.
To illuminate the countertop, you can choose diodes of any desired shade or combine several colors. But experts especially recommend taking a closer look at the red diodes - due to a small dispersion, the endless tunnel acquires more depth.
Such an unusual piece of furniture is perfect both for home use and for placement in the office. It can be made of absolutely any size and from any materials.

Lilac backlit table.
Materials and tools
You can make an exclusive piece of furniture with your own hands. To do this, prepare the necessary materials, tools and follow the step-by-step instructions.
To make a table you will need:
- frame boards (made of wood or chipboard);
- mirror according to the parameters of the table top;
- translucent mirror. The dimensions should be 10 cm larger than the lower mirror;
- self-adhesive diode tape, length depending on the size of the table, but not less than 1.5 m;
- materials for connecting the tape: controller, programmer, wires, power supply unit with USB;
- consumables: sandpaper, glue, screws, metal corners.
Instead of a translucent mirror for the top cover, you can take ordinary glass and cover it yourself with a tint film.
Idea: in order to reduce work, in any furniture store you can buy the simplest table in design and use it as a ready-made base.
Why choose LEDs:
- They give a rich, beautiful, deep shade.
- Longer service life without burnout (while the number of on / off operations does not affect the service life).
- Lack of heating.
- High efficiency.
- Various colors.
- Acceptable cost.
- Bulb safety.
Assembly
Before assembly, it is necessary to develop a drawing of the table, calculate the distance between the mirrors, the number of diodes, and think over the location of the electrical elements.
To get an idea of what the flickering lights will look like in the finished product, just place any light source between the top and bottom of the table and see the result.
Regarding the distance between the mirrors, everything is individual and depends on your wishes. But often the average value is chosen - 8 cm. To calculate the depth of infinity, the distance between the covers must be multiplied by 16. Also keep in mind that the depth of the tunnel will depend on the light transmittance of the top cover. After all the calculations, you can proceed directly to the assembly.
Step-by-step instructions for making a table with an infinity effect with your own hands - making a base:
- From bars with a cross section of 5 * 5 cm and metal corners, you need to make the frame of the future table. Use screws and a screwdriver for fastening.
- Using sandpaper, carefully sand all the edges and corners to give them smoothness and remove burrs.
- Drill holes for electrical elements with a drill, refer to the drawing. Places of holes need to be sandpaper tighter.
- For additional fastening of the structure, you can process the joints with glue. After that, the frame must dry for at least 24 hours.

Assembling the frame.
Assembling the countertop step by step:
- Attach boards (section 5 * 1 cm) to a sheet of plywood of the required size along the outer perimeter, and at a distance of 5-6 cm along the inner perimeter. You should get a kind of gutter between the boards - this is where the wiring and electrical elements will be placed (see photo above).
- At the bottom of the countertop, place the mirror with the reflective side facing up.
- You need to attach the LED strip to the inside of the smaller frame using double-sided tape.
- The wiring is placed in the space between the frames.
- Attach the top mirror cover to the table top.
- The whole structure is fastened with screws.

Assembling the table top.
At the end of all the work, you should have something like this table with a mirrored surface:
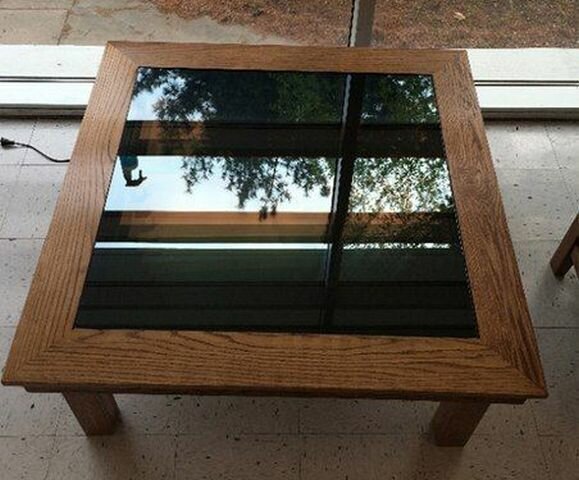
The finished product with the backlight off.
However, it should be understood that you can make a table with an infinity effect from any material that you know how to handle - for example, from plexiglass, plastic, metal.
- When working with mirrors and glass, remove the protective film only at the end of all processes.
- Be sure to thoroughly study the diode connection diagram in order to avoid a short circuit, or even worse, a fire.
- Use moisture resistant glue for fixing.
- In the event of a breakdown of electronic parts, it will be convenient to have free access to them, therefore it is better to place the controller and programmer not inside the table, but outside - placing it in a neat box and fixing it under the tabletop.
I decided to make with my own hands a coffee table with LED backlighting, the decoration of which resembles infinity. For a long time after the renovation, something was missing in the room, everything seemed to be in place, but still something was wrong. Accidentally on the Internet I came across a photo of such a table and realized what exactly I want. I went shopping - I didn't find it, I decided to do it myself. Such a table will add creativity, modernity to the room and will attract more than one curious look.
Let me open the curtain, the secret of this infinity is in the use of LED backlighting, the color range of which can be varied. Such a tape is installed in the middle between the reflective coatings. In the main, a mirror is used (for this purpose, one is translucent, the second is ordinary), thanks to this, the radiation from the backlight is clearly visible to everyone.
To make such a coffee table with LED backlighting with our own hands, we need:
- wooden boards or MDF;
- glass or translucent mirror and ordinary mirror;
- LED Strip Light;
- screws and screwdriver.
The first thing we will do is a drawing of the future table, taking into account all sizes. Then, following our calculations, we make blanks from MDF sheets (or boards) and mirrors.
Next, we make three templates with internal space. The workpiece where we intend to mount the LED strip is made with a diameter inside one centimeter larger (when making a table from chipboard). We glue all three blanks together, at the same time insert a mirror at the bottom. We smooth out all the corners and sides, treating this very scrupulously.
In order for us to be able to somehow get to the tape, in case of a breakdown, we install the table cover so that it can be removed.
Now we cover our entire structure with a translucent mirror.
We make the legs to the table with a wide section and with small round holes through and through, since it is through them that we will lead the wires.
It turned out very interesting and beautiful.
This is how you can decorate doors and much more in the house. A DIY coffee table with LED backlighting will be just the beginning of your experiments.
DIY step-by-step master class. Photo report.


Conventional dressing tables usually need to be installed in a well-lit area. Models with external and built-in lighting from the Heggi catalog remove this limitation. Now the furniture can be placed even in the corner, and at the same time, uniform, comfortable lighting for cosmetic procedures will be quite enough.
Range of dressing tables with mirror and lighting
The collection contains several modifications of furniture:
- traditional dressing tables with lighting and a mirror (one or three canvases). Equipped with open and closed shelves, drawers, pouf. Materials: solid wood, veneered MDF, metal;
- chests of drawers with several drawers at the bottom. Convenient if the room requires additional storage space. The mirror and niche for cosmetic accessories are installed under the hinged cover;
- designs that combine the functions of a dressing table and a writing table. The mirror and cosmetic compartments are hidden under the mobile worktop. When folded, the furniture turns into a comfortable workplace.
Each model belongs to one of the furniture series for the bedroom and living room. You can buy a dressing table with lighting separately or complete with a wardrobe, chest of drawers, bed, side tables. The goods are delivered throughout Russia (check the terms and cost with the managers). In Moscow, there is a possibility of self-pickup from the store's warehouse.
Illuminated table - very interesting and eye-catching element decor rooms.
Through the use of a translucent mirror and many sources light is created awesome the effect shining tunnel.
This unusual a piece of furniture is also called a table with infinity, 3D table and a luminous table.
In contact with
classmates
LED strips

The most convenient are self-adhesive ribbons.
Operating principle
The LED strip consists of two diodes - single-chip, having one color spectrum, and three-crystal, consisting of three color spectra (green, blue, red).
Radiation crystals mix, forming a wide color gamut.
Specifications

- LED type - the main difference between all LED strips from each other. The most common LEDs are SMD 3028 and SMD 5050.
The abbreviation stands for Surface Mount Device, and the numbers show the dimensions of the LED lamps: 3.0 x 2.8 mm and 5.0 x 5.0 mm. - Density. The more LEDs there are per one running meter, the brighter the glow from the tape.
- Glow color LEDs can be anything. The most popular are white, yellow, cold and warm colors.
- Moisture protection. IP 20 - open, IP 65 - moisture resistant, IP 68 - the highest degree of moisture resistance.
Advantages
- Large light recoil;
- High strength and vibration resistance of tapes;
- Long operational life (about 100 thousand hours);
- Various tones and shades glow of lamps;
- Inertia belts are small, which allows you to use the most high brightness from the very moment of switching on;
- Quantity cycles on / off switches do not affect the lifespan of LED strips;
- Environmental friendliness;
- Security;
- Budgetary price;
- Not prone to breakage due to low temperatures.
Note! High temperatures are categorically contraindicated for LED strips.
How to illuminate a computer desk using LED strip, see video:
DIY 3D table
Consider making more complex, but the most secure and handsome LED table.
Materials (edit)

- Mirror(diameter 60 cm);
- Mirror translucent self-adhesive film;
- Expanded polystyrene(for the case);
- Glass or plexiglass (thickness 4 mm, 65 x 65 cm);
- Metal strip in a roll (for a window);
- Wires;
- Instantaneous Super glue;
- Bilateral Scotch;
- Power Supply 5 / 5.5V 200 / 300mA with USB output;
- Self-adhesive tape LED(not less than 1.5 - 2 meters);
- Arduino Uno;
- Programmer for Arduino (for projects);
- USB to power the microcontroller.
Note! The mirror can be absolutely any shape: square, circle, oval, D-shaped bar, etc.
Instruments

- milling cutter(you definitely need a nozzle for making round parts);
- regular or
- soldering iron(you definitely need solder for a soldering iron);
- dremel;
- scissors;
- knife(for cutting metal and plexiglass);
- pencil, pen, thin marker;
- square(ruler).
Stages of work
Step 1. Cut out a piece of plexiglass circle across the diameter of our mirror. The edges we clean we remove the shavings. 
Note! When cutting a circle from plexiglass, you should quickly guide the milling machine so that the edge does not melt.
Step 2. Carefully glue the self-adhesive on plexiglass film. We glue the plexiglass to the table with tape. We remove the film that is applied to plexiglass, and a film from a mirror film. We spray plexiglass water, and even better - soapy solution. We place the mirror film on the glass and drive out all the formed bubbles.
Step 3. Protruding edges of the mirror film cut off scissors. We leave the entire structure to dry (no less 12 hours).
Step 4. On dried mirrored plexiglass, you need to carefully attach metal strip with transparent super glue.
Step 5. We glue the LED strip on internal side of the metal strip.
Step 6. Drill holes in the metal strip for wires.
Step 7. We grind the received holes.
Step 8. The connection code can be to write yourself, but you can use the ready-made one. Scheme Arduino Uno controller connections: 
Step 9. From plexiglass you need to cut 10 - 15 small rectangles. Using transparent instant glue, attach them to facial side of the mirror. They will serve as props for constructions from glass and metal. The size rectangles should be such that the strip, together with the plexiglass, overlaps our mirror.

Step 10. Into rectangles install top design with glass. The glue should be completely dry out. It is advisable to put something heavy on top for the best bonding surfaces.
Step 11. Second (external) film remove from plexiglass. This construction can be used as mirror. We install the structure on a table with a table top of the same or smaller diameter.

For nutrition tapes can be used electrical networks or build a small battery. When powered by a battery, the table will become even more safe and will not depend on the power grid. It can also be installed in suburban a house where there is no power supply.
LED strips are safe and durable. To illuminate the table, you can use monochromatic or multicolored LED strip (they differ only in price). Luminous the table will delight the hosts and their guests with an unusual design.
How to install lamps to illuminate the desktop in the kitchen, see the following video:
In contact with
Do you see inaccuracies, incomplete or incorrect information? Do you know how to make your article better?
Do you want to offer photos on a topic for publication?
Please help us make the site better! Leave a message and your contacts in the comments - we will contact you and together we will make the publication better!