A do-it-yourself turtle for the garden can be made quickly enough if you have the appropriate skill.
If you decorate your garden plot with garden crafts, it will be more pleasing to the eye and lively.
Various materials can be used to create a product: cement, clay, pebbles, foam plastic, plastic and even rubber. Before creating, you need to decide on the material and dimensions of the product.
Foam plastic to help

To make a turtle, you need to make a frame from polystyrene foam and tie it tightly with wire.
To make a turtle from foam plastic, you will need the foam itself, wire, cement and paint. The frame is designed from foam plastic, then it should be tied with wire. A cement solution is prepared, which will be applied to the foam. In order for the head to be firmly fixed to the body, it must be driven into the base of the future product with nails before cementing.
To save on cement, you can use expanded clay. Apply it to the surface of the foam and wait for it to dry completely. The craft can be varnished and the colors you like applied to the surface. To decorate the turtle's eyes, you can use different numbers of stones, beads or buttons.
Before the cement has time to dry, all parts of the product must be shaped. To do this, take a wet brush, which removes all the unevenness and blemishes. The head and other parts of the turtle can be formed separately from cement, but this will be more difficult.
You can place some kind of support under your neck so that it is fixed more securely. Roll 2 balls, which will later be used as eyes. Before drying, the shell can be given any design. The final painting and drying will not take long.
Return to contents
Plastic plate
A cool solution would be a simple plastic plate, which is easy to find at every dacha. A turtle can be made from a plate of any diameter.

A cute turtle can be made from two painted tires, an old basin and a small piece of plywood for the head and tail.
Required:
- Plate.
- Markers/paint.
- Stickers or plastic overlays.
- Cardboard.
You need to take a plastic plate and slightly trim the edge. The product can include various available tools. Take cardboard, which has been pre-cut into pieces, and glue it to the inner surface of the turtle using glue or tape.
Form the future limbs of the turtle: tail and head. The latter can be made from a separate piece of cardboard and also using simple paint or beads.
The top of the turtle is covered with paint. Color solutions are limited only by imagination.
Return to contents
Plastic product
The following materials will be required: two-liter bottle; foam balls for legs, neck and head; drill; dye; glue; varnish; iron; artificial eyes; milk bottle cap. The scheme of action is as follows: four holes are drilled in the bottom of the bottle. The edges of the resulting workpiece must be melted with an iron. The next step is this: take the foam balls and cut them in half. Four halves of foam balls are glued to the previously drilled holes. Glue is selected at your discretion. You can use a hot glue gun to speed up the process. Fix securely and wait for drying.

To make paws, you need to cut the tire into four equal parts and insert them into the cuts of another tire.
Half of the small ball must be glued almost to the base of the bottle (the turtle's tail). Next, you need to paint the bottle itself in the color you like and wait for it to dry. The whole foam ball also needs to be painted in the color that will be used to paint the legs, tail and head.
Use a milk bottle cap and cut out a paper circle. Along the edge marked on the lid, add glue and glue the lid. Paint the resulting form.
A large number of common products are attached to a small ball glued at the base. The cap from a milk bottle will serve as a hat, and ready-made eyes or beads are glued to the head, and facial expressions are depicted with a marker. The hat is put on the turtle's head and glued.
After which the product must be coated with spray varnish. Use a marker to make appropriate marks and delimit the shell.
The plastic turtle will be a wonderful stand for flowers and gardens.
The voluminous paper turtle consists of a simple flat body and an impressive shell made from circles of colored paper. The craft is not at all difficult to make, because the main part of the work is cutting out circles from paper.
Materials used:
- Double-sided colored cardboard;
- Double-sided colored paper;
- White paper;
- Scissors, compasses, markers, glue stick.
Volumetric paper turtle step by step
Making a shell
At the first stage you need to make a beautiful three-dimensional shell. It consists of 12 circles. Cut them out of paper. You can make the shell multi-colored and cut out circles of two or more colors; a single color is also beautiful. The diameter of the circle is arbitrary, but I don’t recommend making it less than 2 cm, since the turtle will turn out to be very small, and the work itself will be more difficult.

Fold the circle in half.

Then again to make a quarter. At the top of one of the sides (where the cross is shown), spread glue and glue the sides together. Gluing only in the upper part will ensure a beautiful opening of the shell from below.


Make quarters like this from all 12 circles.

Now they need to be glued together, but in a certain form and order. Look at the quarter. If you place it on the surface at a right angle, the lower part will seem to bifurcate. This is the position in which you need to glue all the quarters: single corners to single corners, and bifurcating parts to the same ones. Glue also needs to be applied only in the upper part, where shown with a cross.


Glue all the quarters together, alternating colors if you also have more than one.

Then apply glue to the last sides and close the circle. You will get a beautiful voluminous shell.

Exactly the same technique is used in, and.
Making a turtle body
Cut a circle out of cardboard, the diameter of which is equal to the circles on the shell. Also cut three strips from the same cardboard, two identical for the paws, and the third a little thicker, from which the head will be made. Also cut out two circles for the eyes from white paper and use a felt-tip pen to draw a pupil in the middle.

Glue two thin strips in a crisscross pattern onto the cardboard circle.

Then fold the thicker strip in half and glue the ends together. You will get some semblance of a thick loop. Glue it between the two paw stripes and press down a little.

Apply glue within the circle with the paws and glue the volumetric shell to it.

If necessary, make the paws shorter and draw patterns on them, glue the eyes to the head, draw a smile. The volumetric paper turtle is ready.


In many countries of the world, the turtle has always been revered and praised, some consider it a symbol of femininity, the Indians believed that our entire world rests on its mighty back, the Chinese believe, to this day, that it symbolizes longevity, wisdom, well-being, prosperity and can protect from misfortunes. And is it possible to ignore all these legends? We invite you to make a wonderful symbol - a turtle with your own hands, to protect your home and garden.
There are many options for making this souvenir, and we will try to cover the most popular and interesting of them.
Soft pillow
For every needlewoman who knows how to crochet, it will not be difficult to knit a turtle pillow. Such a cute little thing will fit perfectly into your interior and will serve not only a decorative role.
We will need:
- leftover yarn;
- hook No. 2 or No. 3;
- fabric for the cover;
- filler.
Making a pillow. Using the fabric pattern, we make hexagons, sew them together and stuff them with filling.

Let's start knitting the shell, for this we need to knit the hexagons according to pattern 1 and sew them to our shell-case.

In order to tie the head, you need to dial 4 air. loops and tie them with 8 single crochets. We continue according to the same pattern, not forgetting to make increases in every 4th row. The head size should be approximately 6-7 cm.
We knit the tail and paws according to the same principle and stuff them with filler. Using buttons or other suitable material, we make eyes and assemble our parts together.

Our Tortilla Turtle is ready.
Garden decoration
If you want to transform your garden with something fun and inexpensive, we offer a master class on making a turtle from tires.
We will need:
- 2 tires;
- empty bottle.
We do everything according to the photo:

Such a turtle can be used not only as a decorative element, but also as an original flower bed.
Felt turtle
Another very interesting option for a felt souvenir. Such a souvenir can be decorated as a refrigerator magnet, a charming brooch for a handbag, or simply left as is, in the form of a toy.
The size of this turtle can be varied as you wish, if you have enough material, you can increase it several times. Let's look at a small example.
We will need:
- pattern;
- felt of different colors, 2 mm each;
- scissors;
- beads for decoration;
- glue "Moment";
- filler.
First of all, you need to draw a pattern and cut out the parts according to it.

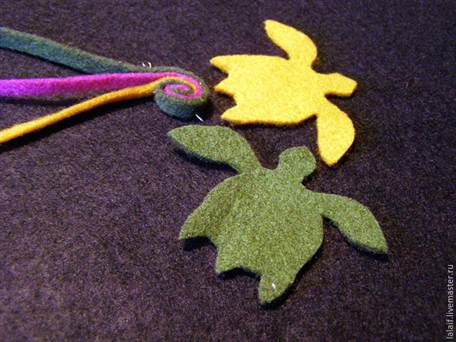
From felt, cut into thin strips, you need to roll up spirals and pin them together with a pin to hold them.

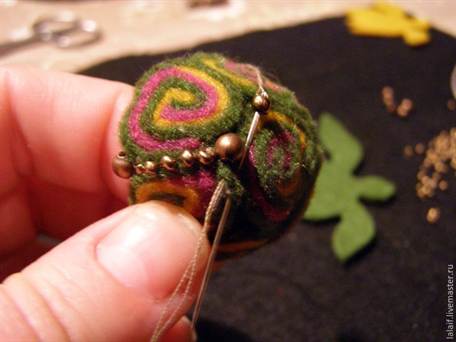
In the future, we carefully sew them together.

Using a needle we collect our shell.


We embroider the gaps with beads.
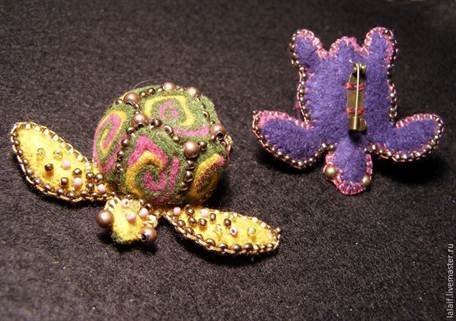
We fill our shell with filler and sew it to the base.

On the underside of the belly we glue pieces of felt in the form of fins to make our turtle seem more voluminous, and we sew the belly together.


Our turtle is ready.
In fact, there are a lot of materials from which you can make a turtle, the main thing is to use your imagination. We bring to your attention some more interesting ideas with photos.
- A wonderful craft made from pine cones. This craft will be very interesting to do with children.

- A turtle made from rubber bands is a new type of art that has already conquered the whole world with its originality and simplicity of execution.

- You can make an original decoration or brooch from polymer clay.


- A plaster turtle will be a stunning decoration for your garden. Of course, you will have to work hard, but the result is worth it.


An unusual sculpture of a turtle decorates the landscape of the garden and is its highlight. How to make a turtle with your own hands for the garden?
To work on this craft you will need the following materials:
- foam sheet;
- strong wire;
- cement mortar;
- colored oil paint.
The legs, neck and tail are cut out of foam plastic. They are laid out in the correct order on plastic wrap.
From above, the space in the middle is filled with small pieces of foam. There should be a small slide.
The wire is cut into 3 parts. Staples are made from it, which are placed on top of the foam slide, holding the pieces together.
The head is cut out of foam plastic separately. It should be in proportion to the body. In other words, don't be too big or too small. It is coated with construction cement mortar, making it voluminous.
In this case, the edge of the lower part is left foam. Leave the workpiece to dry. The head is attached to the body with nails.
Next, the paws and tail are coated with cement mortar, and then the turtle’s shell. Use a staple to level it. The result should be a hemisphere with smooth curves. After all work, allow the workpiece to dry.

When the cement sets and hardens, using a thin brush, use green, yellow and brown paints to draw the pattern of the shell. The legs, tail, and head are also painted over. The end result is this nice garden sculpture made of cement.
We carry out work from plastic
Making a turtle out of plastic with your own hands is not at all difficult. You will need the following materials:
- strips of plastic;
- plastic bowl;
- a small sheet of plywood;
- glue;
- colored oil paint.
The process of making the craft begins with placing a plastic bowl upside down on a sheet of plywood. Using a pencil or marker, draw a circle along the edges of the bowl. Next, cut out a circle from plywood.

Paws and tails of equal width are cut out of strips of plastic. They can be painted in any color using prepared paints. When the blanks are dry, they are glued onto a circle of cardboard: two paws in front on the sides, two on the sides in the back and a tail between them in the middle.
The edges of the bowl are coated with glue and a circle of plywood is placed on top of the paws. Allow the workpiece to dry.
Instead of one large bowl, you can use several small plastic plates. Then you get a whole group of beautiful figures that are placed among the grass or on the paths in the garden.
How to use old tires?
You can make a turtle for the garden from waste materials - old tires or something else.
To make a beautiful garden sculpture, you will need the following materials:
- 2 car tires;
- a container of polyurethane foam;
- empty glue bottle;
- spray paint.

In the whole tire, cuts are made along the upper edge on the sides. Separately, 4 paws and a tail are cut from another tire. They are threaded with their bases into the cuts on the first tire and secured using construction screws.
On one side, another incision is made in the center. The edge of an empty paint or glue can is squeezed into it. This is a blank for the head.
A large metal bowl is placed over the tire hole. It is also attached to the rubber with self-tapping screws. Next, the entire perimeter is coated with polyurethane foam from a container.
When the foam dries, use a sharp knife to form a hemisphere, like the shell of a living turtle. Irregularities are sanded with sandpaper.
The blank for the head of the craft is also covered with polyurethane foam. It is blown from all sides with polyurethane foam and sanded until it looks like a real head.
A beautiful pattern is drawn on the shell using a simple pencil. To make it voluminous, the frozen polyurethane foam is slightly pressed along the lines using an awl.

An original solution made of stones
You can also make a turtle from natural materials. A beautiful sculpture will decorate any, even the most sophisticated, landscape. To bring the idea to life, you will need the following materials:
- stones of various sizes;
- cement mortar;
- metal rods;
- colored garden paint.

A suitable location for the location of the future sculpture is selected. The first layer of stones is laid out in a circle. On top of it there are 2 metal rods in front and behind on the sides, one next to the other. The rods are fixed with a second layer of stones, which are laid out on top. Everything is filled with liquid cement.
Small pebbles are laid out around the rods in a semicircle. The voids also need to be filled with cement mortar.
Next, the turtle's shell is formed from the stones. It is filled with liquid cement. While the surface of the shell has not yet set, small stones are placed on top over the entire area. Each of them is slightly pressed into the base.
The workpiece is left for several days to allow the cement to dry. The finished garden sculpture is covered with multi-colored layers of paint. Let it dry.
Just like that, using scrap materials, using enthusiasm, imagination and diligence, you can make a beautiful exotic turtle for the garden. Other beautiful figures are made from these materials.
Lesson notes on observing pets - live freshwater and red-eared turtles. Materials about educational activities, projects on environmental education, children's “research” works about these animals and the features of caring for them. Scenarios of various theatrical performances with the participation of “characters in shell.” Step-by-step master classes on creating original crafts; original didactic and educational games in the form of turtles. Using the Tortilla Turtle image in physical education activities (including in the pool).
A turtle is walking in a reliable shirt.
Contained in sections:Showing publications 1-10 of 350.
All sections | Turtle. Activities, games, crafts, projects
My card index of riddles 14 riddles about Turtle * Lives peacefully, is in no hurry, carries a shield just in case. She walks under it, not knowing fear. (Turtle) *What kind of miracle? Like this miracle: dish on top, dish below. A dish walks along the road, its head sticks out and its legs stick out. (Turtle) * Who wears...
 Target classes
: - making appliqué from waste material. Tasks: - continue to develop the ability to cut out blanks from colored paper using ready-made templates; - consolidate the ability to compose a whole object from several parts, carefully glue applique details, finish...
Target classes
: - making appliqué from waste material. Tasks: - continue to develop the ability to cut out blanks from colored paper using ready-made templates; - consolidate the ability to compose a whole object from several parts, carefully glue applique details, finish...
Turtle. Activities, games, crafts, projects - Research project “Our friends are turtles”
 Research project “Our friends are turtles.” Object of study: red-eared turtle Project participants: teacher, students, parents. Age: older children Duration: short-term Type: research Relevance. The nature of our planet Earth...
 Image library "MAAM-pictures"
Summary of a lesson on modeling from salt dough (middle group) Topic: “Friends for a turtle” Purpose: To teach children to convey the characteristic features of a turtle in modeling, using previously learned methods of working with dough Objectives: Educational objectives: -Teach children to identify the main...
Objectives: cognitive development: Clarify ideas about the unique appearance of a turtle: it has a shell, a head, claws, paws, a neck, a tail. To form in children an idea of the behavioral features of a turtle: it eats, moves, breathes. To develop children's skills...
 Master class on application: "Turtle" for children of primary preschool age. Today I bring to your attention a master class on making a turtle from colored paper. The turtle symbolizes strength, patience, endurance, constancy, slowness, fertility,...
Turtle. Activities, games, crafts, projects - Summer entertainment “Lion Cub and Turtle Visiting the Children” in kindergarten
Summer fun for preschoolers in preschool educational institutions. Scenario "Lion Cub and Turtle visiting the guys" Description. Summer entertainment scenario for children of all age groups in kindergarten. In good weather, it is held on the kindergarten playground. Target. Create a joyful summer mood...
 Goal of OD: Making paper appliqué using the “gluing on a flat surface” technique. Program tasks: To introduce children to the type of applique using the technique of “gluing paper onto a flat surface” - select the necessary parts from oval or round paper and stick them...


