A striking example of a modern, practical and aesthetic suspension system is the Armstrong ceiling (photo below) based on cellular boards. You need to understand that under Armstrong they mean the products of the company of the same name. Its popularity is so high that today, almost all suspension-type systems, out of ignorance, are called that way by many.
Construction materials
Before analyzing the pros and cons of the company's suspension systems, it is worth understanding what the design is. It was Armstrong who came up with the idea to combine different materials for the production of modules. Using a standard frame based on metal rails and suspensions as a basis, manufacturers offer customers to choose the finish to their liking.
You can choose from the following options:
- mineral fiber;
- basalt fiber;
- polycarbonate;
- natural wood;
- become;
- aluminum, etc.

You can try to diversify the design due to the texture. The original ceiling in the apartment will look with the use of plates:
- embossed;
- geometric pattern;
- with perforation;
- with decorative elements.
A very special option is Armstrong designer ceilings, made to order in a single version.

Advantages and disadvantages of systems
The popularity of designs has not faded for several decades, which means that there is something that inspires confidence among consumers. Armstrong's list of positive qualities of ceilings clarifies this issue. So, designs are popular due to:
- the possibility of arranging an interceiling zone for masking communication systems, electrical wiring, ventilation with constant access to them if necessary;
- no need to prepare a rough base for installing the system - the ceiling will mask surface defects;
- the possibility of quick installation and the same simple and not protracted dismantling if necessary;
- high reflectivity of the plates, allowing to save on energy consumption;
- excellent sound insulation (suitable for the design of public spaces);
- the ability to decorate the canvas with additional accessories and practical lighting fixtures;
- high level of safety and environmental friendliness.
The seemingly flawless system has several drawbacks.

These include:
- Reducing the height of the ceilings in the room by at least 8 cm, and in some cases more. Despite the fact that almost all types of suspended ceilings sin with this, you need to be prepared for the fact that the Armstrong design will only be appropriate in a room with initially high ceilings.
- Exposure to moisture. Armstrong systems and similar systems will not protect the premises from floods. The mineral fiber included in the boards will not cope with the test, therefore, in the event of an emergency, the ceiling must be completely or partially replaced.
- Despite a wide choice of finishing materials for system cladding, embossing and options with plate sizes, their design component is inferior to the same stretch ceilings, the advantage of which is the implementation in several levels with hidden and open lighting.
- Low strength. Armstrong ceilings are not as resistant to mechanical damage as they seem. If it is not metal or wood, it is easy to damage it during installation or dismantling work.
- Doubtful environmental friendliness of mineral fiber boards. You can talk about the complete safety of the ceiling only in the case of aluminum or wood finishes. Man-made materials include mineral fiber, starch, water-based paint and cellulose - all of which are not the best option for human neighborhoods.
Traditionally, the Armstrong suspended ceiling and its counterparts with a similar design are presented in several versions of plates, each of which has its own characteristics.

Varieties of ceiling systems - good to know
All variants of Armstrong suspended structures, despite the differences in functionality and content, have a visual similarity. Nevertheless, conditionally ceilings are divided into several types:
- Budget option - plates "Tatra", "Baikal", "Cortega" and "Oasis". This is an excellent choice for those who care about durability, naturalness, combined with an acceptable cost.
- Plates of the class "Prima". The most resistant to moisture, they are much more expensive than the previous version, but they can be used in rooms with a high level of humidity (bathroom, kitchen). During operation, they do not lose their shape, retain a rich color.
- Soundproofing boards. A specialized version of the ceiling for rooms with a high level of noise, often for public use. The ceiling covering suppresses all types of noise.
- Plates of the Bioguard series. Suitable for installation in rooms with increased hygiene requirements - hospitals, kindergartens, schools, canteens, food workshops, etc.
- The most expensive and unusual Armstrong designer ceilings, which are ordered according to individual sketches.
Among the presented options for plates, suitable ones can be chosen for the interior in any style. At the same time, not only the materials at the base of the plates and classes, but also the types of edges can affect the final decision. There are three types: Microlook, Tegular and Board.

The latter is quite rightly out of competition because of its versatility and even some neutrality. Mounting ceilings with plates of this type is simple - this will not be reflected in the figure. As for the first two options, with their help it will be possible to assemble a ceiling with clearly marked boundaries between the elements.
In conclusion, it remains to be noted that the Armstrong ceiling systems developed only a few decades ago have firmly entrenched themselves in the Russian market for a reason. There are a lot of objective reasons for this and technical characteristics that have been tested by time and active operation.
Designs fit perfectly today not only in office interiors, in trading floors and restaurants. With a skillful approach, they are used to decorate the ceilings in apartments in an original way, practicing the device of functional and economical lighting based on fluorescent raster lamps.
A variety of modern building materials and the introduction of new technologies allow craftsmen to create real masterpieces, decorating ordinary apartments in an original and non-standard style.
What he really is?
Armstrong ceilings have been popular for more than a decade. This company was one of the first to introduce a system of suspended ceiling structures to the world market, therefore it can rightfully be considered the founder of this type of ceiling.
Suspended ceiling consists of:
- bases in the form of a system of suspended elements that serve to fix the ceiling tiles;
- various fasteners;
- decorative panels.
A distinctive feature of Armstrong ceilings is considered to be a complete set of structures, i.e. the ceiling comes with everything you need to assemble it, while other companies offer to purchase structural elements separately.
By purchasing it, the client does not have to worry about the need to find suitable fasteners or decorative connecting elements, since the ceiling tiles and the fasteners that come with them complement each other perfectly.
Decorative ceiling panels Armstrong are made of rock wool, starch, clay and additional inorganic components. Depending on the design of the design, the front surface of the plates is covered with paint or textured.
Installation rules
 Installation work does not require special skills, since the technology is as simple as possible. The design consists of guide strips mounted around the perimeter of the room, and crossbars that are fixed to them with special latches.
Typically, the length of the constituent elements is 60 cm or 1.2 meters, however, if necessary, all parts can be easily cut with ordinary construction scissors for metal.
First, guide strips are attached around the perimeter of the room, it is important to set them perfectly evenly, because otherwise the plates may not converge with each other or move slightly to the side, and the final design will not look as impressive as we would like.
Now it is important to determine the location of the lighting fixtures. A clear designation of the output of wires will protect against the subsequent coincidence of the attachment points of chandeliers or lamps with the guide profiles of the ceiling covering.
Tip: it is better to bring wires and cables out immediately, bare ends should be carefully insulated.
If the guide strips are attached to the walls as firmly as possible, for which it is desirable to use dowels, then the hangers for fixing the main profiles will best be held with anchoring.
Now you can attach the main T-profiles to the fixed hangers. After fixing all the parts, it is necessary to align them using a laser level. If this is not done, problems may arise with the fastening of subsequent structural parts.
 The next stage is the fixation of the transverse profile, for which special notches are provided in the main profile. Fastening is carried out by snapping matching parts; additional fastening of the elements is not required. Similarly, we carry out the fastening of the longitudinal profile to the transverse lines.
The final step will be the installation of decorative panels. For ease of installation, on the reverse side of each plate there is a designation which side and in which direction to insert it. Grilles and lighting fixtures are mounted during the installation of ceiling tiles, for which special holes are cut in the right places for inserting fixtures.
 To make the ceiling beautiful and perfectly even, during installation work, the main recommendations of experienced builders should be taken into account:
 Choosing the Armstrong system for ceiling decoration, the consumer can purchase decorative panels of any shades, which makes it possible to have many options for the interior of the room.
To create an unusual ceiling, you can alternate plates of different shades, the standard white color goes well with bright inserts, for which you can insert a bright panel through several white squares and continue this row, symmetrically placing colored squares throughout the ceiling.
With the help of a specifically designed ceiling, you can delimit a room by creating certain sections in it. For this, a longitudinal or transverse row of plates of a different color is used, for example, a white base can be divided by a blue or turquoise line. It is best to use tiles of the same color that is available in the interior, this will give the room a certain style.
Tip: this design is appropriate in the living room or dining room, when you need to distinguish between eating and relaxing areas.
You can emphasize the extraordinary design of a room decorated in the style of "hi-tech" or "modern" with the help of a tiled floor with a textured pattern. This can be an embossed pattern, acrylic molding, gilding and other variations of the pimply design of the outer layer.
Advantages
 Among other similar types of ceiling coverings, Armstrong products are distinguished by the following qualities:
- they perfectly absorb sound, due to which they increase the level of sound insulation of the room without the use of additional materials;
- the material from which the coating plates are made is characterized by increased moisture resistance, which allows the use of such a ceiling in bathrooms, kitchens, on open terraces and in other places with high humidity;
- special impregnation of the plates makes the material non-combustible, which prevents the spread of fire in the event of a fire;
- Armstrong plates meet international safety standards - they are made from natural materials, therefore they do not cause allergies and can be used in crowded places, as a finishing material in kindergartens, schools and medical institutions;
- ease of installation allows you to assemble the ceiling structure with your own hands, without putting much effort into it;
- the specificity of the ceiling design allows you to hide communication pipes, cables and other elements behind the decorative panels that violate the harmonious appearance of the room. Along with this, if necessary, hidden structures can be easily reached without violating the integrity of the ceiling;
- A rich color scheme maximizes the possibilities of designing a room.
Interior photos
Today, suspended ceilings are an integral part of the interior of trading floors, offices, restaurants, etc. In addition to their decorative function, their use contributes to the creation of good acoustics and optimal microclimate conditions.
Modular suspended ceilings of the Armstrong type are widely used in both office and residential buildings, as well as in public places, shopping malls and premises for various purposes.
Modern interiors are hard to imagine without these light, aesthetic, comfortable designs, with which you can give the room a finished look. In addition, the flaws of the old ceiling are not visible.
Advantages:
- Low cost modular systems.
- The environmental friendliness of the material from which the panels are made.
- The possibility of partial repair of the ceiling structure without closing the premises for repairs. It is only necessary to replace removable panels unsuitable for further use and put new ones in their place.
- The design of the Armstrong false ceiling profile allows you to hide engineering communications behind it.
- Adequate ventilation of the space hidden behind the false ceiling is ensured.
- Possibility to install recessed lighting and special grilles for ventilation, as well as fire prevention systems.
- Installation, replacement or repair of individual parts of the ceiling is very fast.
- The level of sound insulation of the room and its acoustics are improved.
- The weight of the structures is small. This allows you to install suspended ceilings in large areas. Additional supports or partitions are not needed.
- Ceiling Armstrong is not combustible.
Using fasteners of various lengths, you can adjust the level of the ceiling, reducing the volume of the room just as much as necessary.
The disadvantage of this ceiling structure is only one - the ceiling is not able to withstand moisture. In those rooms where the humidity is constantly increased, you can use special moisture-resistant and washable ceilings.
Varieties:
- Ceilings economy class. They are installed where it is important to observe hygiene, good acoustics and sound insulation. Among them are the brands: TATRA, BAJKAL, OASIS and OASIS PLUS.
- Prima ceilings. These ceilings are more durable, they are not afraid of constant exposure to a humid environment. Decorative textures and increased fire resistance are the hallmarks of this type of Armstrong. They always look expensive and stylish. Brands: PRIMA CASA, PRIMA PLAIN, as well as PRIMA ADRIA and others.
- Moisture resistant ceilings Armstrong. Used in baths, swimming pools, laundries, technical areas, warehouses. Series: MYLAR and NEWTONE RESIDENCE.
- Hygienic ceilings Bioguard. Modular suspension structures are suitable for medical facilities. They are also allowed to be used in the food industry. Suspended ceilings meet all standards.
- Armstrong Acoustic Ceilings are suspended systems that most fully provide high sound and noise absorption. Used in offices, restaurants, cinemas, hospitality, schools, swimming pools. NEEVA and FREQUENCE. - a series of acoustic ceilings.
- Designer ceilings Armstrong. Many people think that conventional modular ceilings are pretty simple and boring. But this opinion is wrong. Design solutions for suspended ceilings are distinguished by original colors, interesting surface texture, and innovative materials from which the panels are made. Where is it applied? When decorating bars, restaurants, shopping centers, airports, hotels, cottages. Popular series: CELLIO, CIRRUS DORIC, GRAPFIS CUADROS, LINEAR and DIAGONAL.
Installation Features:
- Before starting the installation of the suspended structure, all communications must be carried out. They will later be completely covered with ceiling panels.
- The weight of the built-in equipment should be clarified. Suspension systems withstand a load that reaches 6.5 kg per sq.m. If the weight exceeds these figures, a suspension system is needed that can withstand weights up to 10 kg per sq.m.
- Installation begins with marking. The plane of the future structure is set using a level (laser or hydraulic). Next, wall corners are attached along the level line. Place and install fasteners.
- The assembled suspensions are installed on parallel lines drawn on the ceiling. Guides are attached to the hangers through the holes. The result is a single space with installed wall corners.
- In the guide profiles, which are at a distance of 60 cm, special jumpers are inserted into long slots. As a result, they form a grid, the size of the cells of which is 0.6 by 1.2 m. Further jumpers of shorter length are added - a grid with cells of 60x60 cm appears.
- It remains to insert the ceiling panels (cards). If there is excess material, it is removed with a special construction knife.
Today's Armstrong ceilings surprise with their variety. Some are able to make the room lighter and more spacious, others effectively emphasize its best sides, others are masterpieces of design.
The attractiveness of the ceiling determines how aesthetically the interior of the room will look. Therefore, starting repair work, this detail should be given maximum attention. But to achieve an elegant and stylish look of the ceiling is more difficult than the walls - working conditions are more difficult.
If you have a tight deadline to put the ceiling in order, then the best choice is a suspended structure. Its most popular variety is the armstrong ceiling. It is quick and easy to install, and is also reasonably priced.

Advantages and disadvantages of Armstrong ceiling
Armstrong slab mesh suspension system has the following advantages in addition to ease of installation and low cost:
- Excellent sound and heat insulation properties.
- In the space between the ceiling and the suspended structure, you can conveniently place a communication system and lighting fixtures.
- Suspended ceilings are easier to repair.
- It does not require special care.
- Huge range of profiles and plates. The surface of the plates can imitate metal, glass, mirror, wood, be painted in various shades, be matte or glossy.
- Light weight

The disadvantages include low strength and lack of protection against leakage from above. And fiber ceiling tiles also have a low level of resistance to moisture - water spoils them, causing deformation. In addition, curvilinear forms with Armstrong cannot be obtained.
Diagonal execution deprives it of all advantages. Only an experienced specialist can install such a ceiling. Moreover, this will require significant time costs.

Armstrong suspended ceiling reduces the height of the room by about 25 cm. As a result, it is rarely seen in the apartment. The main scope of its application is shops, office premises, restaurants, cafes.

Ceiling construction
Armstrong cellular slab ceiling is a profile structure attached to the rough ceiling surface with suspensions. The profiles form cells, which may be square or rectangular. Plates and lamps for the ceiling are inserted into them.

Profiles act as guides. They bear the brunt of the burden. The weight of the entire ceiling structure is negligible, therefore, when laying the profiles, a step of 1.2 m is maintained.

Hangers for the ceiling are attached along the marked markings every 0.5 m. From below, the suspensions are equipped with hooks, and there are holes in the supporting profiles. Profiles are simply hung on hooks.

A transverse profile is mounted between parallel guides with the same step of 1.2 m. The result is a system of profiles with cells of 1.2 m * 1.2 m. The standard dimensions of ceiling tiles are 0.6 m * 0.6 m.

For the installation of Armstrong ceiling slabs, additional installation of profiles is required until a cell with the required area is obtained. Then you need to install lighting fixtures and the ceiling tiles themselves.

Construction details
The Armstrong ceiling is a collection of easily interconnected parts. Its advantage, such as modularity, makes it possible to obtain a ceiling system of various shapes and sizes.

Only obtaining the ceiling of a non-linear configuration is not available. This limits the scope of Armstrong to only rectangular and square rooms.

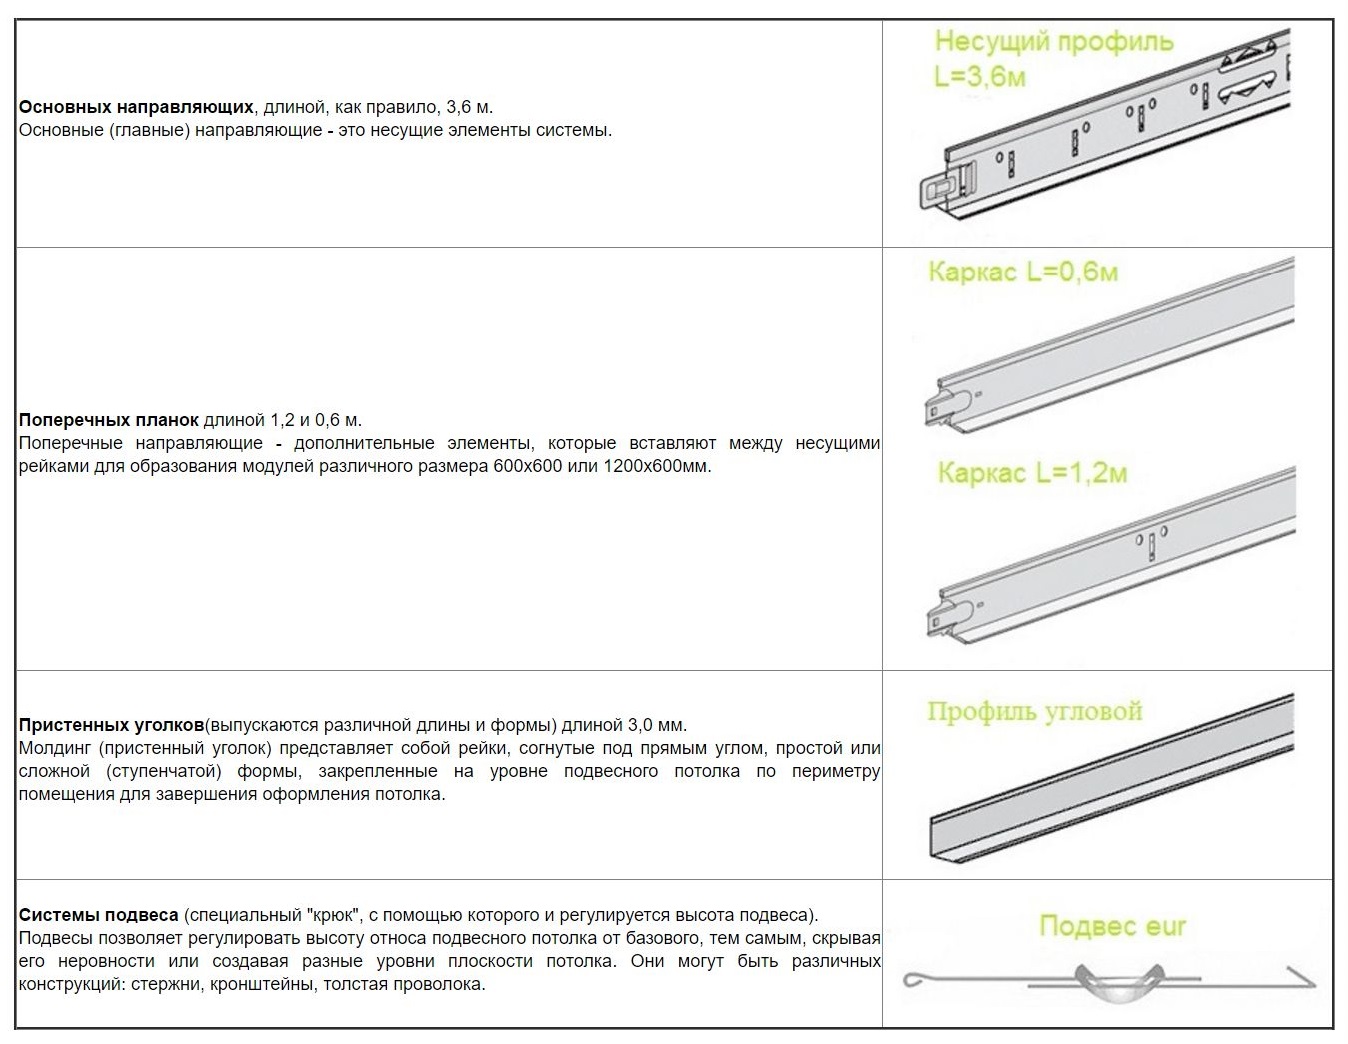
Guides
Guides are made of aluminum alloy. Perforations are applied on top of them, thanks to which they are fastened to the suspensions and connected to each other.

The part of the guides visible from the room is usually white, but can also be silver-gray. You can also find profiles in black, gold and other colors.

Guides are produced in lengths of 0.6 m, 1.2 m, 3.6 m. The guide profile must be solid, but if necessary, can be spliced. Given this, the length of the profile should not be less than the length of the room. Speaking of the transverse details of the frame, one part should have a length of 1.2 m, and the other - 0.6 m.

Unlike load-bearing profiles, it will not work to cut them to the desired length - there are protrusions on their edges for joining with guides. Therefore, in order to do everything right, it is necessary to carefully calculate the Armstrong ceiling for a particular room.


Depending on the type of plates, transverse profiles and guides of two types are distinguished: with a shelf length of 1.5 cm and 2.4 cm. The back can also vary - be 1.9 cm, 2.4 cm, 2.9 cm (depending on the thickness plates).

There are also wall profiles, made in the form of a corner, which are attached around the perimeter of the room. They serve to support the end plates. The size of their shelves can also be different - 1.9 cm and 2.4 cm.

Ceiling tiles
The classic size of plates for the Armstrong suspension system is 1.2 m * 0.6 m and 0.6 m * 0.6 m. The latter variation is more popular. This is because the human eye perceives squares better than rectangles.

In addition, the plates can have different thicknesses. It can vary from 6 mm to 19 mm. The thicker the slab, the better the soundproofing properties of the ceiling. Also, sound insulation depends on the material of manufacture.

Armstrong ceiling in the interior of a city apartment is not often seen. But it is an essential attribute of public places and offices. Such a ceiling system will not exhaust its potential soon, because the design is improved every year.

Armstrong ceiling photo


Ceiling type "Armstrong" refers to suspended ceilings. The slab-cellular design provides simple installation and easy replacement of elements, allows you to hide communications and wiring, and also gives the room a strict and discreet look.
Pros and cons of Armstrong ceilings
The scope of Armstrong is quite wide: it is used for finishing ceilings in public places and offices, sports and cultural centers, cafes and shops. They also fit well into the design of apartments.

Advantages of Armstrong ceilings:
- low price;
- good sound and heat insulation;
- a large selection of plate materials allows you to create any design;
- no preliminary preparation of the ceiling is required;
- simple installation that does not require the involvement of specialists;
- the ability to hide communications and ventilation systems, provide easy access for their inspection and repair;
- easy installation of built-in lights;
- dismantling and reuse possible (the ceiling system is completely collapsible).

Armstrong ceiling with natural wood slabs
The disadvantages of this design are that it:
- lowers the ceiling height by at least 20 cm, so it is not always suitable for finishing apartments;
- not suitable for rooms of non-standard shape;
- does not protect against leaks;
- afraid of moisture, organic plates get wet and deformed.
Thanks to a huge list of advantages, the popularity of Armstrong ceilings does not decrease, despite new suspended and suspended technologies. The Armstrong ceiling is quite easy to install with your own hands in an apartment or office.
Armstrong ceiling prices
ceiling "Armstrong"

Armstrong ceiling design
Armstrong ceilings are a frame made of metal slats in the form of 60x60 cm cells, on which hard or soft plates of the appropriate size are laid.

Rigid slabs can be made from the following materials:


Soft plates are made from mineral or organic natural materials. In recent years, as part of the struggle for environmentally friendly finishes, mineral slabs have practically ceased to be used - they contain mineral wool, small particles of which have a bad effect on the respiratory system.

Organic soft boards for Armstrong ceilings are used quite often, they consist of recycled cellulose raw materials and are absolutely safe, light in weight, and easy to cut during installation.

The design of the ceiling, as well as the frame elements used for it, are shown in the illustration.
Prices for the ceiling "Armstrong" made of wood
ceiling "Armstrong" made of wood

- Ceiling plate measuring 60x60 cm.
- Transverse T-shaped profile, length - 0.6 m.
- Bearing T-shaped profile, length - 3.7 m. They are placed parallel to the short wall of the room, if necessary, they can be increased using standard fasteners or sawed off the excess.
- Longitudinal T-shaped profile, length - 1.2 m. Attached to the carrier with a step of 0.6 m.
- Ceiling suspension with a hook (5a) and a rod (5b). The suspension bar is attached to the ceiling with dowels or anchors, the hook is attached to the supporting profile. Due to the clamp (5), the height of the suspension is adjusted, ensuring the horizontal level of the frame.
- Wall L-shaped profile, length - 3 m. It is attached around the perimeter of the room using a level.
- Anchor or dowel for attaching the suspension to the draft ceiling.
- Trimmed ceiling plate to fit the size of the room.
The profile for the frame can be metal, powder-coated, or metal-plastic. The standard shelf width is 15 or 24 mm, the first is used for lightweight organic slab structures, the second for mirrored, glass and metal ceilings with a large number of built-in elements. For particularly heavy structures, reinforced suspensions are also used. The frame is mounted using standard fasteners. It requires minimal fitting and is assembled like a designer, easily and quickly.
Note! Armstrong ceiling slabs can be made independently from wood panels or MDF. This design of the plates will give the room originality.
Material calculation
To calculate the materials you need to know the dimensions of the room - length and width. According to them, the required number of tiles and profiles is calculated. The calculation includes several stages.

- Determine the required number of tiles. To do this, calculate the area of \u200b\u200bthe room by multiplying its length by its width in meters. The result obtained is divided by the area of one tile, for a standard size of 60x60 cm it is Sp \u003d 0.36 m. Round the result to the nearest whole number.
Example: for a room of 3.5x5 m, the area of \u200b\u200bthe room Sk \u003d 3.5x5 \u003d 17.5 m. The number of tiles Np \u003d 17.5 / 0.36 \u003d 48.6. After rounding, you get 49 pieces.
- Calculate the number of wall profiles. To do this, determine the perimeter of the room by adding the lengths of all its walls, and divide it by the standard length of the corner profile of 3.0 m.
Example: room perimeter Pk = 3.5 + 5 + 3.5 + 5 = 17 m. The number of wall profiles Nsp = 17/3 = 5.66 pieces. After rounding up, you get 6 pieces.
- Find the number of carrier profiles. They are usually placed along a short wall at a distance of 0.6 m from the wall and 1.2 m between the profiles. The number of profiles in a row is found as follows: divide the width of the room by the standard profile length of 3.7 meters, and round the result to a larger integer. The number of rows is determined by dividing the length of the room by the installation step of the supporting profiles of 1.2 meters, rounded up to a larger integer. The number of profiles in a row is multiplied by the number of rows.
Example: for the room shown in the example, there will be one profile in the row, since the width of the room is smaller than the standard length of the profile. The number of rows is 5 / 1.2 = 4.16 rows, after rounding - 5. Total - 5 carrier profiles.
- The number of longitudinal profiles is found as follows: the length of the room is divided by the length of the profile 1.2 m and rounded up; the width of the room is divided by the installation step of 0.6 m and rounded down. The results are multiplied.
Example: the number of rows of longitudinal profiles is 5 / 1.2 \u003d 4.16, after rounding it turns out 5. The number of profiles in a row is 3.5 / 0.6 \u003d 5.8, after rounding down - 5. Total 5x5 \u003d 25 is needed things.
Ceiling frame prices
ceiling frame

- The number of transverse profiles is found as follows: the length of the room is divided by the installation step of 1.2 m, rounded down; the width of the room is divided by the profile length of 0.6 m and rounded up.
Example: the number of profile rows is 5/1.2=4.16, after rounding - 4; the number of profiles in a row is 3.5 / 0.6 \u003d 5.8, after rounding - 6. Total 4x6 \u003d 24 pieces of a transverse profile.
- The number of suspensions is calculated as follows: the length and width of the room are divided by the installation step of 1.2 m, both results are rounded up and the results are multiplied.
Example: 5/1.2=4.16, after rounding - 5; 3.5 / 1.2 \u003d 2.9, after rounding - 3; 5x3 \u003d 15.

For the convenience of calculations, you can use table 1, it is enough to find a room of a suitable size in it and determine the required number of ceiling elements.
Table 1. Calculation of the material for the Armstrong ceiling.
| Room dimensions, m | Number of plates, pcs. | Wall profile, pcs. | Carrier profile, pcs. | Longitudinal profile, pcs. | Cross profile, pcs. | Hangers, pcs. |
|---|---|---|---|---|---|---|
| 3x3 | 25 | 4 | 2 | 12 | 10 | 9 |
| 3x4 | 34 | 5 | 3 | 16 | 15 | 12 |
| 3x5 | 42 | 6 | 4 | 20 | 20 | 15 |
| 4x4 | 45 | 6 | 6 | 24 | 18 | 16 |
| 4x5 | 56 | 6 | 8 | 30 | 24 | 20 |
| 4x6 | 67 | 7 | 10 | 30 | 30 | 20 |
| 5x5 | 70 | 7 | 8 | 40 | 36 | 25 |
| 5x6 | 84 | 8 | 10 | 40 | 45 | 25 |
| 5x7 | 98 | 8 | 12 | 48 | 63 | 30 |

After preliminary calculations, it is recommended to draw a sketch of the ceiling on a scale, indicating the placement of profiles, suspensions and built-in elements, as shown in the illustration. When installing heavy fixtures or elements of ventilation systems, it is recommended to install additional suspensions.
Prices for recessed luminaires
recessed luminaires

Note! It is better to order all elements with a small margin in case of adjustment or damage during installation.
Ceiling preparation
Like other types of false ceilings, Armstrong completely hides the imperfections of the rough ceiling, so surface preparation consists in removing the old peeling coating. If whitewash or paint is firmly attached to the ceiling, it can not be removed. In the event of detachment of individual sections or destruction of the plaster, the pieces of the old finish that have fallen off can damage the slabs, so it is better to remove them, and seal the cracks and cracks with cement or alabaster putty.


Armstrong ceilings with soft slabs are afraid of water and, when wet, fall to the floor and break. Therefore, in rooms where water leaks are possible, it is necessary to perform.
There is a distance of 20-25 cm between the finished ceiling and ceilings, in which sound and heat insulating materials can be placed. In this case, first, a frame is mounted from a wooden block for fibrous insulation boards, positioning it so that it is offset relative to the frame of the false ceiling. The insulation is laid and covered with a vapor-permeable moisture-proof film. When using expanded polystyrene, it is attached directly to the draft ceiling with glue and fungal dowels.

Note! When installing thermal insulation, do not forget to remove the wiring for lamps and ventilation ducts.
Armstrong ceiling installation
Ceiling installation work includes several stages, described in table 2.

Ceiling Armstrong Axiom KE Canopy - installation instructions. Download file.
Table 2. Armstrong ceiling installation sequence.
| Stages, illustrations | Description of actions |
|---|---|
| Further installation largely depends on the level marking, so it is not recommended to neglect this step. Marking is carried out using a laser level from the lowest corner of the ceiling. In the corner, the average length of the suspension is laid off from the base ceiling so that it can be adjusted in both directions, up and down. From this point, with the help of a level, lay lines along both walls, mark the corners adjacent to them and continue the lines on the remaining walls. They must meet at the last corner. |
| Wall L-shaped profiles are fixed with dowels and self-tapping screws or anchor bolts in increments of 0.5 m with the shelf down. Align the shelf along a pre-marked line. In the corners, the profile is bent, having previously cut the shelf. |
| With the help of ceiling hangers, carrier profiles are fixed in order to place them in the right place, it is convenient to pre-mark the location of the rails. They are fixed in increments of 1.2 meters parallel to the short wall of the room; for convenience, you can draw or mark lines with a chalk cord on the ceiling. They mark the attachment points of the suspensions according to the sketch. The general rule is that hangers should be located no more than 1.2 m apart and 0.6 m from any wall. Anchor bolts or dowels are used to fasten the suspension. According to the marking, holes of the desired diameter and depth are drilled and the suspension is fixed to the eye of the rod. |
| The installation sites of heavy lamps and blocks of split systems are reinforced with additional suspensions, placing them with some offset relative to the main ones. Keep in mind that the hanging hook can interfere with the installation of elements, so it is better to place the hangers with an offset of 5-10 cm. |
| Bearing profiles are installed according to pre-applied markings, fixed with hanger hooks for special holes in the profile. The ends of the carrier rails must rest on the L-profile flange. If the length of the profiles is insufficient, they are increased using a standard lock on one of the ends of the rail. They can also be trimmed if necessary. |
| Align the horizontality of the carrier profiles by adjusting the length of the hangers. To do this, compress the butterfly clip, move the hook and rod in the right direction, after which the clip is released, and the length of the suspension is fixed. To control the plane of the ceiling, tightly stretched cords and a level are used. |
| Longitudinal profiles with a length of 1.2 m are fixed in increments of 0.6 m between the carrier rails using standard fasteners on the profiles. The indentation from the walls is adjusted so as to avoid excessive trimming of the extreme plates. It is best to make the indents symmetrical. The distance between the longitudinal rails is filled with transverse rails with a length of 0.6 m, which are also fastened using standard fasteners. |
| After the complete assembly of the ceiling frame, they begin to fill the cells with built-in elements and slabs. First you need to prepare for connection the communications passing behind the finishing ceiling: electrical wiring, ventilation ducts. They are brought to the installation sites of elements and blocks. For ceilings, Armstrong use raster, LED or fluorescent lamps with standard dimensions of 590x590 mm. Their installation is quite simple: the lamp is turned on at a slight angle to the plane of the ceiling, turning it diagonally across the cell. They turn it and combine it with the cell, after which it lies on the guide profiles. Through the adjacent empty cells, the luminaire is connected to the power cable. |
| Spotlights can also be installed in Armstrong ceilings. For their installation in the slabs, holes are cut out according to the size of the fittings of the fixtures, and they are fixed. Put the tiles in place and connect the lamp. Air intakes of ventilation systems are cut in the same way. |
| They try to install split system units in the most fortified places, for example, in the corner. |
| Blind plates are installed last. They are brought in diagonally inside the cell, placed on the guides and, lifting and turning from below, are led into the cell. You should not put pressure on them from above - with the correct assembly of the frame, the plates should lie down effortlessly. |


Video - Armstrong ceiling installation, instruction
How to install an Armstrong ceiling in a typical apartment
The main problem when installing the Armstrong ceiling in an apartment is to lower the level by at least 15-20 cm. With a lower height, it will be difficult not only to mount the frame, but also to maintain its horizontal position. Another difficulty is laying tiles. To get the slab into the cell, it (the slab) must be tilted at an angle of at least 30 degrees, and if the space between the frame and the base ceiling is too small, the tile will not fit.
Ceiling prices "Armstrong Axiom KE Canopy"
Ceiling Armstrong Axiom KE Canopy

The main difficulty in installing the Armstrong ceiling in an apartment is that the plates in the process tilt at an angle of 30 degrees, and this, in turn, is impossible if there is not enough space above the frame
If the ceilings in the apartment are higher than 275 cm, the Armstrong installation is performed using conventional technology. In this case, the final height of the room will be at least 250 cm, which is allowed by SNiP. With a lower ceiling height, Armstrong ceilings are recommended to be installed only in rooms with periodic stay of people, for example, in the corridor.
Video - Armstrong mirror ceiling installation
The Armstrong ceiling is notable for its low price, does not emit harmful substances and does not worsen the microclimate. It is easy to install and maintain, provides easy access to communications and is suitable for almost any room, the main thing is to choose the right plate material and design.