VirtualBox is a program for creating a VM (virtual machine) with the desired configuration: OS model, processor frequency, amount of RAM and video card memory that are allocated from the physical hardware of the computer. It is distributed free of charge and you can download the latest version from the official website: https://www.virtualbox.org.
This article will provide detailed instructions for VirtualBox and how to use it.
Program installation

After downloading the Oracle VirtualBox installer from the official website, we start by choosing the installation location.
Having chosen the installation location of VirtualBox, we proceed to the next stage of work.

On the screen that appears, you are prompted to create shortcuts on the Start menu, on the desktop, and on the taskbar. We recommend that you keep the second and fourth points, and the rest are up to you.

This is followed by a warning that the installation may experience problems with the Internet connection. Do not worry, this problem occurs very rarely. Click Yes, then Install, after which the installation process will begin.
Create a virtual machine
 At the end of the installation, we look into the program, where we will be met by a window. In it we find the button "Create" and click on it.

We select the name that will be assigned to your VM, and you can click on the "Expert Mode" button to immediately configure its configuration. If you do not press, it will go through the step-by-step setting of all items.
 By assigning a name, adjust the amount of RAM. It is worth mentioning that it will allocate from your RAM, and the more of it, the better. The minimum value recommended is 2 GB.
Since we have the first input, we choose to create a new virtual hard disk.

Here we cut out the size of the hard drive and its type (depending on the OS you choose, the amount of space you need will depend. This also applies to RAM - XP does not support more than 3.5 GB). When finished, click "Create".

The process itself will take a little time - about 2-3 minutes. You should leave the computer alone and let it finish quietly.

When the system is created, it will show up in your VM list. As you can see, installing virtualbox turned out to be not so difficult, everyone can handle it on their own.
Configuring VirtualBox
Let's see how the virtualbox virtual machine is configured in detail.
- General.
- System.
- Display.
- Media.
- Audio.
- Net.
- COM port.
- Shared folders.
- Interface.

After creation, we can see all the characteristics set for the system, and it also becomes possible to configure it in more detail.
To do this, click on the "Configure" button or right-click on the machine you need.
In the window that appears, you can change:
- system name;
- supported plugins;
- number of RAM and video memory processors;
- remote access settings, etc.
Let's analyze them in detail.
Although it’s worth warning first, in order for some functions to work, you will need to download the Extension Pack plugin for VirtualBox from the official site.
General

Here the name of the virtual machine is changed, its description is entered, the directory for saving screenshots, and the password and type of encryption are set.
 System
Motherboard
Here, the values of RAM, the chipset of the motherboard, the type of cursor manipulator, and the order in which disks are loaded are regulated.
Processor and acceleration
 Here you set the number of processors used and the degree of allowable load.
In the acceleration item, you can configure advanced functions, but it is not advisable for inexperienced users to touch anything in it.
Display
Screen
This item configures the amount of video memory and monitors supported by the VM, the scaling factor, and the inclusion of 3D - 2D acceleration, that is, your system will be able to support video and 3D applications.
Remote access
 If the VM was added to the intended server, and it needs access from another PC, then this item exists for this. Here the default port number is 3389, but if you are going to connect more than one server, then you will have to change it; and adjusts the authentication method. To set up access, you will need to know the IP address of the VM Host.
Screen capture
This item allows you to configure the capture of a picture from the display of the virtual system, setting the video quality and its frame rate, resolution and placement path. Everything is pretty intuitive.
carriers
 The next item configures the VM's optical and hard drives by adding or editing them. The allocated space on physical media can be adjusted so that the system presents it as an SSD and supports certain functions.

Audio
Here you can configure support for the sound card VM and playback of its sound by setting the type of audio controller.
Net

Here you can configure the connection to the network: the number of adapters, their type, the type of connection itself. By setting different types of network cards in this menu, you can achieve the desired scenario when working in the VM.
COM Port
Use this item to emulate RS-232 ports. Both the quantity and its mode are regulated.
 At this point, support for virtual controllers from USB 1.1 to 3.0 is selected. And if you add them to the list of controllers on your PC, they will be displayed in the VM, respectively. To do this, you need to click on the green plus sign on the right side of the window.
Shared folders
Here you configure the folders that will be visible to the virtual machine. The setting is made as for ordinary shared folders, i.e. you just need to specify where access is granted to other users, and where not. And save the selected settings.
User interface
 Customizable toolbar that is available when you log into the car. You can add or remove sections in it.
launch

After completing all the settings and manipulations, you can proceed directly to starting the machine. To do this, click on the "Start" button.

At startup, you will be required to specify the location of the disk image with the operating system, since it will have to be installed as on a regular PC. Click on "Devices" > "Optical Discs" > "Select Disk Image" and select a pre-downloaded image (ISO) of the OS on the Internet.
After restarting the machine, the standard OS installation will begin (depending on which one was downloaded). After completing it, you can start using the machine the way you want.
Lately, in the comments section of Linux distribution installation reviews, users have been asking questions about VirtualBox. This is due to the fact that in the video I install the operating system on a virtual machine. As it turns out, many do not know what it is and as a result they think that such an installation may differ from installing the system on a regular computer. Let's deal with this.
What is Virtual Box
If I say that VirtualBox is a virtualization software product for various operating systems, as many sites do, reprinting the definition from Wikipedia, then you may have some associations, but still, this is a rather incomprehensible and generalized formulation . So I will explain in simpler terms.
virtual box is software that mimics a real computer, allowing the user to install, run, and use other operating systems like normal applications. It's like a computer within a computer.
A virtual machine creates a kind of isolated environment on a computer, which consists of virtual components of a real PC: hard drive, video card, RAM, various device controllers, etc. Thus, the operating system installed in VirtualBox will be completely sure that it is running on real hardware.
This also leads to the answer to the question - is installing an operating system on a virtual machine different from installing it on a real PC? The answer will be no! In some cases, when working with VirtualBox, you may need special machine settings, but the OS installation process itself is identical for both options.
What is VirtualBox for?
There are many ways to use virtual machines. Consider the most popular among ordinary users:
- Familiarity with other operating systems. Regardless of which operating system is installed on your computer, you can install any of the supported ones in VirtualBox, and these are: many Linux distributions, FreeBSD, MacOS, any version of Windows, Android and others. There is no need to be afraid that with such an installation you will break the real system, or delete important data - the virtual machine works in isolation and you can experiment with it as you wish. When you no longer need it, simply remove it and it will not leave any traces behind;
- Another way to use VirtualBox is to run a program that doesn't run on your main OS or version. For example, you work on Windows and you need an application that is only available under Linux. Sometimes the only way out is to install Linux in VirtualBox and use the necessary software from there. A detailed situation may be when you need a program that works only under older versions of Windows;
- Testing of various software. It may happen that you need to use some program, or in general you often have to test various applications, and you do not really want to clutter up your work machine. Again, VirtualBox comes to the rescue. In addition, using a virtual machine, you can not be afraid to infect your computer with viruses, even if this happens with an OS running in VirtualBox.
These are the most common ways to use a virtual machine among ordinary users, but VirtualBox is also often used:
- Developers to test their product on various platforms;
- By students to practice in building a network, and the like.
Installing VirtualBox
There is nothing complicated and unusual in installing VirtualBox on a computer. Windows users can download the latest version of the program from the download page of the official website. Then run the downloaded exe file and follow the prompts of the installer.
Linux users, in most cases, have the option to install VirtualBox from their distribution's repositories. For example, in Ubuntu or Debian, this is done with the command:
sudo apt-get install virtualbox
After installing the program, you can start creating virtual machines.
Creating Virtual Machines in Virtualbox
To create a virtual machine, you need to start VirtualBox and click on the button on the top panel Create :

The Create Virtual Machine window opens. On the first tab, you need to specify the name of the operating system, its type and version. For example, let's create a virtual machine for installing Ubuntu.
In field Name specify the name of our virtual machine - Ubuntu. Since you will identify the system by this name, it is better to give a more descriptive name. So we will install 64 bit Ubuntu 16.10, then the address is in the title: Ubuntu 16.10 x64. If you write the correct OS name in the field Name , usually Type is determined by itself, if this does not happen, you can select it manually. Same with version. Click Next :

In the next step, you need to specify the amount of RAM that you are ready to give to the virtual machine. Depending on the type of OS being installed, VirtualBox will automatically select the recommended amount, but this is usually the minimum required amount, so you can increase it if possible.
When determining the amount of RAM for a virtual machine, you can rely on your experience with the system being installed, if any, as well as the total amount of RAM on your computer. But it is advisable not to give the virtual machine more than half of the real amount of RAM on your PC.

Click Next .
Now we need to create a hard drive for our Ubuntu. Physically, the VirtualBox hard drive is a special file that will be stored on one of the partitions or drives (you can specify the location) of your hard drive.
VirtualBox offers 3 options for what to do next:
- Do not connect a virtual hard disk - in this case, you will need to connect it yourself after creating the virtual machine;
- Create a new virtual hard disk - here, I hope, everything is clear;
- Use Existing VHD - This option is for those who are already using VirtualBox and who have previously created VHDs.
Since we are creating a virtual machine for the first time, the second option is suitable for us, which is marked by default - Create a new virtual hard disk . Click Create :

On a new tab, we determine the type of virtual hard disk. There are also a number of options to choose from here, based on whether you plan to use this drive with other virtualization software such as VMware or Paraleles in the future. In most cases, ordinary users do not plan to do this, so you can leave everything as it is and use the standard disk format for VirtualBox - VDI . Click Next :

Select the storage format of the hard drive: dynamic or fixed :
A dynamic hard drive on the physical hard drive of your PC will always take exactly as much space as the OS installed on it with all programs and files will “weigh”. That is, if during the creation of a virtual machine you created a disk with a capacity of 100 GB, but after installing the OS only 25 GB will be occupied, then the hard disk file will occupy only 25 GB. If you take it to 50 GB, it will "weigh" the same way. I think it's understandable - a dynamic hard disk will increase to the maximum specified value as the virtual machine extracts.
If you select the disk type - fixed, VirtualBox - will immediately create a file of the size you specify, and it will not change.
And although we see from the note that a dynamic hard drive is slower than a fixed one, in order to save space, it is advisable to choose it. Click Forward :

The final step is to set the name, location and size of the virtual hard disk.
Specify the name of our hard drive. If you plan to use it with only one OS, you can give it its name.
If you wish to specify a specific storage location for the virtual disk, click the folder button to the right of the hard disk name entry field, and enter a new path. I'll leave it as is.
And finally, we indicate the size of the hard drive. VirtualBox here again offers us its own version, which will depend on the type of OS being installed. You start from how much free space you have on a real hard drive, as well as how actively and in what way you will use the virtual machine. I indicate 50 GB. Then press Create :

The virtual machine is ready:

And before starting the installation of the operating system, it remains to specify VirtualBox only the image of the iso file of our Ubuntu or the installation disk. This can be done both through the settings of the virtual machine, for this you need to go to the tab in the settings carriers and in the field specify the path to iso file:

So during the start of the virtual machine:

And we are waiting for the OS installer bootloader to appear:

Everything, further installation of any OS on VirtualBox does not differ from installing it on a real PC. If this is the same Ubuntu, we have both a video on the channel about it and.
On this, we figured out the creation of virtual machines in VirtualBox. Let's move on to the additions of the guest axis.
Guest axle additions
After installing the operating system in VirtualBox, you can start using it, but such a system may not fully reveal its capabilities. So, for example, the guest system (the one running in VirtualBox) may have a small screen resolution, it does not have access to physical USB ports, and there is also no way to create shared folders to transfer the necessary files between the host (the one that you have the main ) system and guest. In order for all these features to appear, you need to install the so-called Guest axle additions . This is a set of drivers and additional programs that provide deeper integration of the guest axis with the host and activate additional features of the virtual machine.
Installing Guest Additions in Windows
To install guest additions for Windows running in VirtualBox, in a running OS, from the virtual machine menu, which is located at the bottom of the screen or on the top panel by default, select Devices and from it select Mount disk image Dguest OS additions :

After that, the corresponding disk should be connected to the system and by running the installation wizard, you need to follow all its points. After installation is complete, you must reboot the guest system.
Installing Guest Additions on Linux
In order to connect a disk with guest OS additions in guest Linux, you need to do the same manipulations as in the previous case, however, their installation can occur in two ways.
In the first case, after connecting the Guest Axis Add-ons, the system may offer to install them automatically. To do this, you will simply need to enter the administrator password:

Then the installation will start:

If the auto-install did not start, then using Ubuntu as an example, you need to do the following in the terminal:
- Go to the directory of the connected drive: cd /media/geek/VBOXADDITTIONS_5.1.18_114002
Instead of geek write your username. The version of the guest additions may differ, so it is better after entering VBOXADDITIONS use the TAB key - it will automatically add the ending.
- Now we need to run the script VBoxLinuxAdditions.run , enter: sudo sh ./VBoxLinuxAdditions.run
- After installation, we also reboot the guest system.
Now we will try to set up the well-known VirtualBox virtual machine and tell you how to use it, but first we will figure out for what purposes it can come in handy. This emulator is designed to deploy multiple operating systems that you install (Windows, Linux, Mac or Android) without affecting your main system. It can be used for various experiments, testing software and programs.
VirtualBox virtual machine, a good emulator for companies and private use. This free and open source product has various functions. The distribution kit of the program is on the official portal, where you can download it. There is a paid virtual machine for more advanced users called VMware, but we will cover this topic in another post.
Download and install the VirtualBox emulator

Go to and download the distribution package of the program to your computer. Download distributions for your Windows or Linux operating system.

Unzip the file, right-click and run the VirtualBox emulator as "Administrator". A welcome window will open, click the "Next" button.

In another window, you will be prompted to select a directory for installing program components, we recommend leaving the default settings and clicking "Next".

Then they will offer to install program shortcuts, you can not touch anything and continue to install the emulator. During the installation of the program, a notification will pop up that the network may be disconnected. If you have any files downloaded from the Internet, wait until they are downloaded and continue installing and configuring VirtualBox.


At the time of installation of the program, windows will pop up about installing software for the USB controller, network services and network adapters, click "Install".

At the end, click "Finish"
How to set up the VirtualBox program
Setting up the VirtualBox virtual machine implies the following: after you have installed the program, run it from "admin name" and change the interface language in case it doesn't suit you or leave the default settings.

In the program panel, click "File" - "Settings" select the language you want on the right and click "OK".

Let's start installing the emulator. Click on the panel at the top "Create". In the "Create a virtual machine" window, write the name that will be displayed in VirtualBox, select the type and version of the OS.

Assign the desired amount of RAM (RAM) to the emulator. Then this parameter can be changed. In another window, click "Create a new virtual hard disk".

We mark the type of file that will serve as an HDD disk for your emulator, we recommend setting "VDI". Choose a storage option, it is better to put "Dynamic virtual hard disk".

Specify the volume required for your disk with the slider, as a rule, the smallest volume is standard. In case you later need to change the characteristics, mark your virtual machine and click "Configure" in the top panel:

Menu "System": tab "Motherboard"- you can change the size of allocated RAM (RAM). "Load order"- uncheck the item "Floppy Disk".

Tab "CPU"- allocate the number of processors for the VirtualBox virtual machine, as well as the CPU (processor) load limit. Check item "Enable PAE/NX".

Tab "Acceleration" check the boxes "Hardware virtualization".

On the menu "Display": You can accelerate video memory and enable 2D and 3D acceleration.

Menu "Carriers": select the iso image of your operating system downloaded from the Internet. In case you are installing the OS from a disk, check the box "Live CD/DVD".

Select "Optical Disc Image".

On the left menu "Net": it is possible to set the number of internet adapters and connection type. Check item "Enable network adapter"- connection type "NAT".

Menu USB: Celebrate "Enable USB Controller" - "Enable USB EHCI Controller". The USB filter determines which actual USB device will be connected in the virtual OS, and which one will be connected to your system. For the normal operation of all your USB-2.0 drives in a virtual OS, you need to install the plugin, you can download it on the official website.

Shared folders: This setting is important to configure, because the virtual OS will interact with your system through shared folders. Press the plus and type the full path to the directory of the shared folder located on your PC, for example, drive D:\Disk. The Disk folder must be created in the D: drive directory on your PC. Check item "Auto connect" and click OK.
Starting and installing the operating system in VirtualBox

Now it remains to launch the VirtualBox emulator and install the OS as on a real PC. Click "Launch".

And install the operating system.
After installation, along with the main distribution of VirtualBox, the program will ask for permission to install network services and protocols from Oracle.
In order for different versions of the OS to function normally with each other, install all recommended add-ons.
The installed VirtualBox program looks like this:
To install Windows 7 and Linux operating systems as an emulator, you need to have their images on your computer or on a USB flash drive / sidirom.
We do the following:
1. Click the Create button. Select the name and type of your virtual OS.
2. In the next step, you need to specify the amount of RAM you want to allocate for your new operating system. We recommend setting at least 512 MB.
4. Leave the format of this disk unchanged.
5. Select one of the options for your drive. Dynamic will be able to grow in size when you fill it with new files. Static - will not grow in size, will have the previously specified value, and not 1 MB more
6. Specify the location where the virtual disk will be created on your PC (it is desirable to place it on NOT the system disk), specify the name for your disk and the size.
7. After your virtual disk is created, you need to run it.
8. After starting, you need to install a new OS on it from an ISO image or from a sidirom.
Select the disk image from which the new OS will be installed.
After installing the operating system, you will have a unique opportunity to use different operating systems in one VirtualBox window.
VirtualBox is an intuitive program to use. If you are not interested in theory and want to start practicing right away, then refer to the instructions for using VirtualBox to install and run operating systems in a virtual computer:
- Installing Linux on a virtual computer (using Linux Mint as an example)
In this series of articles, the features of VirtualBox are discussed in detail, and a detailed description of its options is also given. This material is recommended to you if you want to thoroughly understand VirtualBox, and also if you have any problems or questions that you cannot solve on your own.
What is virtualization and its usefulness
VirtualBox is a program that allows you to run multiple operating systems on one computer at the same time. Among these operating systems can be Linux, Windows, Mac and others. VirtualBox itself also works on various systems (it is cross-platform).
This means that with the help of VirtualBox, being, for example, in Windows, you can, without restarting the computer and not even installing another OS on a real computer, boot into Linux, work with any Linux applications as if you had a Linux operating system installed. You can, for example, run other versions of Windows to test settings and programs that you don't want to run on your main operating system.
Virtualization (running operating systems inside virtual computers using VirtualBox) has a number of useful features:
- simultaneous launch of several operating systems - you can get acquainted with new operating systems without turning off your main system;
- separation of real and virtual computers - when working in a virtual OS, you do not need to be afraid of erasing the bootloader, losing files, or in any way harming your main operating system, since the virtual system is completely delimited from your main system. Whatever mistakes you make in the virtual machine, your main OS will always remain intact. For this reason, a virtual computer is suitable for various tests, including those that can harm the OS; for example, in a virtual computer, you can analyze malware (viruses) without fear for the main system;
- ease of software installation - if you are on Windows and you need to work with a program that only runs on Linux, then instead of the tedious tasks of trying to run the program on someone else's OS, you can very easily deploy a Linux virtual machine and work with the desired program from there. Or vice versa, while on Linux, you can create a Windows virtual machine to run Windows programs without having to try to run them on Linux;
- the ability to roll back the changes made - you do not need to be afraid to do something wrong in the virtual computer, since you can take any number of system “snapshots” at any time and, if you wish, return to any of them;
- infrastructure consolidation - virtualization can significantly reduce the cost of hardware and electricity; Today, most of the time, computers use only a fraction of their potential during their work, and on average, the load on system resources is low. A large amount of hardware resources as well as electricity is wasted. Therefore, instead of running a large number of physical computers that are only partially used, you can pack many virtual machines into several powerful hosts and balance the loads between them.
VirtualBox Concepts
When it comes to virtualization (as well as to understand further information), it is useful to get acquainted with the terminology, especially often we will encounter the following terms:
Host operating system (host system).
This is the operating system of the physical computer on which VirtualBox was installed. There are versions of VirtualBox for Windows, Mac OS X, Linux, and Solaris.
Guest operating system (guest OS).
It is an operating system that runs inside a virtual machine. Theoretically, VirtualBox can run any x86 operating system (DOS, Windows, OS/2, FreeBSD, OpenBSD).
Virtual machine (VM).
This is a special environment that VirtualBox creates for your guest operating system while it is running. In other words, you are running a guest operating system "in" a virtual machine. Normally the VM will appear as a window on your computer's desktop, but depending on which of the various VirtualBox interfaces you're using, it may be displayed full screen or remotely on another computer.
In a more abstract way, internally VirtualBox thinks of a VM as a set of parameters that define its behavior. These include hardware settings (how much memory the virtual machine should have, which hard drives VirtualBox should virtualize, through which container files, which drives are mounted, etc.) as well as state information (these may include: the virtual machine in currently running, saved, its snapshots, etc.). These settings are reflected in the VirtualBox Manager window as well as in the VBoxManage command line tool. In other words, the virtual machine is also what you can see in the settings dialog.
Guest Additions.
This refers to special software packages that come with VirtualBox but are meant to be installed inside a virtual machine to improve guest OS performance and add additional features.
Installing VirtualBox on Windows
To download VirtualBox go to the official website https://www.virtualbox.org/wiki/Downloads . Click the link " Windows hosts' to start downloading the installation file. Run the file with a double click - the installation process is similar to any other program in Windows.
You can choose which components to install, it is recommended to install all VirtualBox components for full support of all options:
You may receive messages about installing unsigned drivers - agree to install them. For the program to work correctly, agree to all installer requests.
The following warning tells you that network connections will be dropped for a short time, i.e. you will be temporarily disconnected from the network. We agree that the Internet connection will resume automatically in just a second.

Installing VirtualBox on Linux
On Linux, VirtualBox can be installed in several ways:
- from the standard repository
- binary file downloaded from the official site
- from the VirtualBox repository added to the application sources (only for Debian-based distributions)
Installing VirtualBox on Debian and derivatives (Ubuntu, Linux Mint, Kali Linux)
For Debian and derivatives (Ubuntu, Linux Mint, Kali Linux) you can install VirtualBox from the standard repositories:
sudo apt install virtualbox virtualbox-qt linux-headers-"$(uname -r)" dkms vde2 virtualbox-guest-additions-iso vde2-cryptcab
Installing VirtualBox on Arch Linux and derivatives (BlackArch and others)
For Arch Linux and derivatives (BlackArch and others) you can install VirtualBox from the standard repositories:
Sudo pacman -S virtualbox linux-headers virtualbox-host-dkms virtualbox-guest-iso
For information on installing on other distributions, as well as additional details, please visit the corresponding page: https://www.virtualbox.org/wiki/Linux_Downloads
Installing the VirtualBox extension packs
Additional extension packs can be downloaded to extend the functionality of the base VirtualBox package. Oracle currently provides one extension pack.
The VirtualBox Extension Pack adds the following features
- USB 2.0 Virtual Device (EHCI)
- USB 3.0 Virtual Device (xHCI)
- Support for VirtualBox Remote Desk Protocol (VRDP)
- Host webcam transfer
- Intel PXE boot ROM
- Experimental support for PCI transfer on Linux hosts
- AES disk image encryption
VirtualBox extension packages have the extension .vbox-extpack. To install an extension, simply double-click on the package file and an assistant will appear to guide you through the installation steps.
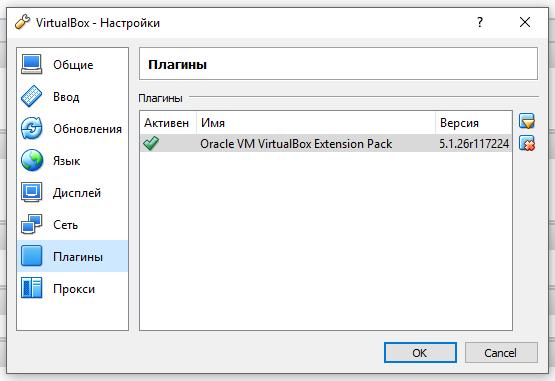
To view currently installed extension packs, open main VirtualBox Manager(main window of the program), in the menu " File» select « Settings". In the window that opens, go to the " Plugins”, there you will see the currently installed extensions and you can remove the package or add a new one:
You can find the extension pack for the latest version on the download page.
If you are not using the latest version of VirtualBox, then you can find the extension package at - select the folder with your version number and download, then double-click the file with the extension .vbox-extpack.
Starting VirtualBox
On Windows, VirtualBox can be launched from the menu or from a desktop shortcut.

On Linux, you will also find VirtualBox in the menu,
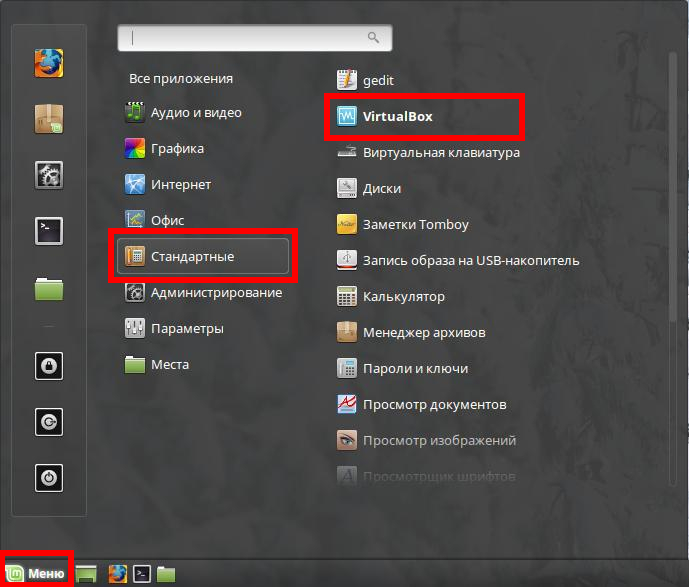
or you can type the command in the terminal:
virtual box
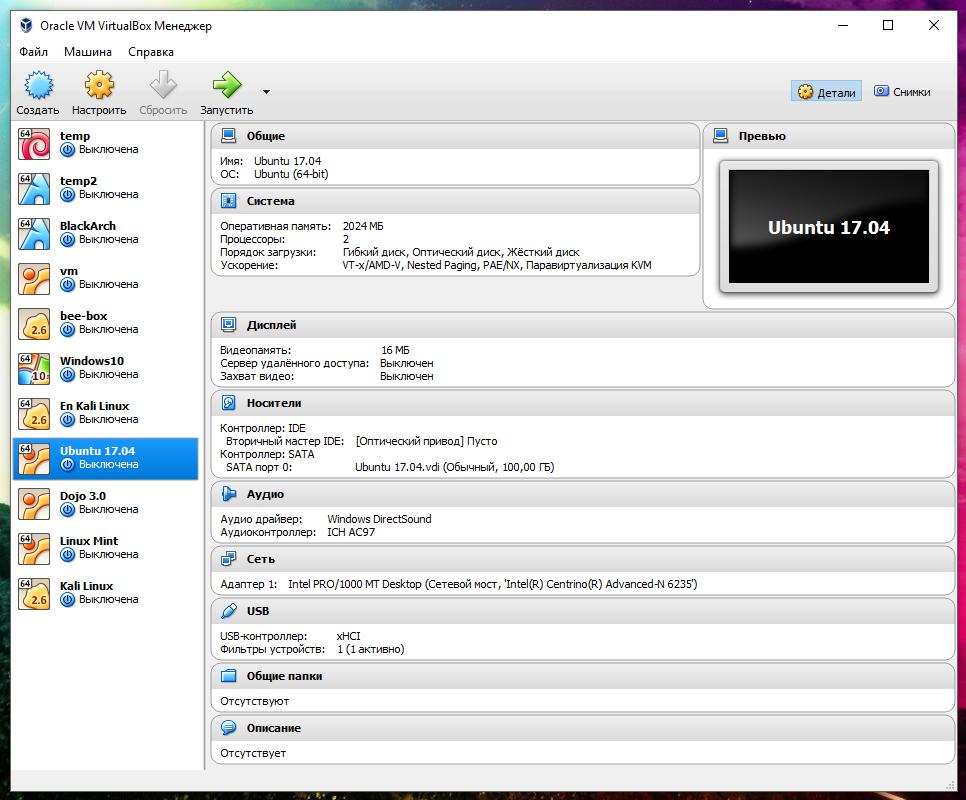
A window similar to the following will open:

Or, if you have already created virtual machines: