Installing a fan is a sensitive issue. Before making a fan with your own hands, you need to determine its installation location. The fact is that in the manufacture of structures today two types of engines are used:
- collector;
- asynchronous.
During operation, collector units emit a lot of noise, and when it switches, a spark occurs. In addition, the movement of the brushes also makes a lot of noise.
Asynchronous motors, which are equipped with a squirrel-cage rotor, are the exact opposite. At self-production For fans, you can use an element from the refrigerator as a starting relay.
Fan Manufacturing Principles
When making a fan yourself, you need to take into account some aspects, the most important of which is noise. To get an idea of the work commutator motor, you just need to remember how the Cyclone vacuum cleaner works, its volume is about 70 dB. Based on this, you should consider whether to use such an engine or not. In this regard, it is most realistic to use an asynchronous motor; moreover, when making the simplest fan model, a starting winding is not required. And its power is small, and the secondary EMF is induced by the field from the stator.

The drum in an asynchronous motor has a squirrel-cage rotor with cut copper conductors along the generatrix, passing at an angle relative to the axis. It is this slope that determines the direction of rotation of the rotor in the engine. The copper conductors are not insulated from the drum material, since they have a conductivity that is superior to the surrounding material, and the potential difference between adjacent conductors is small. And due to this, a current flows through the copper. The stator and rotor are not connected to each other by contacts, and therefore no spark occurs, since the wire is covered with varnish insulation. That is why the noise of an asynchronous motor is determined by the following factors:
- ratio of stator and rotor;
- quality of bearing elements.
With proper configuration of an asynchronous motor, silent operation of the motor can be achieved. Well, what if we're talking about about how to properly make a duct fan with your own hands, then you can allow the installation of a commutator motor, but taking into account where the section will be located.
The duct fan is installed in the air duct section itself and is located in the center of the duct. For this reason, when a fan is made in an air duct, noise does not play a special role, since the sound wave attenuates while it passes through the duct.
Return to contents
To make a fan yourself, you need to purchase a model of a kitchen or bathroom fan, the one that is mounted to the hood. The box from under it will also come in handy, and you will also need:
- scissors;
- net;
- glue or tape.

Fan installation diagram.
The structure will be powered from the network, but will consume little electricity. To begin with, take a box and make a through hole in it. Fan design for hoods cylindrical, it will also be the basis for the shape of the hole.
Subsequently, a fan will be installed in this hole. The hole is cut with a smaller diameter than the structure itself in order to make it more stable and safe. An opening is made on the side of the bottom of the box to allow the cord to exit. To prevent the fan from dangling in the box, you can place cardboard scraps in it and secure it with electrical tape. For safety, a protective mesh is installed on the front part where the blades are located. The denser the mesh in the mesh, the less likely it is to get caught by the blades. Making a homemade fan does not require much expense, and if you decorate the box, you can get additional element interior arrangement.
Return to contents
USB fans: features
Such a model will not be easy to make. This is an excellent option for individual cooling when working on a computer. Such a device is obtained with sufficient power, and the energy consumption is not much more. To construct this design you will need:

- a couple of CDs for the computer;
- cord with USB plug;
- wires;
- an old motor, the kind usually installed on children's toys;
- wine stopper;
- cylindrical cardboard;
- glue and scissors.
First of all, the disk is cut into blades. The power of the air flow depends on the presence of blades; the more there are, the stronger the blowing will be, but the segments themselves should not be small.
Only one disc is cut, the second will be used as a stand.
To bend the blades, they are heated over a small flame and bent forward at an angle.
They should be turned in one direction. When the disk with blades is ready, a plug is inserted into its center and a hole is made in it.
In order to make the wire usable, the outer winding is removed from one end of the USB cord, under which there are 4 wires. The paired ones can be separated, connected to the motor and insulated.
From time to time the need for a kind of fan arises, but small models are relatively expensive. There is no need to rush to shell out money, because a small fan can be easily made with my own hands. In terms of efficiency, it is not inferior to purchased analogues, and its creation will require a minimum amount of materials.
Making a fan from a cooler
The simplest way to make a fan yourself is to use an unnecessary cooler (these are used in computers as a cooling system for components).
It is not surprising that this method is the simplest, because a cooler is a small fan. There are only a few things left to do simple steps to give it its final shape and performance.
The cooler itself is quite functional, but you need to prepare it for non-standard way uses:
- Wires.
If the fan is located next to the computer, a regular unnecessary USB cable will do. It needs to be cut and the insulation removed (the same with the cooler wires):

We are only interested in two wires: red (plus) and black (minus). If there are other colors in the cooler or USB cable, feel free to cut them off and isolate them, since they are absolutely unnecessary and will only get in the way.
- Compound.
After cleaning, the wires need to be connected to each other (it is enough to twist them tightly together). Don't mix up the colors. This threatens serious complications in the process of creating a ventilator.
A length of 10 mm is sufficient for twisting. If necessary, you can clean most of the wire, this is not scary, but you will have to insulate much more.
- Safety.
Remember that proper insulation is the key to success and a guarantee that the computer or outlet will not short out. Bare wires should be covered with electrical tape (exclusively in the absence of power), and the thicker it is, the better.
There is no particular point in explaining what threatens the fall of “minus” to “plus”. If the red and black wires come into contact while transmitting electricity, not only the USB cable/port, but also the computer components may burn out.
In principle, computers are not afraid of such moments if they are equipped with protection against voltage surges. But when a wall outlet is used, repairing the wiring in the apartment will be much more difficult than creating a small fan.
Therefore, take serious care to insulate the exposed parts of the wires. Rarely does anyone need unnecessary complications.
- The finishing touches.
Don't forget that a computer cooler is very light, but at the same time very fast. Even with a voltage of 5 volts, its speed will be quite high. We consider this voltage for a reason: the cooler will do its job perfectly, and the operation will be as silent as possible.
Due to the small size of the device, it may fall due to vibrations. This should not be allowed for the following reasons:
- Such a cooler cannot cause lethal cuts even during operation, but there is no guarantee that the device will not jump up and fly off, for example, into the face;
- if it falls on a non-flat surface (on a pencil, pen, lighter), its blades can be damaged: fragments breaking off at such a rotation speed can cause irreparable damage;
- other unforeseen circumstances.

Therefore, it is important to secure the cooler (with tape, glue) on some more stable surface: a box, wooden block, table.
- Additional functions.
If desired, the finished fan can be updated externally, a switch can be added (so as not to pull out the cord every time), etc. But attention is also paid to a method that increases the efficiency of the device relatively well.
Just cut it off top part plastic bottle and glue it (with a wide hole) to the cooler frame. Thus, the air flow will be more accurate and directed: the force of air movement will become approximately 20% stronger, which is a pretty good indicator.
At this point, the creation of the fan is completed, and it is ready for full operation.
Disc fan
If the previous option does not suit you, and you want something more complex, then consider self-creation fans from computer disks:
- Engine.
Since we don’t use a cooler, we need to get some kind of motor that drives the blades of our future device. In fact, you can also use the motor of the already mentioned cooler of the cooling system, but this is too simple.
You should find or buy a motor with a specific part that moves (for example, a protruding iron rod). Since we are making a fan from disks, then the presence of such a rod will the best option. Motors from an old VCR or player are also perfect, because they spin discs and cassettes - just what we need for the spinning propeller in our fan.
You should not use an engine made from washing machine or even a past fan - they are extremely powerful. Due to the self-assembly of the structure, it will be very flimsy. In the very first seconds, a strong motor will scatter fragments of blades throughout the room and fly off the base.
If there is a running motor, it must be secured with wires in the previously mentioned form.
Having a running engine in hand, you need to concentrate on the disks, which are the main components of our fan. First of all, cut one into 8 equal parts:
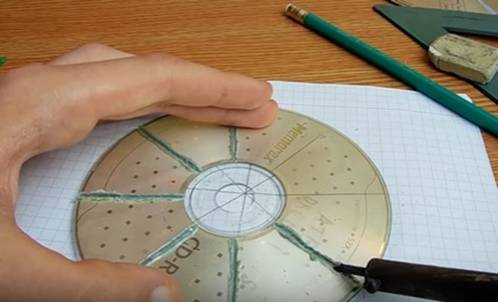
To avoid mistakes during the procedure, you can first mark the disc with a pencil. It is best to use a soldering iron (there will be no sharp edges, it is safer), but regular scissors will also work.
Afterwards, the disk should be slightly heated with a lighter so that the material becomes more pliable, and the wings should be bent in the manner of blades, like conventional fans:

You can do the same with regular plastic bottle:

We need to put it in the center of our propeller wooden cork from the bottle. If the size is too big, it can be planed.
- The remaining parts.
As a center holding the entire structure, you can use a regular roll sleeve toilet paper:

It should be secured in the center of the second disk, which will act as a foundation for the fan. You can place half of the second bushing on top, as seen in the photo, so that the motor is inside it. You need to hang the blades from the disk/bottle on it.
The fan is ready for operation. If desired, you can add decorative elements to make the device look more presentable.
You can see clearly how such a fan is made from a bottle in this video.
Additionally, it should be recalled that important points when creating a homemade fan:
- To fasten the parts together, you need to use high-quality “superglue”.
Exactly the one that you can’t peel off even if you want to. The entire structure must be as stable as possible and not succumb to vibrations and fluctuations. Be responsible and fill everything you see with glue except the blades and internal parts of the engine.
- Take your time.
You risk missing out important detail, and this significantly increases the chances that something will go wrong during the operation of the finished fan. The consequences can be quite serious.
- Do not use inferior components.
If you don’t need the motor that is used to create the engine, its performance may be in doubt. Make sure it will last for some time and be effective.
Building an engine from scratch is a highly specialized process and requires a lot of knowledge. Make sure that the motherboards are in order, that all necessary connections are sealed well, etc. It is better to check again than to make another fan later.
- Insulation.
We remind you once again: do not forget about high-quality winding of wires with electrical tape. You shouldn't save it, because short circuits and repairing them will force you to sacrifice a lot of expenses. Perhaps even in a monetary sense.
The hand-held fan is quite compact, efficient and does its job well. It is not difficult to do if you take the procedure responsibly and follow the instructions. There are no restrictions on dimensions: if you feel strong, feel free to start assembling the fan bigger size.
In contact with
With the onset of heat, we remember fans, the simplest and most accessible human inventions for freshening the air. The classic fan design consists of an engine, onto the shaft of which an impeller with many blades is attached. During operation of the fan, air is sucked in from the rear side and, passing through the blades at an increased speed, is pushed forward, creating a cooling and freshness effect.
A conventional fan has a number of disadvantages: noise and vibration from the blades, which collect dust and air pollution. In order to clean them, it is necessary to remove the protective grille. The speed of such fans is adjustable in only a few modes, and it can be difficult to adjust the blowing angle.
The alternative device we propose does not have these disadvantages. This development was invented by Dyson engineers, presenting an almost revolutionary solution in the field of air ventilation. Thanks to them, the world learned what a bladeless fan is. And today we will collect it at home.
Operating principle of a bladeless fan
The main difference between a bladeless fan and a conventional one is the changed direction of the ejected air flow. This is achieved due to the fact that the engine and impeller are placed vertically and hidden in the base, which is equipped with grilles. Through them, air flows pass into a frame placed above the base and equipped with slots around the perimeter for ventilation.Materials, tools for a bladeless fan
To assemble this cutting-edge household gadget, we will need the following materials:- Sections of PVC pipes with a diameter of 150, 125, 90 mm;
- Quick-drying glue for plastic, such as superglue;
- A small piece of blue plexiglass or plexiglass;
- Server cooler YW880, frame width 60 mm;
- White aerosol paint, 1 can;
- Soft section metal mesh with cells of about 10 mm;
- Rheostatic speed control board, toggle switch;
- Solder, flux, thermal casings, self-tapping screws;
- Line segment LED strip, length - about 50 cm;
- Power supply (adapter) 12V/2 A;
- Insulating tape.
- Miter saw or grinder (angle grinder) for cutting pipes from PVC pipes;
- Jigsaw for cutting curved lines;
- Drill or screwdriver with a 50-60 mm crown cutter;
- A set of drills of various diameters;
- Soldering iron, screwdriver, scissors, pliers, hot glue gun;
- Painting knife.
Work order
Preparing plastic pipes
Take a segment PVC pipes with a diameter of 150 mm and trim it, aligning the edges. We mark a fragment about 100 mm long and make a cut with a miter saw or angle grinder.


The edges of all pipes must be sanded to avoid burrs, unevenness and to improve the fit of the edges for adhesive joints.

The next step is to select a plastic container that will fit tightly onto our section of pipe. We cut off the bottom of it with a painting knife, and use superglue to secure it to the top of the pipe.


Then we take a pipe with a diameter of 125 mm and cut off a pipe 90 mm long from it.


The next one will be a pipe with a diameter of 90mm, which we will also cut like the previous two. This is the base of our fan. The length of the segment is 120-130mm.

The basic plastic parts are ready. You can check how they will fit together by placing them in their places.


The fan frame sits perpendicular to the base, so the 90mm pipe needs to be slightly prepared by cutting off its edge according to the circumference of the frame. We mark it with a pencil, you can cut it with a jigsaw or the same grinder.


Unevenness in a curved cut can be smoothed out with sandpaper, removing burrs at the same time.

Using a hole saw with a diameter of 50-60mm, a drill or a screwdriver, we make a through hole in the middle of the largest pipe. This will allow air to flow through the base and into our frame. We fix our base with superglue.


In order to close a fan frame consisting of two pipe sections different diameters, on the smaller of them a plug is glued at one end. We make it from a sheet of plexiglass or blue plexiglass.

Having first marked the larger circle and then the smaller one, we cut off the plug ring.

Now it can be attached with superglue to the smaller frame pipe.

Using spray paint white and electrical tape as masking tape for plexiglass, we paint the plastic parts of our fan.


After the paint has dried, you can glue a piece of LED strip onto the larger pipe on the side of the plug. Don’t forget to immediately solder the contacts for LED backlight, and bring them to the base.


We fix both pipes of our frame with superglue.


Electrical part
We begin to prepare the electrical filling of our fan by soldering the cooler contacts. It is better to take the wires with a reserve so that it is convenient to work with them when connecting the control board and toggle switch.


You can use a soldering iron to make mounting holes to securely secure the cooler in the base housing.

We fix the cooler and drill two ventilation holes in the base opposite each other. This can be done with the same core cutter.


We close these holes with fragments of metal mesh, pre-cut to size.

Glue the mesh fragments with a hot glue gun.

We solder the contacts of the toggle switch and the power socket. We cover the exposed contacts with heat-shrinkable casings, warming them with a lighter.


Now you can make holes for the toggle switch and power socket, and secure them to the fan base housing.
Very often, in the sultry heat, there is not enough air flow in the room. To solve this problem, many people buy table fans, they are convenient and compact, some of them work from USB, that is, they can be connected to any charger, power bank or laptop, so that the coolness is always with you. But why buy something that you can make yourself using available materials? For site readers we have prepared two simple instructions who will clearly explain how to do USB fan at home with your own hands. So, all you need to prepare is a sharp knife, good scissors, electrical tape, an unnecessary USB cord and, in fact, a homemade executive body. As for the latter, it is customary to use one of two options: an old cooler from a computer or a motor from a car or other toy.
Idea No. 1 – Use a cooler
It will take no more than 15 minutes to assemble a USB fan from a cooler. First you need to prepare the cooler. Two wires come out of the device - black and red, and sometimes yellow, even less often - blue. Yellow and blue are of no use to us. We strip the insulation by 10 mm and put the prepared element aside.
Next you need to prepare the USB cable. We cut off one half of it and clean off the insulation at the cut point with a sharp knife; a stationery knife works perfectly. Under it you will see four wires, of which two are necessary: red and black. We also clean them, but it is better to cut off the other two (usually green and white) and insulate them. 
Now, as you understand, you need to connect the prepared contacts in pairs, according to: red to red, black to black using twisting. After this, you need to carefully insulate the cable connections using electrical tape or heat shrink and make a stand. As for the stand, it’s up to your imagination. Some people successfully use wire, while others cut out a nest in a cardboard box in a very interesting way.

In the end, a homemade mini fan is connected to a computer or charging block, and you can enjoy the operation of your own electrical appliance.
Cooler idea
Idea No. 2 – Use a motor
In order to make a USB fan from a motor and a CD, it will take a little more time, but you can still easily make such an electrical device with your own hands in an hour. A motor for such a homemade product should be chosen with an operating voltage of approximately 5 Volts, maybe a little more. If you take the motor to a lower voltage, too much current will flow through the circuit and the motor will quickly fail. 
First, we prepare all the elements of the device. In this case, you will need to make an impeller (blades). 
To do this, we recommend using an ordinary CD. We draw it into 8 equal parts and carefully cut it with good scissors, almost reaching the center. Next, we heat the disk (it’s convenient to do this with a lighter), and when the plastic becomes more elastic, we bend the blades at an equal angle (as shown in the photo).
If the impeller is not bent enough, then during rotation of the disk air flow will not be created. However, if you overdo it, the homemade product will also work poorly and unstable.
When the blades are ready, move on to creating the main mechanism. Inside the disk you need to insert an ordinary one, cut to the right size, a champagne cork that needs to be placed on the motor shaft. Next, we move on to creating a USB fan stand for a laptop. 
Here, as in the previous version, everything depends on your imagination. Of all the available means, the option with wire is the most suitable. When homemade USB the fan is ready, we connect the motor wires to the USB cord wires, as in the previous version, carefully isolate the twist and proceed to testing.
Sitting at the computer in summer time many people begin to suffocate from the heat; it’s good if there is air conditioning, but it’s not always convenient to turn it on. In this article we will tell you how to make a USB fan with your own hands, from a motor, a cooler and a small engine. We will show you the manufacturing process and step by step instructions, we will highlight two of the simplest and most effective methods.
Making a fan using a computer cooler
To make a fan at home and not have to strain at all, we found this method on the Internet. The entire manufacturing process will take no more than 20 minutes, you can use old coolers or just buy a new one in the store, the price for them is now a pittance.
First we begin to prepare the cooler, it has two wires: red and black. We remove 10 mm of insulation from each wire; there is even an insulation stripper. The size of the cooler does not play a special role; of course, it is better if it is big size, the wind flow will eventually be stronger. 
We begin preparing the USB wire; to do this, cut off one half at the main cut and remove all the insulation. We will get four wires: two black and two red, we also strip them. If there are other green or white wires on the cooler, cut them off, they only get in the way. Learn how to make a thermoelectric generator with your own hands.
In the end result, you need to connect the wires to each other, there may be several ways, the main thing to remember is color coding. Don’t forget to isolate everything from each other, the more isolation, the better. For convenience, the finished cooler can be installed in a regular shoe box, so it will be more stable. 
This is how the guys in the video suggest we make a fan from a cooler. The method is actually simple, we don’t promise strong airflow, but working at the computer will be much more pleasant.
How to make a USB fan with your own hands using a motor
So, to make a fan from a disk motor and a usb, we will need more time, but this type of fan will look better. Anyone can make such a device, the main thing is to show a little desire and patience. 
First of all we need to make the blades for our fan, we recommend using a regular CD drive, it looks great and is quite easy to make. Also read interesting article, where we make laser levels.

Here are the guys with the video showing a really cool method. In a similar way, you can make a fan out of paper, but remember, the paper must be thick; it is optimal to use cardboard.