I offer a master class on how to make an original gasoline lighter with your own hands. A commemorative coin dedicated to Jerusalem was used for decoration.
Rear view, photo from the side of the hatch for refilling the lighter with gasoline.
The manufacturing process is described in sufficient detail. The work is quite painstaking and sometimes very tedious, but the result is worth it! All customers were very pleased with the lighter, as were those to whom it was given as a gift.
The word Norah embossed on the lighter is the name of the customer’s grandfather. The lighter was made as a gift and was made in the form of a gift set.
Front photo.

Materials and accessories for work
We use the following tools:
- dremel
- hammer
- soft hammer
- round pliers
- pliers
- 3 mm tap
- gas burner
- tin paste (tin can be used)
Photo of the assembled gift set.

Lighter on top.

For work we take the following materials:
- copper tube from the air conditioner, 15–18 cm long and 10–12 mm in diameter
- pieces of brass, thickness 0.5 - 1 mm; one 45x45 mm and the second – 30x30 mm
- brass chuck
- armchair tube with a diameter of 4 mm
- 2 pieces of brass 1 mm each
- small brass elements to decorate the hatch and hide welding
- two brass coins
- copper wire for the edge of the coin, 2x4 mm
- two brass bicycle caps
- two adapters for bicycle caps
- two brass bolts 3x12 mm
- four rivets
- drills of different diameters
- coin for decoration, preferably made of brass
- armchair
- flint
- spring
- wick

The process of making a gasoline lighter
Flatten the copper tube to an even strip.

If desired, we emboss your name or other inscription.

Bend it with a soft hammer to a perfect circle.

We weld the ring - this will be the main body of our lighter.

We hide the welding site, the holes for the rivets are 1.5 mm in diameter.

Using a Dremel, we cut off a piece of thread for the hatch from the chuck.

We are preparing materials.

We fix the brass sheet with clothespins and solder it.

Ready. We don't pay attention to the dirt for now.

Now we trim off all the excess brass and then sand and clean it.

Now you need to mark the location for the refueling hatch.

We cut a hole with a Dremel, photo of the intermediate state.

That's it, the hole is cut.

Now you need to solder the threads under the hatch.

We clean and try on the hatch ring in place.

Side view photo.

We are preparing materials for assembling the chair holder.

Photo of the finished tube with a flint holder.

We drill holes for the tube in the body of the lighter on opposite sides.

Let's try on the tube.

We make a wick holder. From the adapter we cut off the knurled part of the bottom.

Trying on the wick holder. We use part of a previously cut brass cap as a nut.

Let's try everything on together.

We weld all the parts.

Bottom view of the workpiece.

Now we clean everything thoroughly.

Intermediate view from below. We cut a 3 mm thread.

Let's try on the bolt.

Now you need to weld the second side with the coin.

Let's try it on.

Trying on a coin and text.

We type the text.

Carefully secure with clothespins and solder very carefully. The slightest inaccuracy will be very critical!


View of the assembly from the coin side.

We cut roughly.


We cut off all excess with a Dremel, grind and polish.


Trying out materials for the hatch.

Solder it. Hatch from the inside.

Front part. Here you can solder any decorative elements.

We cut roughly. Clean with a Dremel and a wire brush.

We polish and try on the part on a lighter. It is important that it sits evenly, without distortion.

Photo from the side. The sealing ring must be gasoline resistant.

The lighter is almost ready, there is very little left.

We move on to making a stand that will cover the spring and provide the lighter with a stable position on the plane.

It is convenient to use a coin of a suitable size for this.

Drill a hole and insert a bolt into it. We put the side on solder paste. At the bottom we place the part cut off from the bicycle cap adapter.

Solder everything together.


Let's try on the stand. If the stability is good, we move on to grinding.

We sand the stand with sandpaper until it shines, after clamping it into the drill chuck.

For beauty, we cut longitudinal grooves with a Dremel.

We sand with a Dremel and a wire brush.


Now we need to collect top cover wick. We take the following accessories:
- coin for base
- brass cap
- connecting bolt
- copper wire edge
- two thick brass rings
- fentiklushka (for composition)

Drill a 4 mm hole in the cap. We drill a 2.5 mm hole in the coin and cut the thread with a 3 mm tap.
Insert a bolt into the cap. We thread all the elements and twist a coin on top. Apply paste between all elements and on the edges of the coin. Place the edge on the coin.

Top view of the assembly before soldering.

We solder the assembly.


We grind and clean the part from dirt with a Dremel and a wire brush.

Fitting.

The lighter is almost ready.

We polish everything until it shines. The photo shows the individual components of the lighter.
We install the chair. We insert it into the horns, then thread a 2.5 mm brass rod through it. Using gentle blows of a hammer, flatten one side first, then the other. You need to flatten it just a little bit, this will be enough for the chair to rotate easily, but at the same time stay securely in place.

We stuff it with cotton wool. Before stuffing, be sure to install the wick. The cotton wool should tightly cover the wick on all sides.

The lighter is assembled.

Excellent value, stable.


We check the work. It burns well. The flame will subside later while the wick is being fired.

Complete gift set.

The video shows the process of operation of the lighter and its appearance from different angles.
How to make your own lighter?
Only God knows how many Kulibins the Russian land bears! Today, dear reader, we will learn how to build a lighter from improvised materials. You will need a certain amount of attention and patience. You will also learn how to make a lighter on the go from potatoes and toothpaste! Don't believe me? So:
How to make your own lighter?
Perhaps the most common option for making lighters in the field is to make it from a cartridge case. Why the sleeve? First of all, the sizes. A cartridge case, for example, from an AK-47 cartridge easily fits in your hand and pocket. And of course, the sleeve is made of metal, which is undoubtedly much safer than a lighter made of other materials. The main problem is where to get it. But we are sure that you have a couple of military acquaintances. We will tell you about 2 ways to make a lighter. There are plenty of videos on the Internet about this.
Method No. 1
- Take any small metal tube. It can, in principle, be of any size, the main thing is that it fits the sleeve.
- It must be welded to the cartridge case. Take a soldering iron and weld the connection thoroughly to avoid early breakage. In addition, it is necessary to make a cutout for a wheel (in a metal tube), which will rotate and start the lighter mechanism. The cutout must correspond to the dimensions of the wheel with a margin for its fastening and free rotation.
- Next, you will need to disassemble any old or expired lighter and remove the flint and spring from it. By the way, a wheel from an old lighter can also be used. We install this design in the cutout. It will be easiest to work with tweezers.
- You also need to make a wick (you can take it from a regular candle by cutting it) and a cap, which can be metal, for example, from the remainder of the same cartridge case, or if you still have a bullet, you can use that too.
- We lower the wick into the sleeve, and solder a cap of any shape to the same sleeve.
Method number 2
Here we need a piece of cotton cord. 
- Take the sleeve and lower the lace into it. This will protect the cord from moisture.
- If you want your homemade lighter to work more efficiently, you need to moisten it with gasoline and only then lower it into the sleeve.
- The spark in this design is obtained using a file. It must be cut to minimum sizes. 5 centimeters in length will be enough.
- Thus, we strike a file, for example, on a stone, we get a spark and our wick, dipped in gasoline, begins to burn without interruption.
This option is good when you are in really extreme conditions.
How to make a lighter outdoors or in the forest?
This method is loved by many unlucky tourists and travelers who forgot to take a means of making a fire on a camping trip. Described below chemical processes help make fire out of almost nothing. What should be done:

In general, many handicraft lovers act very cunningly. Their method, by the way, can be considered completely independent and very inventive. What are they doing? It's simple.
- You need to take a regular, expired or new lighter.
- Now you need to completely disassemble it. All details will be needed.
- We take a known cartridge case of such a size that all the “insides” of the lighter fit in the case.
- Most main tool in this case it is a soldering iron. Those lucky people who communicate with this tool on a first-name basis can easily solder the entire contents of the lighter to the sleeve.
- After this, you must remember to fill the new lighter from the cartridge with gasoline, otherwise there will be no spark.
Hello!
One day, while looking for spare parts for my Primus, an idea struck me. I discovered that from a primus pump it is quite possible to make a camping, gasoline lighter, from which the fuel does not evaporate during storage. Many users of Zippo lighters will understand me.
I’ll say right away that I found all the parts for assembly at a flea market.
And so, for production we will need a pump from the Shmel primus. Or rather, two pump housings and a Chinese Zippo lighter.
First of all, we unscrew the pump valve, remove the contents, and then disassemble the lighter, leaving only the chair, the spring with the screw and the tube in which the spring is located.

We make the body. mark and cut off the thread from the first tube

Then, from the second pump tube we unsolder the nipple

and solder it into the body of the future lighter, deepening it by about 1 mm.

For the lighter cap, we need to cut a piece from the second tube equal to the height of the valve

We adjust with a file. To avoid a bevel, during processing with a needle file we turn the part around its axis.
Upper part The lighters are ready, let's move on to the lower part. Here the cap will be smaller. To do this, just below the side hole of the valve, mark the cut lines of the valve and tube.
And cut off the tube and then the valve.

We also cut off a 15 mm long tube for wind protection and make a plate from the remaining piece.

We cut out two plates for each tube and begin assembling the small cap. We apply solder to the joints, as well as nail polish to avoid unwanted soldering

and warming it up with a burner, solder the valve, plate and tube together

We cut off the excess and process it with a needle file.
Before assembling the top cap, we need to plug the side and top holes of the valve.

We wind thin copper wire around the side holes and solder. We simply fill the top hole with solder, and tin the surface one at a time. We also apply solder to the plate and tube.
We install it evenly and warm it up until it is completely soldered.

After soldering, we cut off the excess, sharpen it with a file and process the entire body with fine-grained sandpaper.
Now let's move on to the tube and chair.

A brass valve from a truck camera is perfect for the body of this mechanism.

We process it with sandpaper and cut off a 45 mm tube. and then we make a groove for the chair with a depth of 10 mm.
The gap between the chair and the tube should be about a millimeter

Now we need to solder both tubes together so that the seat is at a distance of a couple of millimeters from the lighter body. For this I used a brass wrench shaft.

Cut the rod 27 mm long. and try it on. If the distance is too large, you need to sharpen the rod a little. We will also sharpen the tube and body of the lighter.

We apply solder to the surface of the rod and the brass tube, as well as to the iron tube that we removed from the lighter and solder it.

We solder the rod, set the clearance of the chair a couple of mm above the lighter nipple, adjust the position, fix the structure with a crocodile and solder it.

In the 15 mm long tube that we prepared earlier, we drill 8 3 mm holes in a checkerboard pattern. We mark the caliper with a compass at 13 mm and cut out a fragment of the tube. Insert the drill at 11 and tap wooden hammer and reduce inner diameter up to 11 mm.

Then we solder

The wind protection element acts as a guide. Thus, when screwing on the cap, we will save ourselves from aiming, unlike other analogues of screw-on lighters.
Now we need to enlarge the holes in the nipples. We drill the top one at 2.5 mm, and the bottom at 3.5 mm.

And finally, we make a pin from a nail of suitable diameter.
When installing the chair, it is important to pay attention to the direction of the teeth. If mixed up, the roller will not produce sparks.

We insert the flint and spring, tighten it and check.
In order to insert a wick into the hole, we tie a thin copper wire to it and pull it into the hole.

We stuff the cotton wool, cut off the wire, lay the remaining end of the wick and fill it with gasoline for lighters.

OK it's all over Now. The lighter is ready. I hope you liked the article.
If you found the article difficult, you can watch the video instructions for assembling the lighter.
A lighter is very useful tool, which helps us both in everyday life and far outside the city. Despite its low cost and availability in stores, many craftsmen try to make it with their own hands. You may not need these skills, but you must admit that not every one of your friends and acquaintances has one. homemade apparatus. Making a homemade lighter is quite simple. Moreover, it can be made practically from scrap materials. How to make a lighter with your own hands?
The answer to this question can be found in this article.
How to make a lighter from a cartridge case?
One of the most simple ways- this is the manufacture of a device from a sleeve. Here we will look at several methods and options. In the first of the materials you will need a new zipper, sleeve, torch, as well as silver-copper solder. What to do next with these tools? First, you will need to gut the flint from the zipper and get out a metal disk that produces a spark. After this, disassemble all the other parts of this element - the filter, packing and disk fasteners. These parts should be arranged and soldered together. If you find roughness on any element, remove them with a soldering iron, thereby giving it correct form. Next, all the contents are stuffed into the sleeve, a wick is inserted and fuel is poured on top of it. That's it - the lighter is ready for use.
Other ways
To use the second method, you will need to prepare a narrow metal tube. A hole should be made in it for the wheel. Place a special flint with a spring there. Remember that the first element should have a small elastic band. Even from a durable alloy or metal, make a lighter cap along with a wick. Next, solder a metal tube to the sleeve and fill the top of the device with fuel.

The third manufacturing method involves the use of parts such as a sleeve and a cotton cord. At the first stage, the cord must be cut, soaked in gasoline and lowered into the sleeve. Next, you need to ensure the interaction of the device with the flint - for this, leave the outer part of the wick peeking out. The flint itself is made from a file. How to do it? To do this, solder a small piece of file (no more than 5 centimeters long) to the sleeve and pour gasoline into the latter. That's it - the device is ready for use.
How to revive an old gasoline lighter?
If in previous methods we told you how to make a gasoline lighter from improvised means, then in this method we will look at how you can revive an old device and make it work again. But before we get started, a few words about tools and materials.
So, what materials do we need for this?
During the work you need to prepare several copper tubes with a diameter of 5 and 15 millimeters, two pairs of gears and one zipper. The latter can be taken from a regular gas disposable lighter made in China.

Let us immediately note that you will not be able to make a device with the same ignition mechanism as before using these components - for this you only need to have original spare parts. And this is extremely difficult to do - it will be much easier to buy a new one in the store than to suffer with the old one.
To ensure that the opening and closing mechanism of the lighter is not excessively flimsy, the body must be monolithic. Otherwise, during use, the elements of the device will constantly move to the side.
How to do it The principle of resuscitating an old lighter is quite simple - all prepared elements are installed in place of the old ones, and the tool’s container is filled with gasoline. To prevent the fuel from evaporating, it is recommended to install a cap here. However, due to its flimsy design, part of it will constantly cling to the gear, so such a device is not suitable for frequent use.
In conclusion, about gasoline lighters, we note that all the main parts, namely flints, change in it, and therefore such a device will serve for a very, very long time.
Making a device from a battery
How to make a lighter from a battery? Making this element in a similar way will be even easier than all others, so if you have a minimum of free time allotted to work on making a lighter, use this method. And it consists of just a few stages.

First, the basic materials are prepared - a 12-volt battery and a piece of regular foil. As an alternative, take a chewing gum wrapper - this does not change the essence of the matter.
As soon as both contacts are closed, a small “fire” will form at the fold of the foil. Of course, from a reliability point of view, such a lighter is not very convenient to use, but in nature, especially on a picnic, such a thing will definitely not hurt you.
So, we found out how to make a lighter from scrap materials.
Today we will tell you how to make a gasoline lighter with your own hands at home.
Hello! One day, while looking for spare parts for my Primus, an idea struck me. I discovered that it is quite possible to make a camping one from a kerosene stove pump, from which fuel does not evaporate during storage. Many users of Zippo lighters will understand me.
I’ll say right away that I found all the parts for assembly at a flea market.
And so, for production we will need a pump from the Shmel primus. Or rather, two pump housings and a Chinese Zippo lighter.  First of all, we unscrew the pump valve, remove the contents, and then disassemble the lighter, leaving only the chair, the spring with the screw and the tube in which the spring is located.
  We make the body. mark and cut off the thread from the first tube
  Then, from the second pump we unsolder the nipple
  and solder it into the body of the future lighter, deepening it by about 1 mm.
  For the lighter cap, we need to cut a piece from the second tube equal to the height of the valve
  We adjust with a file. To avoid a bevel, during processing with a needle file we turn the part around its axis. The upper part of the lighter is prepared, let's move on to the lower part. Here the cap will be smaller. To do this, just below the side hole of the valve, mark the cut lines of the valve and tube.
And cut off the tube and then the valve.  We also cut off a 15 mm long tube for wind protection and make a plate from the remaining piece.
  We cut out two plates for each tube and begin assembling the small cap. Apply solder to the joints,
Apply nail polish to avoid unwanted spots  and warming up the valve, plate and tube among themselves.
  We cut off the excess and process it with a needle file.
Before assembling the top cap, we need to plug the side and top holes of the valve.  We wind thin copper wire around the side holes and solder. We simply fill the top hole with solder, and tin the surface one at a time. We also apply solder to the plate and tube.
We install it evenly and warm it up until it is completely soldered.  After soldering, we cut off the excess, sharpen it with a needle file and sand the entire body with fine-grained sandpaper.
Now let's move on to the tube and chair.  The brass valve from the cargo chamber was perfect for the body of this mechanism.
  We process it with sandpaper and cut off a 45 mm tube. and then we make a groove for the chair with a depth of 10 mm.
Next is a hole for a pin with a diameter of 3 mm
The gap between the chair and the tube should be about a millimeter  Now we need to solder both tubes together so that the seat is at a distance of a couple of millimeters from the lighter body. For this I used a brass wrench shaft.
 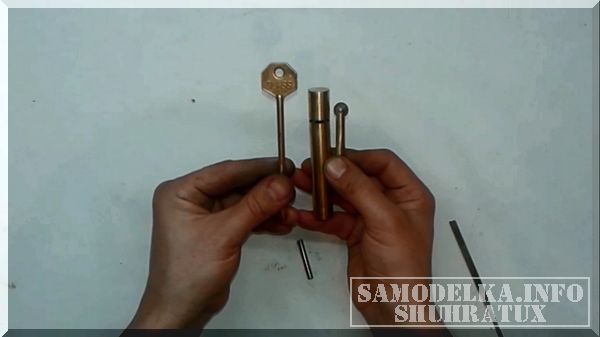 Cut the rod 27 mm long. and try it on. If the distance is too large, you need to sharpen the rod a little. We will also sharpen the tube and body of the lighter.
  We apply solder to the surface of the rod and the brass tube, as well as to the iron tube that we removed from the lighter and solder it.
  We solder the rod, set the clearance of the chair a couple of mm above the lighter nipple, adjust the position, fix the structure with a crocodile and solder it.
  In the 15 mm long tube that we prepared earlier, we drill 8 3 mm holes in a checkerboard pattern. We mark the caliper with a compass at 13 mm and cut out a fragment of the tube. Having inserted the drill at 11, tap it with a wooden hammer and reduce the internal diameter to 11 mm.
 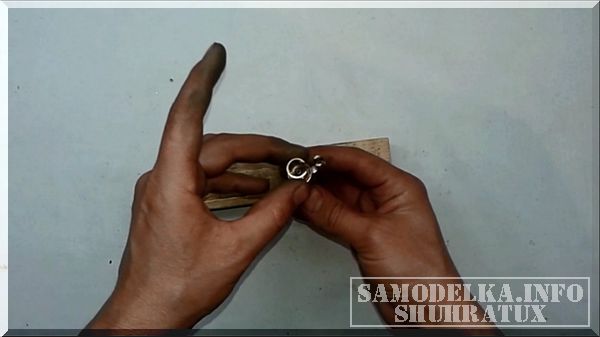 Then we solder
  The wind protection element acts as a guide. Thus, when screwing on the cap, we will save ourselves from aiming, unlike other analogues of screw-on lighters.
Now we need to enlarge the holes in the nipples. We drill the top one at 2.5 mm, and the bottom at 3.5 mm.  And finally, we make a pin from a nail of suitable diameter. When installing the chair, it is important to pay attention to the direction of the teeth. If mixed up, the roller will not produce sparks.
 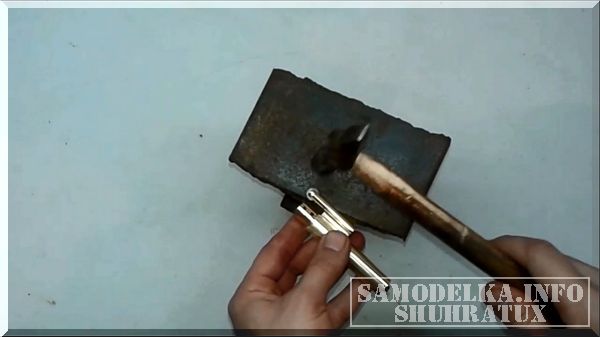 We insert the flint, the spring, twist it and check. In order to insert the wick into the hole, we tie a thin copper wire to it and pull it into the hole.
 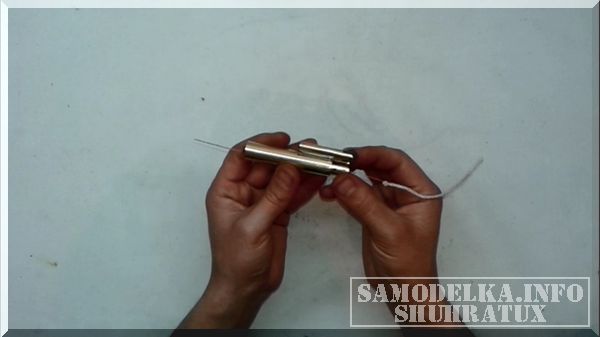 We fill it with cotton wool, cut off the wire, lay the remaining end of the wick and fill it with gasoline for lighters.
 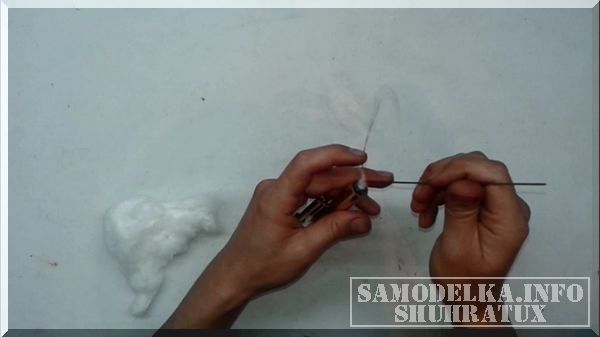 OK it's all over Now. The lighter is ready. I hope you liked the article. If you found the article difficult, you can watch the video instructions for assembling the lighter.


