Lighting is used by people almost everywhere, as it allows them to optimize the work process and improve living conditions. An integral attribute of every home is a table lamp, which can have several configurations.
The design of such a system is relatively simple and consists of several components. You can learn more about table lamps on the website http://decorro.com.ua/105-nastolnye-lampy.
Causes of breakdowns
It often happens that table lamps simply stop turning on and working. There are several main reasons for these malfunctions:
- Broken cord. This may be indicated by periodic loss of light or blinking. Very often the main place of damage is near the fork, as it is susceptible to frequent bending.
- Failure of the switch will not allow the circuit to close, which will cause the absence of light.
- Broken wiring near the socket. Very often this occurs due to burnout of contacts that fall out of the clamps.
Diagnosing this is quite simple, which can be done with a routine visual inspection or using special instruments.
Repairing the lamp
Let's consider a method for repairing an ordinary table lamp, which consists of a lampshade, a leg and a stand.

This process can be divided into several stages:
- First of all, we check the integrity of the connection in the cartridge. To do this, pull back the corrugation and unscrew the top head to reach the required part. When removing the cartridge, you should inspect it for damage. If the wiring has melted, it will be visible. The problem can be corrected by stripping the cable and fastening it back, as well as completely replacing the electrical conductor on the entire lamp.
- When the cartridge is intact, then the cause is the switch. You can get to it from the inside of the stand by unscrewing several screws. There you can also visually inspect possible damage or feel the device using special devices. The damage can be repaired by twisting the wiring again. This must be done in the correct sequence so as not to directly short-circuit the circuit.
Be sure to use electrical tape to ensure good connections that won't short out. Very often the cause of breakdown is the use of light bulbs with a higher power than the one on the device.
Work must be carried out with the lamp disconnected from the mains, observing all safety rules.
You can see how to repair a table lamp in this video:

Repair of table lamps should begin with diagnostics. Malfunctions can be divided into several types:
1. The lamp works, but is unstable - the lamp flickers.
There may be several reasons:
Network operation is unstable, there is not enough voltage.
This can be determined by plugging the table lamp into a known-good network, or connecting it to the network using a voltage stabilizer.
2.During operation, if the cable is touched, the light turns off:
Mechanical damage to the wire.
We check the wire for internal kinks or external abrasions. If this is the reason, you need to replace the wire.
Switch fault
The lamp turns on every once in a while, and when you press the switch, a clicking sound occurs. It is necessary to make repairs (if the switch is disassembled), or replace the switch
3.When the table lamp is plugged in, the light bulb does not light up.
The cause of the malfunction can be either a burnt-out light bulb or a malfunction of the components of the lamp itself.
Important: before starting repairs, disconnect the lighting device from the electrical network!
How to repair a table lamp - we will describe the process in more detail.
1. Let's check the serviceability of the light bulb itself. If the lamp before starting work
worked, you need to wait until the light bulb cools down. Otherwise, when you try to unscrew the socket, you can damage the lamp, and then you will have to unscrew its base using pliers. Let's check the light bulb visually. If the filament has a break, then the repair is complete - install a new light bulb and turn on the lamp. If it is impossible to visually check the serviceability of the light bulb (frosted glass), then you can check it by screwing it into another lighting fixture.
2. If the light bulb is working properly, then the fault may be caused by the socket. Most often, this is a lack of contact with the light bulb due to the contact being too bent. The malfunction can be easily eliminated by bending the cartridge contact using pliers and a screwdriver.
3.If the repair of household table lamps involves replacing the cord, then the new cord must have the same cross-section as the old cord. The new cord is installed in the lamp after thoroughly cleaning its ends (preferably with a soldering iron to avoid mechanical damage to the wires). We make rings on the wires from the plug side and also process them with a soldering iron. Install the plug. This operation can be avoided by purchasing a wire with a ready-made molded plastic plug.

4.Repair of table lamps may include replacement or repair of the switch.
If preliminary diagnostics indicated this particular malfunction, then the switch can be completely replaced with a new one or repaired. Installation of a new switch is carried out by dividing the supply wire into two wires, on one of which a break is made, and the stripped ends of the wire are connected to the switch contacts.
What is a table lamp for and what does it consist of?
How to choose a table lamp
DIY table lamp
In our store you can purchase various table lamps: 


This situation is probably familiar to many: table lamp broke, we’ve already changed the light bulb and plugged it into a different socket - nothing helps.
It's 90% that the cause of the breakdown is burnt wires near the socket. This happens due to the fact that a light bulb of a larger, uncalculated power is often inserted.
Important:
If this is your case, be careful not to touch metal parts, they may be live due to the fact that the burnt wire could touch the lampshade.
The whole process will take you no more than an hour, provided that you already have all the supplies you need. At the same time, a cheap similar table lamp costs on average 300-500 rubles. Therefore, think again about whether you should repair it.
Well, if you still decide to repair, read on carefully.
What you need to repair a table lamp
Note:
The average price on the market at the time of writing is indicated for the materials. Everything you need can be bought at any electrical goods store.
Materials:
- two-core cable about 0.5 m long, with a cross-section of at least 2.5 m?. A meter of good two-core cable costs no more than 50 rubles.
- ceramic cartridge – 10 rub.
- electrical tape - 10 rub.
- heat-resistant insulation – 10 rub.
Tool:
- screwdrivers
- pliers (with wire cutters)
How I repaired my table lamp
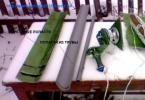
I have this cute example of a Chinese green table lamp, independently decorated with little animals. 🙂

The first thing you need to do is get to the cartridge. Unscrew the lampshade fastening.

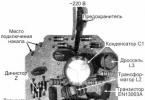
And we take out the cartridge.

As you can see, the wires were burned and torn due to strong heating, the insulation became rigid and burst.
If you have disassembled the lamp and the wires are intact, then the reason is most likely in the switch; use a multimeter or a “test screwdriver” to check the presence of voltage in the circuit before and after the switch. If there is no voltage after the switch, but there is before it, then it needs to be replaced. You can easily buy a similar switch at any electrical goods store. If there is no voltage even before the switch, then only the plug and the supply wire remain. If the plug is detachable, you can check for a broken wire. If not, we change everything along with the cable.
Important:
Before disconnecting the wires, remember or write down which wires will need to be connected in the future. There are not many wires there, the circuit is simple, I think there will be no problems.
Unfortunately, my socket was without wire clamps. To avoid soldering, I decided to replace the cartridge. The existing wires will also no longer work, so we replace them with our own, preferably with thicker insulation. Just don’t overdo it, thick wires may not fit into the metal corrugated rod. In general, before connecting them to the cartridge, I recommend checking this. The wires at the point of connection to the cartridge must be covered with thermal insulation to avoid severe overheating.

Important:
Very carefully, with little force, tighten the bolts on the chuck. Tighten it a little and the terminal will burst! Naturally, the wire will dangle and burn again. You can even buy a spare cartridge just in case, since the terminals are very weak. I didn’t find any other cartridges in my city, maybe things are better with you.
To make it easier for the wires to fit into the corrugation, wrap the ends with electrical tape.

Since the load of the light bulb is not very large (on the lampshade it is written: “maximum 60W”), you can simply twist the wires together, wrapping them well with electrical tape.

If you have a soldering iron, you can solder it, it won’t hurt, or buy special connecting terminals. As an alternative, you can use an excellent homemade wire connection using copper tubing. Don't forget to wrap the wire connections properly with electrical tape.

Put the wires in place.

Make sure, if possible, that the wires do not lean against the socket inside the lampshade.
Well that's it, ours desk lamp working again!

Do not use bulbs larger than 60W, otherwise the wires will burn out again. This is a table lamp, not a spotlight! Well, if a 60W light bulb is not bright enough, in this case, use a gas-filled one (by the way, they say these lamps are harmful and emit toxic gas) or, better yet, an LED lamp. Such lamps heat up less, so you can safely use any brightness, they will not damage the wires, and you can also save energy.
Bright light, friends! 🙂