Hello! I wanted to have as a souvenir casts of my son’s legs and arms. In our city such a service is provided, but in my opinion it is too expensive. After wandering around the Internet, I decided that I could do it myself. I present to your judgment the results of my labors. I will be glad if my material is useful to someone.
So, we need:
- photo frames (size and quantity depends on your idea)
- plaster (regular or for artistic work)
- plasticine (can be old)
- paints, including metallic
- varnish
- cardboard
- scissors, pencil, ruler, PVA glue
- glue (I have: moment super gel, in small tubes)
- sponge
- accessories for decoration (in my case, in nautical style- pebbles, shells, boat, anchor, turtle).
I read about how to make impressions at home here: http://www.chicco.com.ua/forum/sled-malysha-sdelaem-sami-t49618.html. There is also such a master class in the Country
I took old plasticine from my eldest daughter, heated it in the microwave, and made a cake (the child’s hand or leg should fit in there), the height of the cake was at least three centimeters. Plasticine should be soft. We make an imprint of the part of the body that interests us)) It may not work out the first time, don’t despair! We crush it, heat it, make a flat cake and try again. In the end, you will achieve a result that satisfies you. When you make an imprint, the plasticine spreads to the sides, so before freezing, I carefully, so as not to spoil the shape, pressed the plasticine cake on the sides, and the mark becomes a little more “slender” and deeper. Then put the plasticine in the freezer until it hardens.

In an art store I bought this plaster for sculptural work.


When the plaster has hardened, you need to carefully remove the casts. To do this, I put the plasticine with the casts in the oven at the lowest temperature so that it warmed up and became soft, then it would be easier to remove. I dried the finished casts for another day, turning first one side or the other. Otherwise, they remain damp, and we will attach them to the cardboard and this may cause it to become damp and soft.

While our casts are hardening and drying. Let's take care of the frames. I have three very simple wooden frames, square, 13 cm. We disassemble them, take out the back wall and glass. There are metal plates at the back that press against back wall, they need to be bent so that they look like legs on which the frame is placed. This will make it easier to paint.

Following my plan marine theme, I painted the middle of the frames with white paint. I have titanium white from Nevskaya Palitra. I bought it at an art store. We cover it with paint several times so that the wood does not show through. Let it dry.

After the white paint had dried, I painted the now blue paint on the inside and outside edges of the frames. I also painted the sides of the frames. I painted it the same way several times. My blue paint is acrylic, all from the same art store, but was purchased earlier for another project. Leave to dry (preferably overnight).

Now we need to start deepening the frames. To do this, I used a very simple and understandable master class http://bond-mary.blogspot.com/2009/11/blog-post_16.html.
Since the frames turned out to be slightly different, I numbered each frame in pencil with reverse side. And I made boxes for them, which I also numbered accordingly. I made the boxes from ordinary white cardboard for children's creativity. I deepened it by 1.5 cm. Then I painted it with white paint (the same one I used to paint the frames). Then she took a foam sponge, dipped it in blue paint and began to blot the white paint on top. I intentionally left the folds and corners white. Leave to dry.

Now we need to paint our casts. I chose this silver paint.

Before painting, I corrected the casts a little with sandpaper. I made smoother edges and removed some irregularities, but this needs to be done carefully. Casts can break easily. I applied the paint in several layers until I achieved the result I wanted. And again I left it to dry. After the silver paint had dried, I varnished the casts and frames. Advice: DO NOT use varnish on water based, the paints on the frames may mix, even if they have dried well. Again, my varnish is from an art store)). Let the casts and frames dry.

When everything is dry, you can start decorating. Glue the cast. And around it there is already your flight of fancy. The glue I used was moment super-gel, in small tubes, universal. Pebbles are soil for an aquarium from marble chips, bought it at a pet store. I bought shells in different places, in the scrapbooking department, in the handicraft department, I gutted souvenirs from the sea))) The turtle is a pendant for a bracelet, also from the scrapbooking department.

This is what happened with the cast of the leg. I bought the anchor in the scrapbooking department.

The middle frame, as planned, should have a photo of my son. I processed his photo in Photoshop in accordance with the marine theme))) The result is this composition.
what to give to mother and newborn? Breast-feeding. A child from birth to one year. I don’t want a banal rattle, but something very memorable, the baby is very, very long-awaited. set for casting handles and legs?
I have always had a peculiar attitude towards all kinds of casts of the arms and legs of babies. But today I came across something that completely changed my mind. I'm crying.
DIY casts of arms and legs. On March 8, we decided to give our beloved grandmothers a gift in the form of casts of the hands and feet of our 4-month-old daughter. To do this, take half a glass of brewed starch for 1 cup of flour and 1 cup of salt: 1 tbsp...
Foot print. Parental experience. A child from birth to one year. Care and education of a child up to one year: nutrition, illness, development. They did the same thing at 6 months, but it didn’t work the first time; I had to press in the handle and the leg quite hard.
I would like to ask about casts of arms and legs from experienced mothers who have already made these. Which option is better to buy, 3D or simple? Examples below. I just can't imagine how to make it 3D. After all, in theory, if you take your hand back, the mass should follow it and...
Section: Gifts (For happy parents the opportunity to preserve the first traces of your baby’s childhood). casts of arms and legs.
Did it go well? Did you take hand or foot prints? DIY gift for a girl. Gift for second child. graduation at kindergarten. New Year's gifts.
DIY casts of arms and legs. Foot print. Parental experience. A child from birth to one year. Care and education of a child up to one year: nutrition, illness, development. If you decided to make a cast of a child's hand or foot... Smooth embroidery, tell me.
Casts of arms and legs. - gatherings. A child from birth to one year. Care and education of a child up to one year: nutrition, illness, development. the homemade one didn’t work out the first time: (we did everything according to the instructions, but it turned out that we should have used the leg (handle) earlier, but not the hands...
DIY casts of arms and legs. The result is not so pleasing to the eyes - the blinds turn out to be vaguely similar to real hands. Rough, the fine pattern on the hand is not visible. Buy ready-made kits for making casts of children's hands and feet with modern materials.
cast of a hand and foot. - gatherings. A child from birth to one year. Care and education of a child up to one year: nutrition, illness, development. Cast: 2 cups of flour, 1 cup of salt, 3/4 cup of water, knead the dough thoroughly, make a layer 2 cm thick, wash the child’s hands and...
Handprints. How can you make casts of your baby’s hands and feet??? It seems there is some kind of recipe for dough with salt, but what are the proportions??? And if it’s not difficult, give me an idea on how to arrange all this?
Casts are prints. ...I find it difficult to choose a section. Child from 1 to 3. Raising a child from one to three years old: hardening and development, nutrition and illness. If anyone gave such a gift: casts of arms and legs in a frame, tell me where and for how much? And then we have a birthday soon...
casts. ...I find it difficult to choose a section. Child from 1 to 3. Raising a child from one to three years old: hardening and development, nutrition and illness, daily routine and Section: ... I’m having a hard time choosing a section (Tell me, please, has anyone made casts of arms / legs on their own child).
DIY casts of arms and legs. We have one like this, only the color of the frame is different, we did it at 2 months, my husband helped, the first time it didn’t work, only the third time, I rolled it out, then opened my palm with the butt, made a date with a toothpick, drew a circle with a glass and left it to dry...
Conference "Child from birth to one year" "Child from birth to one year". Section: Achievements (I want to make prints of hands and feet. And they gave us special clay. We already have a foot print ready. And in this set there is a frame for this cast, next to it...
DIY prints of children's hands and feet. METHOD 1 Make an impression of the child’s hand or foot. In the end, we didn’t bother with plaster, but made a print with paint) also in a frame. 3D casts of children’s hands and feet.
Surely all parents want to preserve warm, emotional memories of their children’s childhood. But, unfortunately, even the most detailed photographs cannot always convey, years later, that thrilling magical feeling that mom and dad experience while touching their child’s tiny fingers. In this case, hand-made casts of children's hands and feet come to the aid of sentimental parents.
Colorful footprints
The first thing that comes to mind to immortalize the hands and feet of a child is to dip them in watercolor or gouache and print them on plain paper or cardboard. Yes, it's not the best original way, but it is inexpensive and fast. To preserve this sheet for a long time, you can either laminate it or put it in a beautiful stretcher.
Plasticine legs
Another easy option for making casts of children’s hands and feet with your own hands is plasticine. The best choice is one that hardens itself in the air, or a special mixture for modeling. The mass should be flattened into a medallion and the baby’s hand or foot should be well imprinted in it. Be sure to make a hole before the plasticine dries so that the “home heirloom” can be hung on a ribbon.

Salt dough print
Many of us sculpted “salty” figures in childhood, and now, having become parents, salty dough will help us capture the tiny fingers of our babies. So, how to make casts of children's hands and feet from salt dough?
Dissolve half a glass of salt in a glass of water and add about a glass of flour (more is possible until the dough begins to stick to your hands). We divide the resulting mass into 4 equal parts and roll it out with a rolling pin into flat round pieces a couple of centimeters thick and the size of a child’s hand and foot. With the baby's dry, clean palms and feet, we press deeply onto each piece. If the cast is unclear or you don’t like it, you can roll the dough again and repeat the procedure.
When the cast is ready, let the dough dry for 2-3 weeks. After this, the dough can be painted with acrylic paints. As you can see, this method is quite painstaking, but the result will be durable and original casts of the child’s arms and legs made from salt dough.

Salt dough and plaster cast
Even more meticulous and unusual way get prints (casts) of children's hands and feet with your own hands - plaster them.
To do this, we make the dough according to the recipe described above, and form prints in the same way, and it is better to make 2 times more dough so that the print is as deep as possible (2-3 cm in depth). We take plaster (a creativity kit from special art stores for children is best, but a construction kit can also be used). We dilute it with water in the proportion of 1 cup of gypsum to half a glass of water (it is important to add water to the plaster, and not vice versa). Add 2-3 spoons of PVA glue to make the resulting cast stronger. Mix everything very quickly and pour it into the mold with the dough.
Before the mass hardens, it is better to wipe off all the unsightly edges with a cloth, otherwise you will have to file them off later, which could damage the shape. Let the cast of the child’s hand (foot) harden with your own hands for a day. Plaster usually dries quickly, but in order for everything to turn out well, it is better not to touch it for several hours. After which the finished cast can be removed from the dough. We sand all the unevenness with sandpaper. You can decorate such prints with acrylic paint or make an interesting collage of children's photographs with them. The main thing is to approach the process with imagination!

Sand casts
Another way to make your own impressions of children's hands and feet is to use sand instead of dough. The operating principle is the same. Pour sand into a deep container, moisten it with water so that it turns into a thick mass, but does not float in the water and the child’s print does not spread. We lower the baby’s leg or arm deeper (1-2 cm) so that an imprint remains, and take it out. Then we lower the plaster into the resulting mold (the proportions are described above) and leave it for several hours to harden. Then shake off the excess sand.
Casts from the finished set
Here were several ways to make casts of children's hands and feet with your own hands, but you can also use ready-made kits for creativity. They allow you to create high-quality “handles” and “legs” without using improvised tools; you just need to follow the instructions. There are 2D sets (only with prints), 3D (full hand and foot), and also with the possibility of making a cast of a child’s hand along with with an adult hand, casts in a frame, on a stand, in an album, with an engraved plaque and much more. The only drawback of this method is the high cost, but those who really know a lot about original and memorable items will appreciate it.

Instead of a conclusion
Creating memorable things, be it photographs or the first homemade handmade, is very important, since children grow very quickly, and we are not able to preserve every detail in our memory. In addition to such wonderful casts, mom’s chest with little treasures can be constantly replenished - with tags from the maternity hospital or photos from the first ultrasound, greeting cards from family and friends. Photo albums, a bag with the first strand of hair, the first clothes, the first toy, the first pacifier or the first bottle, and when the baby grows up, the first drawings, the first fakes and many other amazing memorabilia.
And the child will probably, as an adult, want to get acquainted again with the things that surrounded him in childhood, and perhaps even remember just a little bit about that wonderful carefree and happy time.
What to give your grandmother for March 8th? Gifts from grandchildren are the most expensive, so grandmothers will be happy about everything. It is especially important that the baby takes part in preparing the gift. Today I want to offer one of these gifts and I’ll show you how to make it salt dough for baby's footprint.
When I saw this idea for the first time, it captivated me. No, it’s not new, but the simplicity of its implementation immediately prompted the desire to repeat it for myself. I hope it inspires you too.
Necessary materials
- salt– 1 glass
- flour– 1 glass
- water– 1/2 cup
- rolling pin for rolling out dough
- kitchen knife
- acrylic paint
- tassel for drawing
How to make footprints on salt dough
1. Prepare salt dough
Mix salt (1 cup), flour (1 cup) and water (1/2 cup). Mix everything well to form a homogeneous dough.
The child can also help in this process. He will really enjoy kneading the dough with his little fingers.
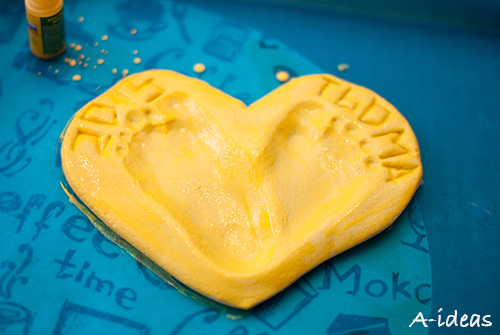
2. Cut out the heart
Roll out the dough with a rolling pin to make it plate approximately 1.5-2 cm thick.

Cut out the heart
Place the heart on a baking sheet. I also lined it with baking paper, but this made the bottom of the heart uneven. It would probably be better to just put it on a baking sheet without paper.
I would be glad to hear your comments on this matter if you repeat the idea.
3. Footprints
With bare children's feet we make an imprint on the heart.

Footprints
We got it right the first time. Although the child practically does not stand still, in those seconds that we need to leave an imprint, he stood still, enthusiastically watching the process.
Using a spoon, make an inscription on the heart.
4. Baking in the oven
Preheat the oven up to 100 degrees and place a baking tray with a footprint for baking for 3 hours.
5. Paint the footprint
After I took the print out of the oven, I let it cool down for a while and then carefully separated the baking paper.
IN original recipe it is written that you can paint the heart almost immediately, but I have it it sat for a couple more days.
For painting I took acrylic paint . It dries quickly.
Painting the footprint
First I painted one side, and at the end of the day I painted the other.

Painting the footprint
You can also involve your child in this process. Even if it turns out less neatly, the main thing is the process. I haven't decided on this yet. We are now at an age when a child wants to do everything himself, he would not let me help, and at some point he himself could simply drop and break our print.
I am very pleased with the result. Only now you need to find deep photo frame to put our gift in it.
I didn't make a hole for hanging on purpose. The heart turned out to be not very light and could simply not withstand its weight, fall and break.
Please leave your review or comment. I'm very interested in your opinion!
Sometimes it seems that children grow up too quickly, parents don’t have time to enjoy communication with their worries, and the awe they feel when looking at their children’s little hands and feet slips away. I really want to leave something in my unreliable memory so that it reminds me of the baby and demonstrates the miracle of the baby’s growth. Photos help partly and plaster casts palms.
Photo by Shutterstock
Making plaster casts is not difficult, the only problem is that babies are mobile, getting your palm to apply the right amount of force at the right moment and not bringing the baby to tears is really difficult. Little secrets come to the rescue.
Option one - economical
You will need: - soft plasticine, - oilcloth, - Vaseline, - plaster, - a glass of water.
Cover the table with oilcloth, otherwise you risk spending the rest of the day cleaning. From plasticine (take a couple of pieces at once), mold a cake at least 3 cm thick. It should be smooth and without holes. Apply a thick layer of Vaseline to one of the surfaces of the cake; you can even use Vaseline oil.
It is not at all necessary to use plaster; foot prints on plasticine look no less cute
In a bowl, dilute a bag of medical plaster (sold in pharmacies or by weight, or packaged in 150 grams), pour it into a glass and gradually pour in 200 ml warm water. Stir constantly to avoid lumps. Cover the glass with a lid.
Now put the finished plasticine in the microwave for 10–15 seconds, so it will become very soft and pliable. Check whether the mass is too hot and whether the baby’s hands will be burned.
Let your baby “drown” his hand or foot in the mass of plasticine. This must be done quickly and clearly; the child must not have time to clench his fingers or twirl his palm in the warm mass. Feel free to take out the handle; the plasticine should not stick, because it has a layer of Vaseline on it. To be on the safe side, you can smear your baby’s hand with baby fat cream.
Pour the prepared plaster into the resulting cavity and leave the mold for 2-3 hours. Once the plaster has dried, you can remove the plasticine. Dry the plaster for another day, now you can file off the unevenness of the plaster using sandpaper. Cover the cast with paint; acrylic or meat paint work well. All that remains is to place it in a deep frame, even without glass.
Option two - home
Make salt dough impressions. Knead 2 cups of flour with 1.5 cups of warm water in a bowl, add 1 cup of fine salt. To make the dough soft and smooth, you can squeeze half a tube of baby cream into it.


