They recently ordered me several daddies, but small ones. Having scoured the Internet, I couldn’t find a MK that suited me, so I made my own. It’s very convenient for me to do it according to MK, where everything is written out, I don’t have to calculate the dimensions again and everything else.
The folder is notable for its small format, even smaller than A5. I also figured out how to beautifully make the middle in the binding area (at least, I think I did, I’ve never seen anything like this before))
We will need:
- - cardboard 1mm
- - scrap paper (2-3 sheets)
- - PVA glue (you need thick glue, you can use construction glue) and a brush
- - decorative tape
- - file
- - decorations
- - printed inscription "Birth Certificate" optional
First, we make the base of our folder: cut out 2 rectangles measuring 19.5 by 13 cm from cardboard (this is approximately the size of a certificate folded in half + 0.5 cm on three sides) and from thin paper a rectangle 22 by 30.5 cm (can be made from craft -paper, but I didn’t have it on hand, so I used scrap paper).
Now in the middle we draw 2 lines (beaten) with a step of 6 mm and 1 line horizontally at a distance of 1.3 cm from the edge. This is necessary in order to glue our cardboard blanks evenly. Glue it, align it, and you can put it under a press for a while.
We cut off the corners, not end to end, but leaving about 1.5 mm. Then we glue our allowances inside. We coat the paper well with PVA glue, bend it carefully so that it fits tightly to the cardboard and glue it.
In the place of our “binding” we draw several times with the pad of our finger to form such a groove.
Now we bend and glue our short sides and form neat corners (as in the photo below).
Let's start decorating our "binding" inside. First, cut out a strip of paper 19.3 cm long (width at your discretion) and glue it using PVA glue again, because... It can be used to coat completely bonded surfaces.
Again, use your fingertip to trace the “binding” several times. You can leave it like that
but I decided to further strengthen the middle with decorative tape - I cut a piece a little longer, coated it with glue and glued it on.
Don’t forget to run your fingertip along the resulting groove.
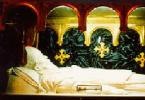
This photo shows the binding already on the finished folder, it looks very neat because the paper folds are not visible.
Next we need to form a pocket inside from the file, it’s a little difficult to show this, because... the file is transparent. My pocket will not be solid, but with a slot in the middle, on the fold. Cut out 2 rectangles from scrap paper (mine measures 12.7 by 19.2 cm). From the file, cut off a white strip with holes and cut out 2 rectangles 12 cm wide (1 rectangle will be closed on both sides, the second on one side)
Our file pieces turned out to be narrower than scrap paper pieces. I used strokes to mark the pieces of the file; I have double ones; I inserted pieces of scrap paper inside. The arrows indicate the uncut edge of the file.
On the other hand, we have such allowances, they are also double for now.
You need to cut off the “back” allowance and glue the wrong side of the scrap paper blank to the back side of the file. It is better to do this using double-sided tape or PVA glue (the “Moment” may show through a little). Here the strokes indicate the contours of the file in the upper half of the folder; it is narrower than paper - so that you can then easily stitch everything on a typewriter and not sew up the “input” and “exit”.
This is the bottom half of the inside of the folder (photo from another piece). Double arrows show the borders where the file was left uncut - these are on the left and below, the paper is inside the file, on the right are allowances.
Now let's fold and glue our seam allowance to the wrong side. In the photo below, double arrows show where the “back allowance” is cut, and one arrow shows the allowance that needs to be folded and glued.
I've already glued it here.
We glue the finished blanks to the inside of the folder and stitch them. Because The pieces of the file are narrower, they will not be stitched on all sides, on the top - on the sides, and on the bottom - on three sides, like a pocket. I stitched first on the sides, then from the top-middle-bottom (since the folder did not always fit in the opening of the machine). From below, where the pocket is closed, I very often raised my foot (with the needle down) to correct the file, because... it can shift and the pocket will turn out crooked.
So, the interior design is ready, we have a slot in the middle so that the folder and certificate can bend freely. Now fold the folder in half and put it under a press, preferably for several hours.
At this time, you can start designing the cover, decorate it to your taste, with or without an inscription - as you like. I got a delicate girlish one that closes with an elastic band.
In the “binding” area I glued and stitched a strip of paper
Details
Another option is a boy's version, with metal corners and an inscription
For decoration, Galeria Papieru paper from the Dawn collection, MME, Mr.Painter, ScrapBerry's, decorative ribbons, sewing, decorative tape, Prima flowers, brads, buttons, metal corners were used.
Hello, my darlings! In the first lines of my letter, I want to sincerely thank everyone for their congratulations on the addition to our family - it was incredibly nice!!! Unfortunately, it’s not always possible to respond to comments - well, you yourself know about the everyday life of a young mother of many children))) But I fulfill what I promised - a gift for my beloved PCs - a master class on a current children’s topic)) For once, my little one is fast asleep, and the family things have been redone, and there is time for socially useful work) So, folder for birth certificate.
I filmed the master class almost a year (!!!) ago, and now a miracle happened)) The MC is very detailed, there will be a sea of photos and tons of explanations) I filmed almost every action and movement in order to present it as clearly as possible)

In fact, a daddy is one of the simplest scrap objects, which is important for beginners, and at the same time you can practice techniques and techniques that will be useful when creating albums and notebooks, for example, the same neat corners, even stretching of the fabric on the cover or even machine stitching. In addition, the materials for the folder need the bare minimum; even complete beginners in scrap scraping can handle it. In addition, I will share some tricks that may be interesting to pros))

To create a folder we need the following current minimum set of tools:

1. A cutting mat, an iron ruler and a stationery knife, or instead of all this - a paper cutter.
2. Fabric scissors.
3. Creasing tool - what kind do you have: a stylus (in the photo - with a wooden handle), a creasing stick, a non-writing pen, a knitting needle or a special tool - a creasing board.
4. Stationery clips or paper clips.
5. Sewing machine and thread, or a needle for hand sewing and a supply of patience)
Adhesive materials:
1. Glue “Moment Gel” or “Moment Crystal” or its analogue known to you.
2. Glue stick
3. Double-sided tape (optional)
Basic materials:

1. Two sheets of scrap paper - select a color that matches the fabric from which the cover will be made.
2. Two rectangles of cardboard (beer cardboard, bookbinding cardboard or passe-partout cardboard) measuring 26.5x19.5 cm each
3. File for documents. For my daddies, I take a very dense, rough one - so that it doesn’t wrinkle or fray during use, and besides, it’s much easier to work with this than with a regular one. For reference: the cost of a regular file in a stationery store is 1 ruble, a thick one - 5 rubles). Here it is closer:

If you take 2 such files, then from the second one you can make a pocket for additional documents - an insurance policy, SNILS, etc. If you don’t find these on sale, don’t worry. Use regular one. And for the pocket, buy a plastic binder - their upper part is dense and transparent - just what you need. Or any other transparent film you find. The pocket can also be made from scrap paper. But film, of course, is more practical.
4. A strip of cardboard with a density of 250-300 g/m2. I use photo cardboard, you can use watercolor paper. Strip size - 26.5x5 cm.
5. Fabric for the cover. You will need a piece measuring approximately 50x30 cm. I recommend choosing a fabric that is not very dense with little fraying edges, preferably cotton, ideally patchwork fabric. Choose fabric with a small, uniform pattern - it is easier to decorate. Large drawing such as owls, bears, cars, etc. It’s almost impossible to decorate, but if you plan to make the most functional folder without decoration, you can take this kind of fabric.
6. Synthetic padding or fleece for a soft cover - you will need a piece measuring 40x26.5, but do not cut it from a single piece in advance!
7. A pair of thin round magnets (mine are 1 mm thick). I make my folders with a built-in magnetic clasp, this seems to me the most convenient to use: the magnet reliably keeps the folder doors from accidentally opening, and the document from creasing, and if necessary, quickly opening the folder does not create any obstacles. In addition, it makes a funny click when closing) In general, of course, you can do l any other fastener - with ribbons, with an elastic band, with a strap with a button or Velcro, or even without a fastener at all - it won’t make daddy any worse.
8. Decorations for the cover - of your choice and taste. Everything is individual here. Personally, I prefer practical options since we travel a lot and the folder is used quite heavily. My “crown number” for daddies has long been just a sign with the inscription “Birth Certificate”, pinned on with a couple of brads for reliability and decorated with a chipboard crown. (I’ll show you in detail how I do this)) If you are making a folder as a gift for young parents or as an interior decoration for a children’s room (this happens!), you can safely use three-dimensional decorative elements - flowers, ribbons, lace, plaster and plastic figures and so on.
Here, in general, is the entire list of necessary materials and tools, everything else is optional. You can get down to the main thing.
I'll start by determining the dimensions of all the paper parts. The certificate itself measures 25x18 cm. The file for storing it and the endpapers of the folder should be a little larger - I’m busy their format is 26x19 cm. Well, the size of the cover, as usual, is a little larger than the endpapers - 26.5x19.5 cm. The length of the connecting cardboard strip is equal to the height of the cover -26.5 cm, width - 5 centimeters. It seems that's it.
So...
1. Install the magnet first Yupart of the cover(we'll call it the top one). Take one piece of cardboard and find the middle of the long side (measure 13.25 cm on each side). Place the magnet about 2 cm from the edge:

We trace with a pencil:

Using a utility knife, cut slits along the contour of the top layer of cardboard (not right through!):

Using any convenient handy tool (the same knife, creasing tool, awl, knitting needle, etc.), carefully scrape out the inner layers of cardboard so that our magnet fits into the resulting “nest”:

We remove everything unnecessary until only the bottom layer of cardboard remains:

The edges of the “nest” can be cleaned with a nail file or fine sandpaper. The magnet should fit well and not protrude above the surface of the cardboard. Attention!
My pre-prepared magnets miraculously disappeared during the shooting process! Where have I looked for them! I even had to do an unscheduled general cleaning the room by moving the bed and cabinets - to no avail! And those magnets of suitable thickness were the last ones at that time! For further shooting, for clarity, I had to use a pair of thicker ones, so in my photo you can see that the magnets are higher than the thickness of the cardboard. This shouldn't happen to you! Looking ahead, I will say that subsequently the right couple was found and were installed in their rightful place instead of the fat men). Glue the magnet into the “nest” with “Moment” glue or superglue, if available. I didn’t glue my temporary ones, but simply fixed them with paper tape:

2. Prepare the spine of the folder. We take out a connecting strip from cardboard or watercolor paper. Using a creasing tool, we draw the first fold line along it at a distance of 2 cm from the edge:

And at a distance of 2 cm from the other edge - the second one:

We get a 1 cm wide path in the middle. Along this path we draw a couple more fold lines - to smoothly round the spine of the folder:

We bend the strip along the outer lines and carefully draw along the fold with the handles of scissors or a creasing tool. We don’t bend too much along the internal lines, we just round the cardboard:

3. Connect the parts of the cover. Coat the side of the spine with Moment glue:

And place the upper part flush with the fold covers, the one with the magnet, magnet facing up:

Glue the second one in the same way detail of the cover, which is still without a magnet, and press it firmly:

We make sure that the edges of all three parts lie on the same straight line, otherwise the folder may turn out uneven:

We wait a couple of minutes and fold our future daddy. If the spine is glued evenly, then the covers will lie strictly on top of each other, without distortion:

4. Install the magnet in the secondth part of the cover.
Finding the second one th half of the magnetic pair and reunite with the first, i.e. We just magnetize them to each other. A pack of somethingWe scribble on the surface of the second magnet (with paint, ink, felt-tip pen), I drew it with a simple pencil. By doing this, we kill two birds with one stone. First, we mark which side we will subsequently glue the magnet to the second part of the cover, so thatjust polarity (remember that incorrectly installed magnets repel there are ?)) And secondly, we find the exact place on the cover where you will need to make a nest for the second magnet (displacing the second nest relative to the first even by 1 mm will definitely give you a visible distortion of the finished folder!):

Now we just close the folder...

Lightly press where the magnets are installed...

And we get an imprint clearly in the place where you need to install the second part of the magnet:

We repeat step 1, those. We implant a magnet into the second part of the cover:

In the end we get it ready This is the basis for our folder:

Now make sure that the folder is not closed for a while! I understand I really want to check the action of the magnetic fastener and the evenness of its installation at this stage... But until the glue under the magnets has completely dried, every attempt to close the folder will cause it to fly out yu one of the magnets! Tested many times)))
5. Glue the padding polyester. Turn the front cover over yu up and coat everything thoroughlyits surface, incl. yuchaya spine, glue stick:

Place the cover on a piece of padding polyester and press firmly:

We cut the padding around the perimeter of the cover:

We get this fluffy blank:

6. Cover the cover with fabricYu. The first and most important thing is the chosenthe fabric is well made south. Make sure that there are absolutely no folds or creases left on the fabric! It will be impossible to remove them in the finished work, but they will be 100% visible! So don’t be too lazy at this stage to sprinkle the material with water once again.I'm always a little starchy Yu.
Cut a 5 cm wide strip from the prepared fabric: 
E So we will later aesthetically and practically close the spine inside the folder:

Place the fabric right side down and the cover on top with the magnets facing up. Allowances for hem of the fabric on all sides will remain equal to approximately 1.5 - 2 cm. We begin to wrap the cover with fabric from the top (long) side. We coat the edge of the cardboard with glue stick along the entire length of the cover to the width of the same 1.5 - 2 cm, pay special attention to the spine (the hollow between the parts of the cover), excess glue (pieces) must be removed with a napkin:

Glue the fabric to the cardboard, starting from the middle (spine), carefully pressing it with your fingers. The glue dries very quickly, so we work without distractions:

In the hollow, the fabric should be glued not only to the spine, but also to the ends of the cardboard:

In the same way we glue the hem allowance on the opposite long side of the cover. We make sure that the fabric is stretched evenly and that fabric “bubbles” do not form along the edge of the cover.
7. Forming corners. First, I’ll remind you of the classic method, and then I’ll show you how I use it.
From the previous step we have this view at the corners:

In the classic version, you need to turn the fabric again by about 45 degrees:

As a result, we get a 4-fold layering of fabric, pl Here is another layer already glued to the cardboard:

In my opinion, too thick... This thickness can easily be reduced by 2 times. I avoid unnecessary layering very simply - I cut a piece of fabric in the shape of a trapezoid from the corner, retreating about 0.5 cm from the fold of the fabric - to the beginning of the cardboard, and then at 45 degrees to the edge of the fabric. Hmmm, what did you write? ... I think it’s clearer from the photo than from the text))


We press:

Coat a 45 degree corner of the fabric with glue...

We press:

And here I always use my own trick, code-named “rolling pin”))) As a “rolling pin” you can use a brush, pen, pencil - any thin cylindrical object. In order to make the layering of fabric on the corners even flatter and unnoticeable, I forcefully roll the “rolling pin” (the wooden part of the stylus) along the newly glued hem of the corner:

Ready:

We repeat the same manipulations on the remaining corners of the folder. When all four corner folds are ready, you can glue the side allowances of the fabric - also with a glue stick. First, we do this on one part of the cover - we coat the cardboard with glue along the side edge of the cover and glue the fabric, starting from the middle, stretching it slightly and carefully tucking the corners. We make sure that the edge of the cover looks even on the front side, and do not allow the formation of fabric “bubbles”. If they still appear somewhere If necessary, you need to peel the fabric off the cardboard, coat it with glue again and stretch the fabric again. A glue stick allows you to do this without harming the fabric. When you are satisfied with the result, roll the corners again with a rolling pin:

On the front side we get these neat corners:

If the fabric covers the magnet, cut it in this place with scissors (my magnets are still temporary, so they are sealed with tape)):

Similarly, glue the fabric allowances to the second side of the cover. A little trick: so that the fabric on the cover is evenly stretched, the last (side) the part needs to be glued in a half-closed state:

Don’t forget about the rolling pin)) After cutting the fabric at the place where the magnet is attached, we will get this almost finished piece cover with straight corners and magnetic clasp:

8. Decorate the spine. Take a strip of fabric that We cut it off before we started tightening the cover, trim it a little in length - to the length of the cover (26.5 cm). Zoutlet's go inside out Yu side on both sides, folds about 0.5 cm wide:

Coat the folds with glue and glue them:

We coat the spine of the folder with glue, paying special attention to the hollow and ends of the cardboard, apply glue to the cardboard to a width of about 2 cm on each side. Remove excess glue with a napkin:

We apply a strip of fabric to the spine, in the center of the cover, the distance from the edge of the folder to the hem of the fabric is approx. 0.5 cm:

We carefully press and push through the hollow, removing all the air from under the fabric and gluing it to both the spine and the ends of the cardboard. You can use the “rolling pin” again, just move it vertically along the cleavage:

When the middle is glued, we press the side parts of the strip to the cardboard, and at the end, carefully glue the hems at the top and bottom, if necessary, applying glue under the fabric with an awl or a needle and using a “rolling pin”:

Now the cover is almost ready))

9. OTC. After the glue on the spine has dried, you can close the cover and check its evenness. The corners must match:

The spine should be rounded, and the bottom...

And from above:

10. Topstitching. If you have both a sewing machine and the desire, we sew the cover around the perimeter. This is really more a matter of taste than functionality) Personally, as a fan of stitching, I always stitch Yu. And unstitched covers look plumper and sweeter, due to the fact that the padding polyester is not pressed by the stitching.


11. Cover decor. Decor is a matter of taste, capabilities and desires of each master. I will only show you how I do it, and only because I captured a couple of moments that may be of interest to beginners.
The decor of most of my daddies is minimalistic and practical, so all that is required for decorations is a die-cut of scrap paper and beer cardboard of the same shape, a crown made of chipboard (thick cardboard) and a couple of brads. The inscription and crown will be “golden”; I will achieve this effect using the hot embossing technique (i.e. applying a three-dimensional image, inscription or background). To do this, you need to have transparent ink for embossing (can be replaced with regular colored ones), special embossing powder and embossing hairdryer (in some cases it can be replaced with regular hair dryersouth). The inscription I'm doingusing a stamp (mine is custom-made, rubber, just like silicone, attached to an acrylic block).

"Ebb Tide yu" made of "gold" crown. Wet one side of the chipboard figurine Yu transparent ink:

Zasypa with gold powder:

I shake off the excess:

I heat it up with a hairdryer:

The powder melts very quickly, forming a dense metal surface. To make the crown more voluminous, the embossing process can be repeated - bathe the figure in ink again, cover it with powder and bake it again with a hairdryer. The crown is ready:

I turn to the sign with the inscription. I apply transparent ink to the stamp with the text “Birth Certificate”:

I put an imprint on a scrapbook paper cutout:

I fill the print with powder:

I shake off the excess:

Next comes almost jewelry work with a needle to remove excess particles of powder and apply the missing ones)) The fact is that even the smallest particles outside the inscription after heating will leave clearly visible marks. In some works this is even good, but here I definitely don’t need it) I bake the powder with a hairdryer and get a beautiful three-dimensional inscription:

Trying out my decor for the cover:

I make sure to duplicate all paper decorative elements on soft covers with cardstock - if I plan to attach them, or even with beer cardboard - if I plan to glue them. In this case, the sign with the inscription will be glued to me, so I reinforce it with beer cardboard. I paste the sign onto a cardboard cutout of the same shape. Glue the middle with double-sided tape:

And I coat the edges well with “Moment”:

Carefully apply the top layer, aligning the edges of the cutting:

And I put a thick sign under the press:

I foresee the question - why it was impossible to first glue the layers of the cutting together, and only then do the embossing. The fact is that most adhesive materials do not behave very adequately when heated (and the hair dryer is very hot!) and cause good deformation of the paper. Therefore, embossing is best done before using glue and tape.

When the glue has dried, I use a nail file to sand the edges of the notch to hide the “layering” - first I move the file perpendicular to the surface:

Then at an angle with unilateral movements towards the wrong side. This way the edges turn out round and smooth:

I pierce holes for brads with an awl - on one side:

And on the other:

I apply Moment glue to the back side of the crown and let it sit for half a minute so that the glue thickens slightly and does not protrude beyond the crown when gluing to the fabric:

I attach a sign to determine the location of the crown and glue the crown:

I apply glue to the sign and also wait half a minute until the glue thickens:

I attach the sign, but don’t press it yet:

In order to position the decorative elements evenly on the cover, I always check with a mat and a ruler. I place the cover on the mat clearly along the marking lines, and apply a ruler to each horizontal and vertical decorative element. In this case - to the inscription, because it should be strictly parallel to the bottom edge of the cover. I also make sure that the distance from the plate to the edges of the cover on the right and left is the same. While the glue is still wet, I'll correct it. location of the label on the fabric:

When everything is level, I press the sign tightly:

I use an awl to poke holes in the brads in the cover. The main thing here is not to forget to open the folder so as not to accidentally puncture the second part of the cover:

First, let's work on the right flyleaf, the one on which the document will be located. If you have a sewing machine, sew the endpaper around the perimeter on three sides: top, right side and bottom (if you don’t have a machine, go straight to the next step):
The document will be located in this corner. The top edge will remain free, and we will sew the left one to the endpaper:

14. Sew the file. We attach the file to the right endpaper and press it on all sides with paper clips or paper clips:

We sew on the machine the left edge of the endpaper (which we have without a line yet) along with the file, and remove the clips as we go. We are not in a hurry under any circumstances, we periodically stop and check whether the file has moved out (since the material is slippery and can move in waves under the pressure of the paw). We carefully secure the tails of the threads on the back side of the endpaper. If you don't have a machine, you will have to sew the file by hand. To do this, use a regular needle to pierce holes along the left edge of the endpaper along a ruler at an equal distance from each other and sew a “back needle” seam. The option of gluing the file will not work - checked)) The material from which the file is made is some kind of miracle of nanotechnology - glue is beyond the control of the moment) Even if it is well glued at first glance, after a while it will definitely fall out. Therefore, there is only one way out - to sew:
15. Left endpaper. If desired, you can make a pocket on it for additional documents (from transparent film, lace, scrap paper, etc.), you can make a photo frame, a congratulatory inscription or something else, or just leave it as is. My practicality dictates the need for the first option) I’m doing yu pocket made of transparent film, usingI use film from the top of a plastic binder for these purposes - experience shows that this is the most practical option. You can cut a pocket from a thick file. The width of the pocket is equal to the width of the endpaper, the height - whatever suits you, mine is 10-11 centimeters. We place the pocket in the desired place, fasten it to the endpaper with clips and machine sew along the entire perimeter of the endpaper, or sew the pocket by handyu - just like the file on the right flyleaf.
And on the fabric areas and magnets - glue. (By the way, my magnets, which were missing at the beginning of the shooting, were found at the very last moment - they stuck to an openwork metal cup with tools, i.e. they were under my nose the whole time!) Apply a thin layer of glue to the magnets and spread it well with a piece of cardboard over the surface . Please note that the magnetic ability may weaken before the glue dries completely! But after a while it will recover - at my live MK this happened to one girl, and I was very upset, and in the evening she called back and said that everything miraculously worked))

We also apply glue along the perimeter of the endpaper - with a thin line:

18. Completion. If you planned a voluminous decor for the cover, all that remains is to glue it on, and you can admire the result)))

Thanks to everyone who read and even got the maximum benefit from this treatise))
Check it out again))
Your life changes dramatically with the arrival of a child in the family, because now you need to bear responsibility not only for your life, but also for the life of the newborn. Most likely, you, like any other mother, want the best for your child. When a baby is born, he already becomes a citizen and receives a document - a birth certificate. This document is very important for the first 14 years of his life and the main thing is to keep his appearance presentable during this period. Therefore, we suggest creating a cover for your birth certificate with your own hands.
Simple lesson
The process of making a cover for a birth certificate with your own hands using the scrapbooking technique can be followed step by step using the example of a master class with photographs.
To create such a useful document folder, you will need such basic materials as multi-colored cardboard, paper, tape, a hole punch, pencils and other materials at hand.

A folder is one of the simplest elements in the scrapbooking technique, so this master class is perfect for beginners who are just trying to master this technique. So, let's begin. First, we measure the dimensions of the certificate, draw a small sketch, and then transfer everything with the correct dimensions onto cardboard or thick paper.

We make a fold, which we glue on both sides with tape so that it does not deteriorate over time.

Thus we have made a basis for evidence. We process the edges with a hole punch as shown in the photo.

The next step is to make pages for all parties.

Using the torn edge tool, you need to go along the other edge.

Cover the border on the outer sides with multi-colored tape.

The next step is to glue ready-made blanks with decorative edges to the main sheet of cardboard.

The photo shows what the folder looks like from the inside.

And now with the front one.

Using a double needle we go along the edges. Yes, this is tedious work, so you need to be patient. This process can take a whole evening for some. The next step is to sew the edges. Please also note that it is quite difficult to process the edges where there is tape.

Glue a transparent film onto double-sided tape, cutting it out from a regular folder. Decorate the middle.

This way you can place the certificate inside the folder.


Sew a pocket for insurance.

The photo of the stitching is a little closer.

Cut out butterflies from paper and stick them in random order on the daddy.

We glued a small angel to the edge of the cover for the testimony with our own hands, having previously cut it out from the postcard.

Beads in the color of the background of the card were glued in beautiful lines. And another small butterfly was glued to the top.

In the middle, the inscription certificate was placed on double-sided tape.

We propose to make the second certificate in two parts, not three. The initial stages are exactly the same: we take the measurements of the birth certificate, transfer them to cardboard, adding space on the fold.

We go through the first sheet with a hole punch. Then we put it on the rest and trace the outline with a pencil.

We cut out the remaining details of the cover strictly along the contour.

You can go over the edges with ink pads.

Glue the fold in the middle.

Good afternoon, dear readers!
We continue to publish MKs and useful ideas from our designers, and today Alena-Yolka will show you how to make a charming folder for your baby’s Birth Certificate.
Word to Alena:
Hey everyone!
Today I will tell you how you can make a folder for a birth certificate in a small format (about A5).
We will need:
Cardboard 1mm
Scrappaper (2-3 sheets)
PVA glue (you need thick glue, you can use construction glue) and a brush
Decorative tape
File
Decorations
Printed "Birth Certificate" optional
First, we make the base of our folder: cut out 2 rectangles measuring 19.5 by 13 cm from cardboard (this is approximately the size of a certificate folded in half + 0.5 cm on three sides) and from thin paper a rectangle 22 by 30.5 cm (can be made from craft -paper, but I didn’t have it on hand, so I used scrap paper).
Now in the middle we draw 2 lines (beaten) with a step of 6 mm and 1 line horizontally at a distance of 1.3 cm from the edge. This is necessary in order to glue our cardboard blanks evenly. Glue it, align it, and you can put it under a press for a while.
We cut off the corners, not end to end, but leaving about 1.5 mm. Then we glue our allowances inside. We coat the paper well with PVA glue, bend it carefully so that it fits tightly to the cardboard and glue it.
In the place of our “binding” we draw several times with the pad of our finger to form such a groove.
Now we bend and glue our short sides and form neat corners (as in the photo below).
Let's start decorating our "binding" inside. First, cut out a strip of paper 19.3 cm long (width at your discretion) and glue it using PVA glue again, because... It can be used to coat completely bonded surfaces.
Again, use your fingertip to trace the “binding” several times. You can leave it like that
but I decided to further strengthen the middle with decorative tape - I cut a piece a little longer, coated it with glue and glued it on.
Don’t forget to run your fingertip along the resulting groove.
This photo shows the binding already on the finished folder, it looks very neat because the paper folds are not visible.
Next we need to form a pocket inside from the file, it’s a little difficult to show this, because... the file is transparent. My pocket will not be solid, but with a slot in the middle, on the fold. Cut out 2 rectangles from scrap paper (mine measures 12.7 by 19.2 cm). From the file, cut off a white strip with holes and cut out 2 rectangles 12 cm wide (1 rectangle will be closed on both sides, the second on one side)
Our file pieces turned out to be narrower than scrap paper pieces. I used strokes to mark the pieces of the file; I have double ones; I inserted pieces of scrap paper inside. The arrows indicate the uncut edge of the file.

On the other hand, we have such allowances, they are also double for now.

You need to cut off the “back” allowance and glue the wrong side of the scrap paper blank to the back side of the file. It is better to do this using double-sided tape or PVA glue (the “Moment” may show through a little). Here the strokes indicate the contours of the file in the upper half of the folder; it is narrower than paper - so that you can then easily stitch everything on a typewriter and not sew up the “input” and “exit”.


We glue the finished blanks to the inside of the folder and stitch them. Because The pieces of the file are narrower, they will not be stitched on all sides, on the top - on the sides, and on the bottom - on three sides, like a pocket. I stitched first on the sides, then from the top-middle-bottom (since the folder did not always fit in the opening of the machine). From below, where the pocket is closed, I very often raised my foot (with the needle down) to correct the file, because... it can shift and the pocket will turn out crooked.
So, the interior design is ready, we have a slot in the middle so that the folder and certificate can bend freely. Now fold the folder in half and put it under a press, preferably for several hours.
9. First glue the sides, slightly stretching the fabric onto the cardboard. We do not touch the corners at this stage:

10. Thus, the next steps of the master are reduced to the design of even corners.

11, 12. We make a cut at 45 degrees on one side of the corner, not reaching 3-4 mm from the edge:


13. Cut the second part of the corner at an angle of 90 degrees as shown in photo 13:

14. This is what the finished flat corner looks like from the wrong side:

15. Apply a drop of glue to the cardboard, use an awl to bend the middle of the corner of the fabric inward:

16. We do similar actions with the remaining three corners:

17. Bend the folder in half and align it along the edges:

18. Cut a strip of fabric 3/30 cm:

19. We bend the edges of this strip on both sides so that its length ends up being 26.7 cm:

20. Using pencil glue, evenly glue our prepared strip of fabric onto the fold of the inside of the folder. Open and close the folder several times to form the folds:

21. And now the fun part – designing the folder! Here you can show all your imagination and creative ideas. To do this, we apply flat and three-dimensional decor, as well as ribbons - ties for the folder. At this stage, you don’t need to glue anything - you should be able to move and, if necessary, change something in the composition: 
22-24. If you are satisfied with everything in the design, then we begin to stitch the ribbons and flat decor (lower layers) on a sewing machine:


25. Be sure to pull out all the threads from the outside - it’s most convenient to do this with a tailor’s awl. We tie knots.


27. Let’s start decorating the inside of the folder: on the left there will be a place for a photo, and on the right there will be a pocket for a document. Cut out two rectangles measuring 19.5/26.5 from scrap paper.

28. To decorate the left part of the cover, namely the place for the photograph, cut out a rectangle measuring 10/16 cm and decorate all four of its corners using a corner hole punch with a functional slot - the newlyweds will be able to insert their favorite photo from the wedding day:

29. To design a pocket for the Marriage Registration Certificate, cut out a rectangle 19.3/10 cm:

30-33. We glue the backing for the photo, add a golden ribbon across the center on the left and a pocket on the right. We stitch for additional strength using a sewing machine. The interior design of the folder is ready!


34-35. We glue the finished inner spreads of the folder.


36. Using a candle, we process the edges of the ribbon ties:

37. We complete the design of the folder with small semi-pearls:

38. Our Folder for the Marriage Registration Certificate is ready! Happy creativity!