No place to put old newspapers? Or do you want to start an unusual hobby? Learn how to weave from newspaper tubes - it's fun and even kids love it!
Straws are an unusual and little-known hobby, but they are an excellent material for crafts!
First you need to make the actual tubes. They will need:
- newspapers or other paper (thin writing paper, cash register tape, tracing paper),
- PVA glue,
- sharp scissors,
- knitting needles of different thicknesses,
- suitable paints (stain, acrylic, food coloring),
Now let’s look step by step at how newspaper tubes are made.
- Determine which direction the paper curls. To do this, a newspaper or regular sheet can be placed on a damp surface - it will show itself. Newspapers are usually rolled to the width of the page.
- Cut the paper into pieces 6-8 cm wide. Knitting needles 1.5 or 2 mm thick are suitable for them.
- Attach the knitting needle to the corner of the workpiece at an angle of 30-35 degrees. Fold the corner of the page onto the knitting needle and press.
- Carefully roll the knitting needle into the paper. At the end, coat the remaining “tail” with glue, wrap it around the knitting needle, and after 5 minutes remove it.
- Paint the tubes immediately or already in the finished product (or you don’t have to paint them at all!). If you decide right away, the most convenient way is to dip them in a container of paint, several at a time, and dry them on a wire rack.
To connect the tubes to each other, simply insert one into the other. If that doesn’t work, cut the edge of one diagonally.
Step-by-step instructions for tube crafts

You can weave almost anything from newspaper tubes, just like from wicker. First, try making a napkin:
- Take an even number of short tubes (for example, 10 pieces of 12 cm each).
- Color them in matching colors.
- Place half on the table parallel, 3cm apart.
- Take one tube at a time from the remaining ones, weave it across at the same distance, making sure that the “top” and “bottom” positions are staggered, and the end result is an even square napkin. Carefully coat the joints with glue.
- Let the napkin dry for 10-15 minutes and you're done!
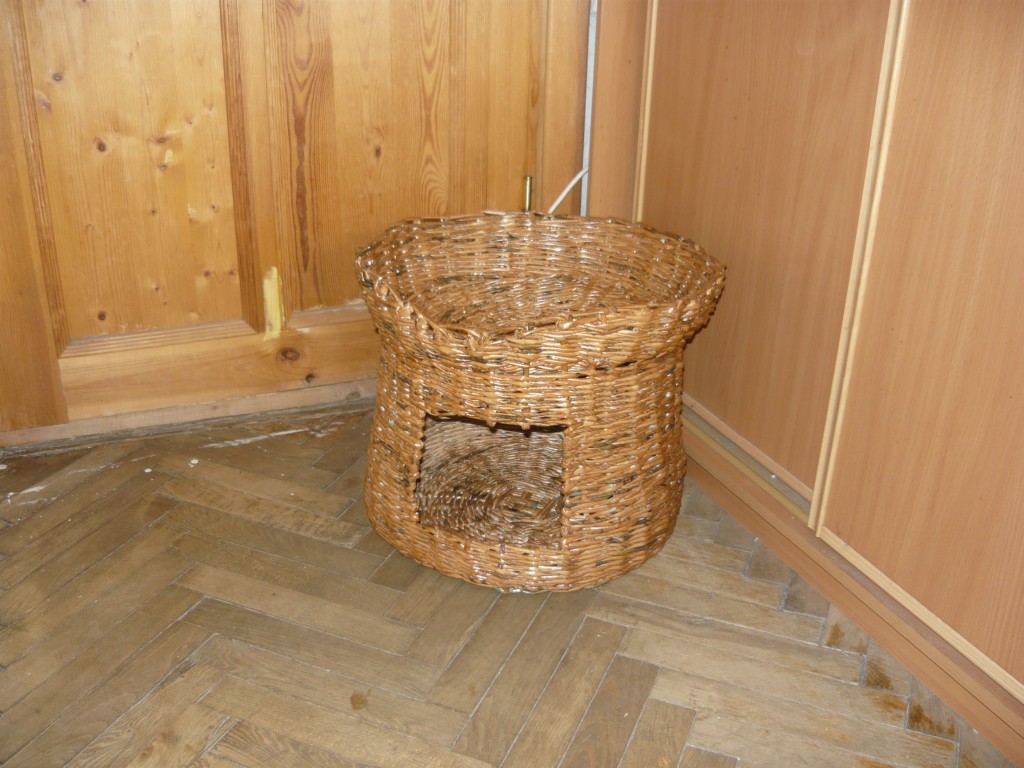
Baskets are woven using the same chess principle, only close together:
- Take a jar for the base, cut out two cardboard circles along the diameter of its bottom, glue the ends of the tubes between them so that you get a “sun”.
- Bend the base tubes upward and secure with an elastic band.
- Glue another tube to the base and begin to braid the base tubes with it. Extend it as needed. Starting from the third row, insert the can into the base so that the shape is not lost.
- At the end of the process, coat the ends of the base tubes with glue and bend them inside the basket.
Sometimes available materials allow you to create a real masterpiece that fits perfectly into the interior space. Weaving from newspapers is becoming quite a popular craft among needlewomen. They have high strength, which allows the use of finished products for household needs.
The newspaper tube begins to gradually replace the weaving made from natural willow vines. Now, to make any item, you don’t need to go looking for high-quality raw materials. In this case, it is enough to use a regular newspaper. Proper processing of the finished product helps to withstand any mechanical loads and testing in an aquatic environment.

Our material provides step-by-step instructions for weaving newspaper tubes for beginners. Advice and recommendations from experienced craftswomen allow you to avoid the most common mistakes during the work process.

How to prepare newspaper for weaving?
Before you start weaving the product, you need to prepare the consumables. For this you will need more than sixty newspaper tubes. For proper twisting you will need:
- newspaper sheets;
- wooden skewer;
- glue.


A long wooden skewer allows you to make a thin paper tube. Any adhesive solution will help fix the finished result.

- To do this, cut newspaper sheets into strips 4 cm wide.
- After this, we divide each element in half using a sharp knife.
- Place the wooden skewer at an angle of 45 degrees.
- We bend one edge of the paper under the stick.
- A sharp movement begins to twist the paper into an elastic tube.
- Lubricate the remaining edge with glue.

Stages of creating a basket from paper tubes
When the required amount of material is ready, you can proceed to the process of manufacturing the product. First of all, you need to decide on the shape and size of your craft. For beginners, it will be easiest to make a rectangle or square. The fact is that round and polygonal products require special dexterity.

Many novice needlewomen are often interested in: “How to properly make the bottom of a basket?” There are two types of bottom:
- cardboard bottom. It is performed in accordance with the selected basket parameters;
- wicker base. To do this, a certain weaving pattern is performed, which adds strength.

It is worth noting that the cardboard base is suitable for small baskets or boxes. Small items can be placed here.

During the work process, it is important to follow the weaving pattern. Here every element must be in its place. Any deviation from the instructions is accompanied by a low-quality product.


To make the basket neat, you need to fix the ends of the newspaper tubes with clothespins to the base of the form.

How to make the bottom of a basket correctly?
Detailed instructions will help you make a strong base for the basket. During the manufacturing process, you must follow the recommendations of experienced needlewomen:
- Take 10 tubes and cross them together.
- Next, each end of the paper vine is intertwined with the adjacent one.
- Weaving must be done clockwise.
- You can increase the length of the tube by gluing them together.
- Once the bottom has the desired shape, you can move on to the next stage.
- The remaining ends of the vine are extended and fixed using stationery pins on the surface of the object.

Processing of the finished product
The most painstaking process in making paper baskets is painting and tinting the wicker product. It is not recommended to paint newspaper vines ahead of time. This may ruin the finished result. The paper may lose its strength, which will affect the appearance of the product.

Acrylic paints and gypsum plaster are used to prime the basket. These components are highly durable and are not afraid of contact with the aquatic environment. As a result, the product can be washed in warm water.

You can add a water-repellent component using odorless furniture varnish. To do this, it is recommended to open all parts of the finished product twice. After treating the surface, the paper basket is placed in a cool place until completely dry.

Varieties of weaving patterns
Today, there are a huge number of techniques and patterns for weaving from newspaper. The most relevant are:
- simple bending;
- bending the rod;
- volumetric bending;
- lazy braid;
- Isis;
- double folds;
- complex bends;


Master class on making a wicker basket
We have prepared a detailed master for you - a class on weaving from newspaper tubes. Before you begin, you need to prepare the following materials and tools:
- paper vine 60-80 pcs.;
- scissors;
- glue stick;
- mold for production;
- ruler;
- pencil.

First of all, we start weaving the base of the future product. For this you will need 10 tubes. All elements are carefully crossed with each other. Each subsequent vine is intertwined with the previous one.

All actions are best performed in a clockwise direction. A step-by-step photo of weaving from newspaper tubes greatly simplifies the task.

When the desired bottom size is obtained, proceed to the next stage. We begin to weave the sides for our basket. To do this, we lengthen the remaining ends by gluing them with a new vine. We fix the long lashes on the form. They must be as elastic as possible in order to avoid future deformation of the finished result.


We begin to weave a new newspaper tube into the finished paper rods. Extend the remaining end of the tube. Weaving continues until the vine reaches 2 cm from the edge of the mold. After this, he begins to secure the remaining paper tubes.


Each subsequent end is smoothly bent over the previous one. They are carefully glued to the wicker base. When the edges are fixed, you can proceed to making the handle.

Here you will need 4 pcs. newspaper vine, one end of which is glued to the side of the basket. Next, we begin to weave the elements together. When the handle reaches the desired length, it is fixed to the other edge of the base of the basket. As you can see, everything is quite simple. The main thing in this matter is to have a lot of patience and good imagination.

Photo of weaving from newspaper tubes


There are many techniques for making DIY crafts for the home. One of them is weaving from newspaper tubes. Newspapers turned out to be a suitable material that could replace the well-known vine of deciduous trees in wickerwork.
There are many techniques for making DIY home crafts.
This is the most accessible type of needlework, allowing you to create beautiful and practical things for the home. To start weaving beautiful crafts from newspaper tubes, you need to spend a minimum of money. Experienced craftswomen use this material at hand to make different types of baskets and baskets (3 types), trays and pencil holders, containers for bulk substances, candy bowls and even furniture, bags and clothes.
The list of necessary materials and tools is small. Almost every home has everything you need, especially where there are schoolchildren:
- newspapers and other paper products;
- PVA glue or other types of glue that quickly glue paper;
- knitting needle;
- scissors or a knife for cutting paper;
- ruler;
- clothespins or large paper clips;
- paints;
- three-layer napkins for decoupage.
Wickerwork is made not only from newspapers; you can use pages of glossy magazines, A4 sheets, and paper wallpaper.
 Newspapers turned out to be a suitable material that could replace the well-known vine of deciduous trees in wickerwork
 Below is a step-by-step description of the process of making wicker paper crafts with your own hands.
Weaving from newspaper tubes begins by watching videos that explain the rules and process of making various products. Having received initial information about the new weaving material, any beginner can begin making his first craft. So, we weave a basket from newspaper tubes.
Many users often need to read the job description in addition to the video. Below is a step-by-step description of the process of making wicker paper crafts with your own hands.
Rolling tubes from newspapers (video)
Main stages of weaving
The first stage is the preparation of the newspaper “vine”. Newspapers prepared in advance must be cut with a paper knife into strips 5-10 cm wide. To keep them even and neat, you can use a ruler. Instead of a stationery knife, you can cut paper for blanks with a breadboard knife with a replaceable blade. This type of knife is used in scrapbooking.
After familiarizing yourself with the process of how to make a weaving tube, you can practice making this material on short strips of paper. It is better to weave a basket from newspaper tubes from long pieces.
It is recommended to roll the cut pieces into a tube on a flat surface. The cut paper blank is placed on the table. A knitting needle is applied to one of its corners at an acute angle. Having tucked a corner of the newspaper under the knitting needle, they begin to twist the strip into a tube. The paper is rolled tightly to make the tube tight. As a result, one edge of the workpiece may turn out to be slightly thicker than the other. This is a normal result, but this difference in thickness should not be large.

To prevent the workpiece from unwinding, a corner of the sheet is glued to the surface of the tube. The glue is selected to such a thickness and consistency that the sheets immediately set and stick together.
The correct determination of the grain direction on a sheet of paper is as follows. You need to run your nails along its edge. If waviness appears along the cut line, then this is the transverse direction of the fibers. No irregularities are formed in the longitudinal direction. In order for the tubes to keep their shape well, they need to be twisted in the longitudinal direction of the paper fibers.
Before weaving, you can paint the blanks. The tubes are painted onto baskets made from newspaper sheets, which will not be decorated with decoupage napkins. You can make a beautiful basket, but poorly painted sides of the tubes will undo the work done. To paint paper vines, it is better to use acrylic paints. They do not affect the flexibility of the material prepared for weaving. Products made from paper tubes are given a finished look by coating their surface with acrylic varnish.
The next stage is weaving the bottom. A round basket made of newspaper tubes is the best example with which beginners can start learning. It can be made for the upcoming Easter holiday. Many craftswomen are already preparing decorations for this day. More often it is a round basket or tray made of paper tubes, multi-colored Easter eggs made using the spiral weaving technique. They are painted in different colors. Place them in a basket or attach original pendants to the eggs and hang the decoration on the wall or doors.
Weaving a round basket or vase from newspaper tubes consists of several not too difficult steps. To begin with, you can make the bottom solid by cutting it out of thick cardboard.
To hide the ends of the tubes glued to the base, cut out 2 cardboard circles of the required diameter. The stand sticks are glued to the bottom circle and then covered with the top of the bottom. In the lower part, you can make holes with a hole punch and insert the base sticks into them. Basket weaving is well described step by step in many articles by hand made craftswomen.
For a small basket you need 30-50 ready-made sticks. It will not be difficult to make its bottom weave. For the bottom you will need 8 paper sticks. They are laid out in pairs and intertwined.

Gallery: weaving from newspaper tubes (25 photos)


Execution of the bottom part
One working tube is bent in half and wrapped around the first 4 rays. The beginning of the weaving is marked with a marker along the edge of the first ray. To prevent the structure from falling apart, they are fixed with clothespins. The ends of the tube intertwine and cover the next 4 rays.
After the end of the row, weaving from newspaper tubes is continued, covering not 4 rays, but only 2. This is how the bottom of the product of the required diameter is woven. The same algorithm is used to weave furniture from newspaper tubes. For furniture, it is better to use wallpaper instead of newspaper. Tubes glued together from wallpaper are more rigid and resistant to damage. The furniture frame is made of wood or aluminum profile.

You can weave baskets from newspaper tubes using the pattern for making wicker products. The base sticks are bent towards the middle. To make weaving easier, place a container of suitable diameter on the bottom. The base beams are attached to the top of the container with clothespins so that they do not fall apart. This is how the first 3 side rows are woven, then the clothespins and container are removed. A paper stick is placed over one beam of the base, then under the 2nd, over the 3rd, under the 4th, and so on alternately until the desired height of the product.
If the paper blank runs out, the wider part of the next tube is placed on its thin end, thereby lengthening it.

All subsequent rows must be pressed tightly against each other so that the work does not fall apart. Each craft has its own flavor. One of the methods is openwork weaving. It is obtained by adding beads or ribbons to the racks of the lid or sides.
If the paper sticks prepared in advance for weaving were not painted, then this can be done at this stage. In addition to varnishes and paints, you can use acrylic-based alcohol stain. It is better not to use the same water-based material, since the newspaper base gets wet and deformed when exposed to water.
The next stage is weaving handles for a basket from newspaper tubes or a lid for a box, then at the end of the weaving you will get a decorative chest for small items.
Weaving from newspaper tubes for beginners (video)
How to weave a handle for crafts?
How to weave a handle for products from newspaper tubes for beginners is well described on the forums of needlewomen. To make a handle for a basket or candy bowl on both sides of the craft, 3 rays of the base are left opposite each other. The remaining sticks are bent inside the product and secured in its walls with glue and paper clips. The long ends of the base are trimmed.
The 3 beams are glued together with a small amount of glue and secured with a clothespin. They are laid overlapping in the center of the handle and carefully braided with paper. After the weaving process is completed, the tube is glued, inserted between the rays of the base and fixed with a clothespin until it dries. Strength is imparted to the product by coating its entire surface with PVA glue. This stage is especially necessary if a laundry basket is made from paper blanks.

Weaving from newspaper tubes allows you to complement the interior of your home with exclusive accessories. Many needlewomen are interested in how to weave a basket or box with a lid. After all, crafts using this technique look no worse than rattan products. Decorated with pictures from decoupage napkins, they become works of art. Such crafts are very much appreciated by handmade lovers. Weaving the lid for the basket is done according to the pattern for making the bottom. Only it should be slightly larger than the diameter of the box itself.
As the level of skill increases, weaving from newspaper tubes can become a source of cash income for the family budget.
Attention, TODAY only!
How to learn to weave from newspaper tubes? Patterns, techniques and master classes for weaving from newspaper tubes. The most beautiful crafts from newspaper tubes.
The talent and skills of some people are sometimes simply amazing. It would seem that what can be made from an ordinary newspaper? Well, a cap, well, an airplane, well, what else? But no, there are masters of their craft who manage to create not just a work of art, but a whole masterpiece from old newspapers.
Ideas for boxes, crafts, vases, baskets, boxes made from newspaper tubes: photos of the most beautiful products
Just look at these wonderful crafts made from ordinary newspaper tubes. Their beauty is simply breathtaking!


Unusual vases made from newspaper tubes


How to make, twist newspaper tubes from newspapers and paint?

We twist tubes from newspapers
For those needlewomen who are taking on the process of twisting newspaper tubes for the first time, this task may seem very difficult and almost impossible. But over time, once you get the hang of it, you can achieve pretty good results when the newspapers seem to roll up into tubes themselves.
So, here is a list of materials needed for rolling newspaper tubes:
- Newspapers
- PVA glue or stationery glue stick
- Knife, stationery knife or scissors (whichever is more convenient)
- Thin knitting needle 0.5-1 mm or skewer

Algorithm for rolling newspapers into tubes:
- Take a newspaper or a stack of newspapers.
- We fold all the pages so that they lie clearly under each other.
- Fold the newspaper in half.
- Again, make sure that the edges of the newspaper do not extend beyond each other.
- Cut the folded newspaper in half.
- We fold the resulting halves of the newspaper in half again.
- Cut the newspaper halves along the new fold.
- We sort the resulting newspaper quarters into two piles.
- We put strips of newspaper with white edges into one pile - the tubes twisted from them will be pure white.
- In another pile we put the strips with letters - the tubes twisted from them will be with a seal.
- We take one of the newspaper strips.
- We place the knitting needle in its lower right corner.
- The knitting needle is placed at an angle of 25-30 degrees.
- Holding the tip of the newspaper, we begin to twist the knitting needle, winding the paper around it.
- We try to roll the newspaper as tightly as possible.
- Having twisted almost the entire tube, coat its edge with glue and glue it to the tube.
- We take out the knitting needle.
- Allow the finished tube to dry for 15-20 minutes.

It is worth paying attention to the fact that the final version of the finished tube will have two ends of different thicknesses - on one side the tube will be thicker and on the other thinner. This structure of the tubes is necessary in order to “build up” them. “Extension” is a procedure based on the creation of long tubes. It consists in the fact that the thinner end of another tube is “screwed” into the thicker end of one tube and “glued” into place. This way you get one long newspaper tube.
Instructions for rolling tubes from newspapers: Video
You can paint the newspaper tubes after the fact - when the product is completely ready. However, this option is only suitable for cases when the craft is done in one color. If the product is designed in different colors, then it is advisable to paint the tubes in advance.
You can paint newspaper tubes with any coloring substances:
- watercolor
- gouache
- acrylic paints
- aerosol cans
- stain (the letters will show through)
- food colorings
- eyebrow and hair dye
- brilliant green
- Basma
- wood paint
- colorless paint with added color (this way you can do it on
- several different shades of paint based on one paint)
How to paint newspaper tubes: Video
- It’s worth immediately highlighting two types of dyes that are the most popular among newspaper tube weavers: acrylic paints and water-based stain. Both of these water-based dyes produce a thorough, dense coloring of paper. At the same time, during weaving, no paint remains on the hands and surface, which is important in this process.
- In order to make the product more durable and water-resistant, it is advisable to varnish it at the tube stage. The ideal option is when the varnish is applied in 2 layers.
- By the way, in the case of varnish, you can save on paint - color can be added directly to the varnish.
- Painted tubes must be dried thoroughly in the oven, in the sun or in front of the stove.
How and where to start weaving from newspaper tubes?

- Often the design of newspaper crafts consists of a bottom, guides and woven tubes.
- Several tubes of the required length are used as guides - the length directly depends on the height of the craft.
- There can be several tubes for weaving - for beginners it is better to start with one tube.
- It is advisable to make the bottom of the craft wicker - this way the product will look more attractive. With this type of weaving, the core of the bottom is first made, the ends of which will later become the racks of the craft, and then tubes are woven around it, creating a round (or other shaped) bottom.
- But you can also make a solid bottom - it is created from two circles cut out of thick cardboard. The vertical posts of the craft are glued to the bottom circle (they need to be slightly flattened at the attachment point), and they are fixed on top with another circle using glue.
- As the base of the craft, you can use a jar, vase, glass or other container of suitable size. The base is installed on the bottom, and the racks are fixed in its upper part with clothespins to ensure the evenness of the product.
- When the bottom, base and guides are in place, you can begin to braid them with paper vine.
Methods of weaving from newspaper tubes for beginners: step-by-step instructions, master class

For beginning needlewomen, the simplest method of weaving from newspaper wicker is suitable - single with a solid bottom:
- We take the finished frame of the future craft.
- We flatten one of the tubes, which will act as a vine, a little at the end.
- Glue the flattened end of the vine to the bottom of the craft.
- We lead the vine behind the nearest guide (with this type of weaving there should be an odd number of them) from the outside.
- We bring the vine inside the craft.
- We braid the next guide from the inside.
- We bring the vine outside the craft and wrap it around the next guide from the outside.
- Thus we continue in a circle along the entire height of the craft.
- As we work, the vine will run out, so we build it up as we go.
- We make sure that the vine lies tightly and the racks stand straight.
- Having filled your hand a little, you can try to weave several vines at once (2-3).
Types of weaving from newspaper tubes for beginners - simple, double, rod, complex, braid, lazy, isid, volumetric bending: weaving pattern for beginners, photo

Weaving pattern using the three-rod rod technique


Pattern of weaving from newspaper tubes using the “izida” technique

Weaving pattern from newspaper tubes “double fold”

Complex bending - diagram


Lazy braid weaving pattern
The bottom of newspaper tubes is square, rectangular, round, oval: how to weave for beginners?
How to weave a simple round bottom from newspaper tubes: Video
How to weave a square bottom from newspaper tubes: Video
How to weave an oval bottom from newspaper tubes: Video
How to weave a rectangular bottom from newspaper tubes: Video
How to weave handles for a basket from newspaper tubes: patterns for beginners
Twisted handle for a basket made of newspaper tubes: Video
Handle for a basket made of newspaper tubes: Video
How to finish weaving from newspaper tubes?
The simplest folds from newspaper tubes: Video
Basket made of newspaper tubes: technique, weaving patterns

Scheme of weaving a box from newspaper tubes
Weaving patterns from newspaper tubes for beginners

To summarize, it’s worth saying that you shouldn’t be afraid to start something new. Even the most famous needlewomen were once beginners. They also didn’t succeed at everything right away, they also got upset and intended to give up their hobby. But nevertheless, over time, everything fell into place - the tubes began to roll up faster, the patterns became more complex and ornate, and the crafts became simply mesmerizing. So, dear readers, go ahead, study, get better, and mastery will definitely overtake you!
How to weave a box from newspaper tubes: Video
How to weave a lid for a box from newspaper tubes: Video
All women in the world are trying to create a cozy nest from their home. In the modern world, you can buy a lot of little things to decorate your apartment. But now more and more representatives of the fair sex use the advice of our ancestors (wickerwork) to decorate their homes. The most chic items are considered to be products made from wood wicker, which is prepared in advance. This is a labor-intensive and time-consuming process; not every tree branch is suitable for weaving. Proper harvesting of the vine, soaking and drying is required. The most interesting method has been invented and is easier to make by simply replacing the twigs with newspaper. Therefore, today you have the opportunity to learn how to weave from newspaper tubes for beginners; we will tell you all the step-by-step lessons of the skill, and teach everyone who wants to master this technique. And after several trial products, it will be very easy to create your own unique masterpiece!
How to properly prepare paper vine
The first stage in the work is the selection of the necessary material. You can work with regular blank paper, but since such paper is quite thick, it is difficult to work with. It's great if you know where to find the paper that printing houses use. As long as it is clean, it is easy to work with in terms of painting the product. But, if not, then we use regular newspaper in huge quantities. Using a utility knife or razor, cut the newspaper into wide strips, about 10 cm each, but no more. Weaving products is much more convenient and easier if the newspaper is cut into long strips.
We take one strip and place it near us; we place a thin, long metal object at the sharp corner. This could be a knitting needle or a bicycle spoke. We wind the strip onto this knitting needle, quite tightly.
Don't be alarmed if one end is thicker, it happens. But still, keep an eye on the thickness; the difference should be minimal. To ensure that the tube has a shape and does not unwind, wet the edge of the strip and secure the corner. This method requires winding about 50 tubes. How many of them you will need directly depends on how complex the product will be and what size it will be.
Before continuing work, you need to decide whether you will paint the woven product. Or paint the sticks first and then weave.
It is worth remembering that you need to select the appropriate varnish. If this is not done, the sticks will become brittle and harsh, the entire appearance will be ruined. The best option is acrylic varnish, which is used for artistic purposes.
A basket made of tubes looks original, on which the text is clearly visible, with a one-color or two-tone coloring. This is a great option for a floor box, photo frame, or small change chest. If the product is not complex, you can paint it at the end of the work.
Weaving the bottom of the product
The bottom can be of completely different shapes: square, rectangular, round. Let's start experimenting with a vase with a solid bottom. Prepare fairly thick paper, cardboard will do, and cut out 2 circles from it. You will need exactly two, since the ends of the tubes from future racks will be hidden between them. We take the first circle and make marks with a pencil, there will be fastening of the racks.
If you decide to weave a vase, then the distance between the posts can be quite wide. There is this type of weaving (oblique), where you are allowed to work on a small number of stacks. After this, glue the ends to the marks and immediately close with the second circle. In a similar way, the bottom is made into a square shape if you decide to make it solid. But the bottom looks much more interesting if it is wicker. From this bottom the work of weaving a box or basket begins. To do this, we cross some tubes, for example 5 and 7. We take one tube and start weaving from the center, moving in a circle, bypassing the main sticks either from above or from below.
After the tube ends, we build up the next one. The technology of this process is described below. This creates a circle of the required diameter.
A square-shaped bottom is rarely found in wicker form.
How to grow tubes and weaving
Vases are usually woven in a high shape; to obtain such a product, the paper vine has to be extended. If the tubes are connected correctly, the work process will be much easier. And the product itself will look much more attractive. Earlier in the text there was a description of how a paper vine has different sized ends. This is very convenient for an inconspicuous connection. To do this, you need to insert the thick end of one stick, the thin end of the other and carefully twist it. For a good connection of the joints, it is necessary to coat the thin end with glue. This transition is much more aesthetically pleasing and completely invisible when the product is painted.
Consider a simple weave made from newspapers, one strip. We attach a stick to the prepared bottom, next to any of the racks. Prepare a suitable form for braiding. As an option, a can or a bottle, if you want to weave a basket, then a box will do for weaving. Next, lift all the racks to the top and secure them with something, a clothespin would be good for this. We braid the racks with the previously secured vine. If you want to weave a basket with two sticks, then the weaving technique is the same.
It is more difficult and time-consuming to braid in rope style; for this purpose, they are braided with two tubes. They are placed on different sides of the rack, and then intertwined between the racks. Weaving from newspaper tubes made using this technique looks very beautiful, and the basket will be durable.
An interesting way of linear weaving, weaving obliquely (in a spiral). This method is ideal for weaving vases or glasses; in this weaving only stands are used, they are intertwined with each other and slightly shifted.
All main types of weaving are continuous, each new row is a continuation of the previous one. If the product has a lid, then its weaving is no different from the main craft, only the height is lower.
When the entire process of making a craft is completed, it must be painted. To do this, you can use a brush or a spray can, if you wish, you can decorate with patterns. What the patterns will be made of (satin ribbons, embroidery or beads) and what kind, imagination will help with this. The last step in the work will be to coat the craft with varnish.
What is woven from paper vines?
Many people think that you can’t make many products of different modifications this way. And in the process of mastering this technique, they realize that they are making mistakes. They say “appetite comes with eating” and so it is here. When everything has been studied, all the work is completely clear, then your own imagination wakes up to come up with your own original crafts.
To weave a basket from newspaper tubes, weave the shape using regular weaving. Then weave a pair of tubes from opposite sides, which is the basis for future handles.
Weaving from newspaper tubes for beginners should be mastered with something simple: cups, coasters, candy dishes. Further, you will be able to create more complex ones, such as a laundry basket, it is much larger in size and the frame must be strong enough.
You can make a chest for sewing supplies, its complexity lies in the weaving of the internal partitions. The most common wicker product is a vase. To make such a product original, make the edge openwork.
Products made from newspaper wicker are easy to use thanks to their simple technique; anyone can learn how to make them. And after looking at examples of such works at least once, you will definitely want to create such beauty at home.
Such weaving from newspapers for beginners simply cannot leave indifferent all those who have a craving for beauty. And this will become another one of your hobbies, and maybe your only one!
Weaving from newspaper tubes video lessons for beginners
Also, to visually familiarize yourself with the process of weaving from newspaper tubes for beginners, we recommend studying several videos from experienced designers and craftsmen. These reviews will talk in detail about the technology as well as visual examples of finished products.
Video: Lesson on rolling tubes from newspapers - secrets and nuances
Video: How to weave a basket with a rectangular bottom
Video: A basket of magazine tubes for beginners.
Video: Basket made of newspaper tubes for beginners
Video: Weaving a heart basket from newspapers
Turn your ideas into reality, and you will succeed, we wish you success in your endeavors!
Below we have put together a gallery of photo ideas for weaving from newspaper tubes that will help you customize and choose exactly what you like. We offer more than 50 photo options: