Despite the rapid development of the Internet, television remains the main source of information for the majority of the population. But in order for your TV to have a high-quality picture, you need a good antenna. It is not at all necessary to buy a television antenna in a store, because you can make it yourself and save a lot of money.
You can find out how to make high-quality antennas for various broadcast bands and what materials to use by reading our article.
There are many types and forms of television antennas, the main ones are listed below:

Antennas for digital television reception
The whole world, including our country, has switched from analogue to digital broadcasting. Therefore, when making an antenna with your own hands or buying it in a store, you need to know which antenna is best suited for receiving DVB-T2 format:

If you live not far from a TV tower, then you can easily make a simple antenna for receiving a signal in DVB-T2 format with your own hands:
- Measure 15 centimeters of the antenna cable from the connector.
- Remove 13 centimeters of outer insulation and braid from the cut edge, leaving only the copper rod.
- Referring to the TV picture, point the rod in the desired direction.
The antenna is ready! It should be noted that such a primitive antenna is not capable of providing a high-quality and stable signal at a distance from the TV tower and in places with sources of interference.
DIY antennas
Let's look at several options for television antennas that you can make yourself from scrap materials:
Beer can antenna
An antenna from beer cans can be made in literally half an hour, using the materials you have on hand. Of course, such an antenna will not provide a super-stable signal, but for temporary use in a country house or in a rented apartment it is quite suitable.  Beer can antenna
To make an antenna you will need:
- Two aluminum cans of beer or other drink.
- Five meters of television cable.
- Plug.
- Two screws.
- A wooden or plastic base on which the jars will be attached (many people use a wooden hanger or mop).
- Knife, pliers, screwdriver, insulating tape.
After making sure that you have all the above items in stock, do the following:
- Strip one end of the cable and attach the plug to it.
- Take the other end of the cable and remove 10 centimeters of insulation from it.
- Unravel the braid and twist it into a cord.
- Remove the plastic layer from the insulating rod of the cable to a distance of one centimeter.
- Take the jars and screw the screws into them in the center of the bottom or lid.
- Attach a rod to one can and a braided cable cord to the other, screwing them onto screws.
- Attach the jars to the base using electrical tape.
- Attach the cable to the base.
- Insert the plug into the TV.
- Moving around the room, determine the location of the best signal reception and attach the antenna there.
There are other variations of this antenna, with four and even eight banks, but no obvious effect of the number of banks on the signal quality has been identified.
You can also learn how to make an antenna from beer cans from the video:
Kharchenko zigzag antenna
The antenna received its name in 1961, after the name of its inventor Kharchenko K.P., who proposed using zigzag-shaped antennas to receive television broadcasts. This antenna is very well suited for receiving digital signals.  Antenna Kharchenko
To make a zigzag antenna you will need:
- Copper wire with a diameter of 3-5 mm.
- TV cable 3-5 meters.
- Solder.
- Soldering iron.
- Plug.
- Insulating tape.
- A piece of plastic or plywood for the base.
- Fastening bolts.
First you need to make an antenna frame. To do this, take the wire and cut off a piece of 109 centimeters. Next, we bend the wire so that we get a frame of two parallel rhombuses, each side of the rhombus should be 13.5 centimeters, make loops from the remaining centimeter to fasten the wire. Using a soldering iron and solder, connect the ends of the wire and close the frame.
Take the cable and strip its end so that you can solder the rod and cable shield to the frame. Next, solder the rod and cable shield in the center of the frame. Please note that the screen and the rod should not touch.
Place the frame on the base. The distance between the corners of the frame at the junction with the cable should be two centimeters. Make the size of the base approximately 10 by 10 centimeters.
Strip the other end of the cable and install the plug.
If necessary, attach the antenna base to a stand for further installation on the roof.
You can watch more detailed instructions for making the Kharchenko antenna in the video:
Coaxial cable antenna
To make the antenna you will need a 75 ohm coaxial cable with a standard connector. To calculate the cable length required for the antenna, you need to find out the digital broadcasting frequency and divide it in megahertz by 7500, and round the resulting amount.  Cable antenna
Once you have the cable length, do the following:
- Strip the cable on one side and insert it into the antenna connector.
- Step back two centimeters from the edge of the connector and make a mark from which you will measure the length of the antenna.
- Having measured the desired length, bite off the excess with pliers.
- In the area of the mark, remove the insulation and braiding of the cable, leaving only the inner insulation.
- Bend the cleaned part at an angle of 90 degrees.
- Set up your TV with a new antenna.
You can visually consolidate the information by watching the video:
Satellite antenna
It’s worth mentioning right away that to receive a satellite signal you need a tuner and a special set-top box. Therefore, if you do not have this equipment, then creating a satellite dish with your own hands will not be possible, since you yourself can only make a parabolic reflector:

All of the methods listed above can be considered seriously only out of sporting interest, since making a parabolic reflector by hand is a very labor-intensive and expensive process. In addition, it is very difficult to accurately calculate the parameters of a satellite dish at home. Therefore, we advise you not to be original and buy a complete satellite dish.
Antenna amplifier
If the place where you live has a weak television signal and a conventional antenna cannot provide a high-quality picture on your TV, then an antenna amplifier can help in this situation. You can make it yourself if you have a little knowledge of radio electronics and know how to solder. 
Amplifiers should be installed as close to the antenna as possible. It is better to power the antenna amplifier via a coaxial cable through a decoupler.  Isolation power circuit
The decoupler is installed at the bottom of the TV and is supplied with 12 volt power from the adapter. Two-stage amplifiers consume a current of no more than 50 milliamps; for this reason, the power of the power supply should not exceed 10 watts.
All connections of the antenna amplifier on the mast must be made by soldering, since the installation of mechanical connections will lead to their corrosion and rupture during further operation in an aggressive external environment.
There are times when you have to receive and amplify a weak signal in the presence of powerful signals from other sources. In this case, both weak and strong signals arrive at the amplifier input. This leads to blocking the operation of the amplifier or switching it to a non-linear mode, mixing both signals, which is expressed in the overlay of the image from one channel to another. Reducing the amplifier supply voltage will help correct the situation.
Please note that UHF amplifiers are greatly influenced by signals in the meter range. To weaken the impact of meter signals, a high-pass filter is placed in front of the UHF amplifier, which blocks meter waves and transmits only signals in the decimeter range.
Below is a diagram of a VHF antenna amplifier:
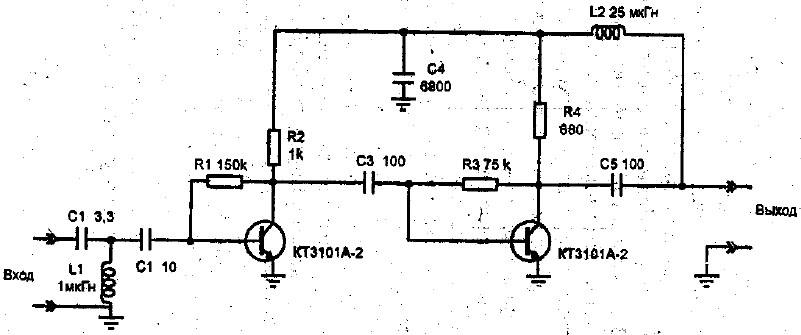
We also suggest that you familiarize yourself with the circuit of the decimeter amplifier:

You can see the operating principle of the antenna amplifier in the video:
Now, having familiarized yourself with the diagrams and armed with a soldering iron, you can safely begin making an antenna amplifier.
We hope that our article about television antennas was useful to you!
A super simple and super quick to make antenna from a coaxial cable for receiving digital television channels can be made with your own hands in about 5 minutes. For this you will need absolutely nothing except the cable itself. And this is the main advantage of this antenna.
You can't live without a TV now.
This design will definitely help you out, for example, when you have just moved into your home and have yet to install a cable or install a stationary antenna. Of course, this is not the only example where this truly simple loop antenna will help.
Now in the comments someone will definitely write that there are even simpler antennas, like a whip one. To make it, it will be enough to simply remove two insulations from the cable and everything will work. Of course, I agree with this, but the loop antenna that I will make from coaxial cable will have much greater gain, due to its directivity and resonant closed circuit.
Making an antenna from coaxial cable
This is what the version made from black cable looks like.
Now let's start making the antenna in order. All we need is less than half a meter of coaxial cable of any color. I took the white one.

We retreat 5 cm from the edge of the cable and remove the top insulation.

Next, remove the insulation from the central core.

Now we twist everything together neatly and tightly.

Then, from the edge with the insulation removed, we retreat 22 cm and cut out a 2 cm piece of the top insulation and the shielded wire from the hose, without touching the insulation of the central core.

Now we measure another 22 cm from the end of the cut and make a cut 1 cm wide only by removing the top insulation. We do not touch the cable shield.

Next, take the end of the cable from which we started. And we wrap it very tightly at the last cut, forming a circle of the antenna.


At this point, our antenna is ready for use. Of course, this is not necessary, but if you hang the antenna outside, it is better to insulate all exposed areas of the cable with electrical tape. You can also add a rigid frame, but this is optional.
Antenna location
We direct the antenna to a repeater or television tower. The direction can also be selected experimentally by rotating the antenna.The best option would be to place it outside the window, since the walls of the house greatly dampen the high-frequency signal.

The test showed excellent results

Sometimes a television antenna breaks down at the most inopportune moment, or it is simply not at hand. For example, during a trip to the country. In this case, the question arises of how to make an antenna for a TV with your own hands from what you have at hand.
Using a homemade transmitter, you can watch a limited number of channels. And the reception may be of lower quality than that of a purchased device. Still, knowing how to make an antenna yourself from available materials can come in handy. An antenna can be either simple or complex. The device will be able to receive almost all types of broadcasts.
Antenna types
Before you start making a TV antenna with your own hands, it is worth understanding the types and technical characteristics of television receivers.
Depending on the installation location, indoor and outdoor television receivers are distinguished. Indoor devices are effective only in areas with good signal reception. They are not suitable for country TVs. For rural areas and areas remote from the television repeater, outdoor television receivers are used.
Based on the type of signal amplifier, television receivers are either active or passive. Passive-type structures receive and amplify impulses due to their own geometry. They do not require power supply and do not introduce their own interference and noise into the signal they receive. Making a passive antenna yourself is the easiest way.
Active devices are equipped with a signal amplifier, which is powered from the mains. An active amplifier itself creates interference and distortion in the area of reliable reception if a device that is too powerful or of poor quality is selected.
Broadcasting is carried out on meter or decimeter waves. To receive only meter or only decimeter broadcast bands, band television receivers are best suited. For example, for the transmission of digital terrestrial television DVB-T2 in our country, only the decimeter range is used.
A log-periodic, or all-wave, television antenna can receive waves in both the meter and decimeter ranges. This is a broadband design with 10 vibrators. The log-periodic device in terms of gain corresponds to a 3-4 element all-wave antenna.
Operating frequencies are limited by the largest and smallest vibrator in the receiver. It fits well with the feeder. Its gain does not change, so connecting to the feeder does not require balancing and matching devices.
A cable with a resistance of 75 Ohms enters the lower tube, exits at the end (which is directed towards the television center) and is connected by a braid to the end of the lower tube, and by a core to the end of the upper tube.
Externally and according to the principle of operation, a log-periodic television antenna consists of several channel-wave devices connected together. Moreover, each of them has its own vibrator, reflector and director. When a signal arrives, vibrators closest in size to half its wavelength are excited. Such television antennas are used to receive both digital and analogue broadcasts.

The wave channel type receiver has the simplest design, which can be quickly assembled from simple and affordable materials. It receives an analogue television signal near a television tower and a digital one outside large populated areas, where there is little interference.
We use beer cans
A do-it-yourself dacha antenna made from beer cans is the simplest and most affordable passive type design. It can be done quickly and without basic skills. At the same time, it copes well with receiving UHF broadcasts.
To assemble an antenna from beer cans you will need:
- cable of sufficient length;
- aluminum cans (for the simplest design, 2 are enough);
- 2 bolts or self-tapping screws;
- plug (F – connector) for connecting the cable to the TV;
- electrical tape or tape;
- a base made of wood or plastic for attaching cans (you can use wooden coat hangers).
The antenna circuit is simple:
- Each can is attached with electrical tape or tape to the base pin at a distance of 7 cm from each other.
- The cable is stripped on one side. They are spread out and attached to the rings of the cans or to screwed-in screws. It can also be soldered. A plug is attached to the free end.
This simplest design is suitable for installation both indoors and outdoors. When used externally, the jars are covered with a large plastic container with the neck and bottom cut off. The cable is pulled through a hole made on the side, which can be sealed using boiling water. The finished receiver is connected and configured through automatic channel search.
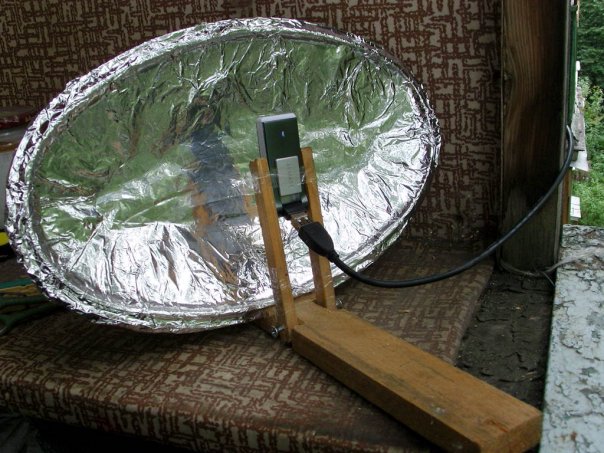
You can also make an analogue of a satellite dish with your own hands. For this purpose, use a simple umbrella. You will also need:
- aluminium foil;
- copper cable;
- 1 tin can;
- amplifier and power supply for it.

DIY TV antenna made from beer cans
Operating procedure:
- Measure the umbrella segments between the spokes and cut out elements corresponding to these dimensions from foil. They are sewn to the dome of the umbrella, covering its entire interior.
- A TV signal receiver is installed at the focal point of the metal grille. The amplifier will be a core from which 4 cm of braiding has previously been removed, and a cable screen that protects against interference.
- An oval is cut out of an aluminum can. A hole is made in the center of it, through which a bare wire is passed and a contact is soldered. To protect against oxidation and corrosion, the joint is covered with plasticine.
- The amplifier is powered through a cable.
- The receiver is attached to the handle of the umbrella with tape so that it does not touch the metal. This will protect against interference and distortion. The junction must be sealed with plasticine.
- The power supply is placed next to the TV, and the antenna is turned towards the repeater.
- Channels are established by driving the dish until the best signal is obtained.
This antenna works best if the tower is located no further than 35 km from it.
We use wire
Another simple design is a homemade wire antenna. To make it, you can use copper or brass wire. These materials are resistant to oxidation.
The wire must be stripped of insulation from the ends. One of them is connected to the TV, and the other to the radiator of the heating system. The pipe is led to the roof - it will work as a signal amplifier. Such an antenna will be able to receive no more than 5 signals. The wire can be stretched onto the balcony and secured to a clothesline.
You can make a TV antenna from wire in another way. It will require:
- 2 pieces of copper wire 3-4 mm wide and 1.8 m long;
- a plate of plywood or metal measuring 15 by 15 cm;
- amplifier (you can use old decimeter amplifiers);
- electric drill;
- TV cable;
- iron pipe or fittings for making a mast;
- bolts.
This copper wire antenna is assembled as follows:
- They make catchers by bending the wire in the shape of 2 diamonds with sides of 45 cm. This is the optimal frame length for such a device.
- The resulting diamonds are fixed on the base. To do this, holes are drilled at the fastening points, flattening the wire, and screws are screwed in.
- If a metal plate is used as a base, then a welding machine can be used to attach the catcher.
- We fix the amplifier in the center and connect the cable to it.
The easiest way to use a mast here is to use a metal pipe, which can simply be dug into the ground or attached to any suitable support. The antenna is fixed to the top of the mast, and the cable is pulled through it. The entire structure is painted to protect against corrosion.
Another popular TV receiver made of copper wire that you can make yourself is a small-sized antenna with an unusual “butterfly” shape. For external use, such a device is made of wire 2-4 mm thick, for internal use - 2 mm or thinner.
A frame is made to receive TV channels. Frame length – 500 mm, width – 200 mm. It is twisted so that 2 identical triangles are obtained, which are separated using wire cutters and soldered to the cable, leaving a 14 mm distance between the vertices. A plug is attached to the other end of the cable. The structure is taped with adhesive tape or electrical tape to a material with dielectric properties - wood, hard rubber, plastic.

Home digital HDTV device
A powerful antenna for a TV, capable of receiving a signal at 490 MHz, is made from a transformer, which is better to purchase, since it will not be easy to make it yourself. You will also need:
- cardboard;
- scotch:
- foil;
- stapler;
- glue.
To make a television receiver, a diagram is used according to which all the parts are cut out of cardboard. The elements are covered with foil, bent and trimmed. It is best to first find a template and diagram through a search engine and print it out on a printer or copy it from a printed publication.
First you need to make a reflector about 35 cm long and cover it on one side with foil. In the middle, 2 rectangles of the same size are cut to attach the catcher.
The antenna is assembled from the prepared parts. Departing 35 mm from the reflector, butterfly-shaped elements are glued to the plate. They can be attached using a stapler. In the middle of each such element, a hole is made for the cable, to which a transformer is connected and a plug is attached.
Option for apartment
You can make an antenna for indoor use using any of the methods presented above.
Another simple option at home is made as follows.
A simple DIY frame indoor antenna is made from copper wire or cable with foil in the winding. The device not only receives television channels, but also serves as a selective filter against interference.
To calculate the size of the loop, you need to know the wave frequency for a given region. The length of the loop will be equal to the product of the coefficient (300 units) and the average frequency range.
Cut off the required amount of wire or cable, and if necessary, clean the edges. Make a loop out of it and solder the TV cable leading to the receiver. A plug is connected to it.
The structure can be hung or installed on a stand. This simple device, with accurate calculations, is most effective for digital television.
A reliable device for the home is a diamond-shaped antenna. It is the simplest representative of zigzag television receivers. To improve reception, it is equipped with capacitive inserts and a reflector.
The device is assembled from plates or tubes 1-1.5 cm wide made of brass, copper or aluminum. To make capacitive inserts, foil, tin or metal mesh is used, which is soldered around the perimeter. The cable is laid from the center and along one side, avoiding sharp bends. It should not leave the frame.

Gradually, everyone is abandoning analogue television, giving preference to digital broadcasting. The largest providers are also restructuring to work with a newer, modern format. The era of analogue TV is gradually coming to an end.
In order for previously installed home antenna devices to complete their resource, it is enough to connect a DVB-T receiver to the TV, as a result, digital signals will be received correctly.
You can make an antenna for digital television with your own hands, so there is absolutely no need to go to the store and spend extra money. You don’t need any special skills or equipment; you can create the necessary design using available tools.
Now we will answer in detail the question of how to make an antenna for digital TV. We will carefully analyze the process, select the optimal material, and also carry out all the necessary calculations. Nevertheless, first we will deal with the theoretical nuances.
Regardless of the signal format, it is transmitted from the tower emitters. Reception of the wave channel is provided by the antenna device. To receive a digital signal, you will need a sinusoidal device with the highest possible frequency, which is measured in MHz.
When an electromagnetic wave passes through the surface of the receiving beams of the antenna, a V-voltage is induced in it. Each wave contributes to the formation of a different potential, marking it with its characteristic sign.

Under the influence of an induced voltage, an electrical current flows in a closed receiving circuit with resistance R. It is gradually growing. Processing is carried out by the TV circuit, the picture is displayed on the monitor, and the sound is broadcast through the speakers.
You won't be able to connect digital broadcasting using a regular indoor antenna. Firstly, you will need an intermediate link that will provide decoding of information - a DVB-T receiver. Secondly, you should use a UHF antenna or Turkin antenna for DVB.

Antenna figure eight
How to make such an antenna with your own hands? First you need to prepare the material. Then carry out the appropriate calculations. At the final stage, assemble the structure and connect it to the TV. Nothing complicated. Every user can cope with this task.

Materials for antenna assembly
Making an antenna for digital television is not difficult. The list of materials used will vary depending on the type of antenna device. For example, if you wish, you can make it even from the most ordinary beer cans.
To produce a good and simple TV antenna for digital channels, you will need copper or aluminum wire with a thickness of 2 to 5 millimeters. In general, it will take only 1 hour to create such a design. You also need to use:
- handset;
- corner;
- copper or aluminum strip.
You will definitely need a tool that will allow you to bend the frames to the required shape. To bend the wire, use a hammer after securing the material in a vice.

You can make your own antenna not only from wire, but also from cable (coaxial). Choose a plug that matches the connector on your TV. Naturally, you also need to fix the structure; the bracket is made from scrap materials.
As for the cable, it must be taken with a resistance in the range of 50-75 Ohms. Particular attention should be paid to insulation if the device will be placed outdoors.
The specifics of fastening are determined in accordance with where the structure will be located. For example, residents of multi-storey buildings will be able to make their own antenna for digital TV and hang it like a home antenna, i.e. on the curtains. To do this, you will need large pins that will serve as a fastening element.

However, if you want to place the created device on the roof, then you need to make a bracket. To do this you will need a file, a soldering iron and a needle file.
We've sorted out the spiral antenna, but you can also make another design - a double square. It is made from copper, brass or aluminum tubes. Wire 3-6 mm thick is less commonly used. In general, the choice of material is determined in accordance with the MF band and the number of channels.

Double square - two frames that are connected by an upper and lower arrow. The small frame is a vibrator, and the large one is a reflector. To achieve maximum gain, increase the number of frames to three. The third square is the director.
The mast must be made of wood. At least its upper part. Please note that it should start at a distance of one and a half meters from the level of the frames.
So, step by step instructions:
- Take the coaxial cable and strip it from both ends.
- One end will be attached to the antenna, the wire should stick out 2 cm.
- The screen and braid are twisted into a bundle.
- We get two conductors.
- Solder the plug to the second edge of the cable. A distance of 1 cm is sufficient. If you use a crimped metal plug, you can skip further steps.
- Tin and make 2 more conductors.
- Wipe the solder joints of the plug with alcohol.
- Place the plastic part of the plug onto the wire.
- A single core is soldered to the central input of the plug.
- A multi-core harness is soldered to the side entrance of the plug.
- Crimp the grip around the insulation.
- Screw on the plastic tip or fill it with glue.
Calculation
To set up digital television reception, it is absolutely not necessary to calculate the wavelength. Just try to make a broadband design. As a result, you will be able to receive the maximum number of signals. To achieve this result, add additional elements to the T2 antenna with your own hands. It is about them that will be discussed further.

The calculation of an antenna for digital TV is based on determining the signal transmission wave. Divide this value by 4 to get the required side of the square. To determine the distance between the two components of the device, make the outer sides of the rhombuses a little longer, therefore, the inner sides, on the contrary, should be shorter.
If you don’t want to calculate the dimensions of the antenna yourself, use ready-made drawings:
- The inner side of the rectangle is 13 cm.
- The outer side of the rectangle is 14 cm.
The difference is the distance between the squares; by the way, they should not be connected under any circumstances; the extreme sections provide the necessary maneuver for folding the loop. It is to this that the coaxial antenna wire is attached.
Antenna manufacturing
If we calculate the entire length, we will end up with a value of 112 centimeters. Cut the wire or any other material that you plan to use, take a ruler and pliers, and begin to bend the structure. The angle should be 90 degrees. If the sides do not match in length, it’s okay, a small error is acceptable.

Initial data for making an antenna for digital TV:
- The first element is 13 centimeters and 1 centimeter per loop, by the way, it can be bent right away.
- Two elements of 14 centimeters each.
- Two are 13 centimeters each, but there must be a turn in the opposite direction; here a bend is created to another square.
- Two more sections of 14 centimeters each.
- The last one is identical to the first one.
The antenna frame for digital TV is ready. If you did everything correctly, then between the 2 halves there is a gap of several centimeters in the middle. Naturally, there may be minor differences. After this, the loops and bend areas must be cleaned until no metal is visible. Processing is carried out with fine-grain sandpaper. We connect the loops and crimp them with pliers to fix their position.
The design itself is ready, but in order for the antenna made for T2 to function correctly, the cable must be processed. We start with double-sided stripping of the wire. One edge will connect directly to the antenna. You need to strip the cable in this area so that the cord sticks out about two centimeters. If you get a little more, you can simply cut off the rest later.

We twist the screen and cable braid into a bundle, as a result we get 2 conductors - a central core and a twisted element of several braided wires. All this needs to be tinned.
Using a soldering station, solder the plug to the second edge of the cable. A centimeter length is quite enough, small errors are acceptable. According to the principle described earlier, you need to make a pair of conductors and tin them.
The plug is placed in those areas where soldering will be carried out in the future; first wipe it with alcohol or a special solvent. Then, using a file or emery, we clean it. Place the plastic plug element onto the cord. Now start soldering. Attach a core to the central entrance, and a multi-core braid to the side entrance. Crimp the grip around the insulation.

Screw on the plastic tip; some experts even fill it with glue or a special sealant to strengthen the fixation. While the fixing base is still wet, quickly assemble the plug by screwing on the plastic part, and then remove excess glue or sealant. As a result, it will be possible to maximize the service life of the plug. The homemade product has been created, it's time to connect it.
Connection
Connect the cable and the frame of the homemade DVB T2 antenna. It is absolutely not necessary to bind to any specific channel, so solder the cord in the middle. As a result, a broadband antenna will be created that will receive the maximum number of TV channels. Solder the second split end of the wire to the other two sides again in the middle, previously you stripped them and also tinned them. To extend the reception range, do not solder the cable from the bottom.
When the structure is assembled, it must be checked. We connect the tuner and turn on the TV. If digital television receives, for example, you managed to set up 20 channels, you need to finally complete the assembly. Fill the areas where soldering was carried out with sealant.

However, if there are very few active channels or there is some interference, then you need to find a place where there will be an optimal signal. If there are no positive changes, change the antenna cable. To simplify the testing process as much as possible, use telephone wire, it is quite cheap. Solder the plug and frames to it. If the signal quality has improved, then the problem is really in the cable. A digital set-top box will broadcast channels even if noodles are used, but as practice shows, its service life is extremely limited.
To protect the cable connection areas and antenna frames from precipitation and other atmospheric influences, wrap the solder joints with ordinary insulating tape. However, this is not a permanent solution. A more effective option is to install heat-shrinkable tubing on the soldering areas, which will ensure proper insulation.

An alternative option with maximum reliability is glue or sealant. The fact is that these substances do not conduct current. Be sure to make a housing for the antenna; an ordinary plastic cover will do for this. If necessary, make indentations so that the frame “settles down”; do not forget about the cord outlet. Pour in the sealant and wait for it to dry. Everything is ready, we connect the equipment and enjoy digital TV.
Double or triple square for weaker signal
The TV antenna is used in villages, dachas and in areas that are located on the border of the coverage area of television towers. The device allows you to receive even a very weak signal. If you do everything correctly, the power of the TV signal will increase noticeably.
A double or triple square has only one drawback - you need to direct the structure to the signal source with maximum accuracy. Therefore, if you do not know where exactly the tower is, difficulties will arise.

The number of frames determines the signal quality. Therefore, if you are outside the coverage area, you don’t have to limit yourself to 2-3 frames, you can make 5. Do not open the antenna with varnish or paint it. This negatively affects the quality of signal reception.
What are the strengths of the design? First of all, the quality of reception. Even if you are far from the repeater, the signal will be clear. However, it will be possible to achieve a positive result only if the user correctly determines the dimensions of the frames and matching device.
Materials
To make an antenna for digital TV yourself, you need to prepare materials that will later be used to make the structure. The antenna is made from metal tubes or wire:
- 1-5 meter channel - copper, brass, aluminum tubes 10-20 millimeters thick;
- 6-12 meter channel channel - copper, brass, aluminum tubes 8-15 millimeters thick;
- decimeter range - copper, brass wire with a thickness of 3 to 5 millimeters.

Double square - 2 frames, which are connected by a pair of arrows (upper and lower). The smallest frame is the so-called vibrator, and the largest is the reflector. A device with three frames will have a higher TV signal gain. The third square is usually called the director.
Instructions for creating a T2 antenna:
- The top arrow (made of metal) must connect the middles of all frames.
- The lower boom is made using electrically insulating materials: wood, textolite.
- Arrange all the frames so that their centers are on the same line.
- The direct line should be sent to the repeater.
- The vibrator must be open circuit. Its edges are fixed to a PCB plate.
- If you made frames from metal tubes, then the edges should be flattened and holes should be made in them to fix the lower boom.
- The mast must be made of wood, or at least its upper part.

Size calculation
The calculation of an antenna for digital TV will directly depend on the range - meter or decimeter. The dimensions of the antenna with three frames are characterized by a large distance between the ends of the vibrator. You need to leave more distance - 50 millimeters.

The tables show the dimensions of two-element loop antennas. Meter range:
|
Channel numbers |
||||||||||||
UHF:
Size of three-element antennas. Meter range:
|
Channel numbers |
||||||||||||
UHF:
Vibrator connection
Considering the fact that the frame is symmetrical, and the connection is made to an asymmetrical antenna cable, you need to use a matching device. The best option is a short-circuited loop. It is made from pieces of coaxial cable. The left segment is a feeder, and the right one is usually called a train. In the place where the feeder and cable will be connected, we fix the cable, which is subsequently connected to the TV.
What should be the length of these segments? The calculation is carried out in accordance with the wavelength of the received TV signal.

At one end you need to cut the cable, removing the aluminum screen. The braid must be twisted into a tight rope. We cut off the central conductor down to the insulation. The feeder also needs to be cut. Remove the screen, made of aluminum, and then twist the braid. However, we leave the central conductor.
The further assembly process is carried out as follows:
- Solder the cable braid and feeder conductor to the left edge of the vibrator.
- The feeder braid needs to be soldered to the right edge of the vibrator.
- A metal jumper connects the cable braid to the lower end of the feeder. These elements can also be fastened with metal wire. The main thing is that there is proper contact with the braid.
- The braid determines not only the electrical connection, but also the distance between the sections of the matching device.
- If there is no metal wire and jumper, then twist the braided lower part of the cable into a bundle, after first removing the screen and removing the insulation. To ensure proper contact, you need to solder the wire harnesses using solder that melts easily.
- The cable pieces should be parallel to each other. Distance – 50 millimeters (small error is acceptable). To secure the distance, special clamps made of electrical insulating materials are used. You can also attach the matching device to the textolite plate.
- The cable that is inserted into the TV socket should be soldered to the feeder (to the bottom). The braids are interconnected, like the central conductors.
To reduce the number of connecting elements, the feeder and cable connected to the TV can be made one. Remove the insulation where the feeder ends. This is done in order to install the jumper.

A matching device is a mandatory element that helps prevent interference. It will be especially useful if the signal transmitter (TV tower) is located at a great distance.
Butterfly antenna
The TV antenna can also be made in the shape of a butterfly. Such a device will be in no way inferior to a decimeter antenna. There is absolutely no need to do everything from scratch. It is much easier to convert a regular grille into a digital one for T2 tuning. To make it yourself, follow these simple instructions:
- Take a small board that will become the basis of the future antenna.
- Cut 8 wires, each 37.5 centimeters long.
- The middle of all wires must be stripped about 2 centimeters.
- Bend the wires until they form a V shape. The distance between the wires should be 7.5 centimeters.
- Cut 2 more wires, each of them should be 22 centimeters long.
- Strip the wires where they will be attached to the antenna base (board).
- Place the screws along the base of the antenna, and then connect the V-shaped elements with two wires.
- Connect the antenna and cable using the special plug.

Every user can create such a device. You don't have to buy anything. The antenna is made from improvised materials.
From coaxial cable
You can actually make a TV antenna manually using a cable:
- Cut approximately 530 millimeters of cable.
- Strip the cable on both sides, fastening the braid into a bundle and exposing the central core.
- Twist the cable into a ring or diamond shape and secure it with tape to the plywood. The distance between the cable rings should be 2 centimeters.
- Cut a piece of coaxial cable - 175 centimeters. Make a horseshoe-shaped matching device out of it. To do this, you need to strip the wire from both ends, as you did in the process of making rings.
- Prepare the antenna cable. The plug is put on one side, and the other is stripped. It is necessary to remove the central core and braid.
- Align the ring and matching device with the antenna cable.

As a base, you can use not only plywood, but also plexiglass.
Antenna made from tin cans
To make a simple TV antenna for digital channels you will need a cable, a couple of aluminum or tin cans, and a small plastic pipe. A wooden plank can also be used as a base.
Remember that the antenna can only be created from aluminum or tin cans. Plastic or glass will not work. The main requirement is smooth, not ribbed, internal walls. Anyone can install such a device with their own hands in just a few minutes.
- Rinse well and then dry the jars.
- The end of the coaxial cable must be cut.
- Remove the insulation from the center core.
- Twist the braid.
- Once you have 2 wires, attach them to the jars.
- If you have a soldering iron on hand, solder the conductors. They can also be secured with self-tapping screws with flat heads. Twist a loop at the ends of the conductors, and insert a self-tapping screw with a washer into it, then secure it to the can.
- Pre-clean the metal, you need to take fine-grained sandpaper and remove plaque, as well as paint.
- Attach the jars to a plastic pipe or wooden strip.
- The distance is calculated individually.
- Connect the cable to the TV and try tuning the channels.

This is an emergency solution to the problem. Don’t be under any illusions; at best, several channels will be available in good quality. The final result directly depends on how far away the TV tower is, how “clean” the corridor is, and also how well the antenna is made.
Now you know how to make an antenna for tuning digital channels using improvised means.
Note.
Nowadays everyone watches TV. Well, or almost everything. Most TV lovers have satellite dishes. You can buy a TV antenna in a store. But sometimes it happens that the antenna becomes unusable, it’s a long walk to the store, but you want to watch your favorite show. At such moments, you can resort to improvised means. For example, if the user is in the country and does not have the opportunity to go to the store. In this case, you can simply make a TV antenna for your dacha with your own hands. Even satellite.
DIY indoor antenna
It is possible and quite easy to make a simple antenna for a TV using improvised materials. You can find it on the Internet many interesting instructions, which will help you make a variety of DIY TV antenna options. There are many options for making television antennas with your own hands.
The most popular type of antenna, which is made by craftsmen from the common people, is definitely considered to be a homemade TV antenna made from beer cans. It is easy to do, there is no need to look for hard-to-find materials, and very little time is spent on the entire manufacturing procedure. An ideal option for a homemade antenna, given the fact that there will be more channels and the picture quality will be an order of magnitude higher.
The simplest option can definitely be called an indoor TV antenna, for the manufacture of which you only need wire. Of course, the number of channels that can be viewed when connected will be very limited, and the picture is unlikely to be very pleasing, but these inconveniences are compensated by other circumstances: extreme ease of manufacture, minimum time consumption and use of a minimum amount of materials. However, the number of channels and the quality of the pictures can be adjusted by attaching the second end of the wire to clotheslines, which will help catch more channels.
There are other DIY options, but they cannot be called popular. Some require more complex manufacturing procedures. In other cases, you may come across extremely negative reviews from people who have tried to make them. So it’s better not to waste time describing their production. You won't find anything useful in this. Some instructions for constructing satellite dishes at home are simply not true.
How to make a TV antenna from beer cans
One of the most popular options is Antenna made from empty beer cans. It is not difficult to make, and the materials are not at all difficult to find. Craftsmen who have experience in creating such antennas claim that the device can be assembled in almost ten minutes, while receiving channels very, very efficiently.
How to make an antenna with your own hands? How to make an antenna from cans?
In order to make a television antenna with your own hands, you will need the following materials:
- cable
- several cans of beer (or other low-alcohol drinks)
- plug
- self-tapping screws
- screwdriver
- stick
- insulating tape
- self-tapping screws, 2 pieces
Below instructions included how to make an antenna with your own hands.
How to make a TV antenna: DIY TV antenna
- First you need to tape two beer cans to a stick with electrical tape, trying to keep a distance of about 7 centimeters from each other. If the cans still have opening rings, the cable can be attached to them using self-tapping screws.
- Next, you need to screw self-tapping screws into the cans, strip both ends of the cable and attach them to the screws.
- For structural stability, you should screw the cable to the stick with electrical tape.
- In order for it to work even in times of bad weather, you should close the jars with a large plastic bottle, the bottom and neck of which should be cut off. After this, you should drill a hole in the bottle through which the cable will be passed. After this area is scalded with boiling water, the plastic will change shape and seal the hole hermetically. This simple device will act as a kind of amplifier. Quite a simple and good amplifier.
This is how you can make a simple TV antenna from beer cans for your TV. It is done quickly and requires a minimum of materials.
There are also options for constructing a homemade antenna for a TV. The option will be described below, how to make a TV antenna:

And the homemade television antenna is ready. In principle, the design itself is quite simple, although it requires some effort. Well, and the availability of appropriate materials.
How to make your own antenna with a minimum of materials
There are two options for making a homemade antenna using a minimum amount of materials. This antenna can be easily made at home and is one of the the simplest homemade antennas.


